BIMS Manual
BIMS Manual sookThis manual describes how to access data and use the tools on the Breeding Information Management System (BIMS). Please use the sidebar on the left to navigate to different parts of the manual, or click on the section titles below. You can access the next page of the manual by clicking on the title of the next page below.
FAQ
FAQ sookFAQ
Check Troubleshooting page for other issues
- How do I create a new breeding program?
- How do I search data?
- How do I view/edit data in a program?
- How do I import data?
- How do I manage Field Book trait and field files with BIMS?
- What do I do if I want to change the name of the accession (e.g. when the material was chosen to go on to next trial) but want to keep the old name and the associated data?
- Please update the accession name and add the old name as Alias in 'Manage Breeding' -> Accession -> Details -> Accession Details -> Actions 'Edit'
- Alias can be used in searching phenotype or genotype when you check 'Check if you want to search Alias as well'.
- Why does it say the species doesn't exist when I added it to the accession template?
- Please check if your species exists in our database by going to Data Import-Data Lookup-Organisms in BIMS. If they do not exist, please contact us.
- Why does it say the accession doesn't exist when I added accession in maternal_parent or paternal_parent?
- Accession names of the maternal or paternal parent need to be entered as a separate row in accession_bims if you haven't loaded them already.
- I mistakenly uploaded a file with data; then I deleted the file. Why is the data from that file still in my breeding program?
- Simply deleting a job from uploaded files does NOT remove your data from your breeding program. You must delete the trial that contains the data. However, deleting a trial only removes samples (unique_ids) and associated phenotypic data. If you want to delete accessions and trait names, you must do so individually from Manage Breeding, or you may contact us.
Troubleshooting
Troubleshooting sookTroubleshooting
| Section | Problem | Solution |
|---|---|---|
| General | I have selected a crop and program, but do not see any options under Manage Breeding and other BIMS sections. | Please refresh the page in your internet browser. |
| I still have problems with viewing BIMS information, even after refreshing the page. | Please clear the cached images/files, cookies, and hosted app data from your internet browser's history. You will have to log back into BIMS and reopen your program. | |
| Data Import/Field Book Management | My data upload failed. | Please make sure that the upload didn't fail due to data errors or typos first by looking at the error logs (see Importing Data section for more details). If you need help, contact us. |
| Even after I changed the max/min value of the trait descriptor in the template, BIMS still give an error saying that I have data outside the acceptable range. | Once your descriptor has been loaded, you have to edit the the descriptor data in BIMS, not in template (go to Manage Breeding, Trait, choose the trait and click 'Edit' .) | |
What do the errors below mean? The required column (unique_id) is missing | BIMS allows you to change the column names in the template for 'accession_id', 'unique_id', 'primary_order', and 'secondary_order'. You get this type of error when the column names in your template do not match the ones in BIMS. Once you change it in BIMS, the templates downloaded from BIMS also changes. Please refer to Figure 26B in the manual. | |
| The output from Field Book Management - Generate input file (Field) - Cross option doesn't seem correct. | Please check your file if it's in the order of cross name, row and the number of progeny for each row that you will plant. In this file, the order of the columns is important, not the column head. Please refer to Figure 30A in the manual. | |
| It says the species doesn't exist when I added in Accession template | Please check if your species exists in our database by going to Data Import-Data Lookup-Organisms in BIMS. If they do not exist, please contact us. | |
| It says the accession doesn't exist when I added accession in maternal_parent or paternal_parent | accession names of the maternal or paternal parent need to be entered as a separate row in accession_bims if you haven't loaded them already. | |
| Search | I can't download my file. | Please make sure that you allow pop-ups on your browser. Please refer to how to allow pop ups on chrome, on firefox, on internet explorer. |
Overview
Overview sookOverview
BIMS (Breeding Information Management System) is a Tripal module being developed by Mainlab Bioinformatics which allows users to explore the publicly available breeding data in the host community databases (GDR, CottonGEN, CGD, GDV and PCD) while also providing a data management solution for private breeding programs. BIMS is now open for breeders to create an account and start using it with current functionality. It is being continuously developed and once complete it will provide individual breeders with a secure and comprehensive online breeding management system that allows them to store, manage and analyze their private data, fully integrated with publicly available genomic, genetic and breeding data within Tripal databases.
The BIMS tool now supports the use of Field Book, an Android app developed by the Poland Lab at Kansas State University for collecting phenotype data in the field. Field Book is a free app that is available through the Google Play Store. It provides easy and customizable interfaces for entering all types of biological data. For more details about Field Book, please visit the developer's website to view the current manual and for more information. In the following sections we provide information on how to use the current version of BIMS, which will be updated as more functionality becomes available. If you would like to be kept informed on progress please sign up for the mailing list (BIMS mailing list). The links below provide information on how to access BIMS, View Data, Search Data, Create a Breeding Program, Import Data, Manage Data using Field Book and Archive Data. If you have any questions please contact using the contact form. We will be holding regular "how to webinars" and are happy to provide individual program training and guidance and solicit input on further development.
We will use one of the databases that host BIMS in this manual but BIMS interface in all databases will look very similar. To access BIMS, simply click on the "Tools" menu (Fig. 1A) and then select "BIMS" (Fig. 1B). The BIMS interface will then open. Public data is available for all users without requiring an account. Users can download public data from BIMS without an account, but will need their user account in the community database to save the results. Access to private breeding data requires users to login with their user account. To create a breeding program, users need to create an account in the community database and contact using the contact form of the community database for breeder privilege.
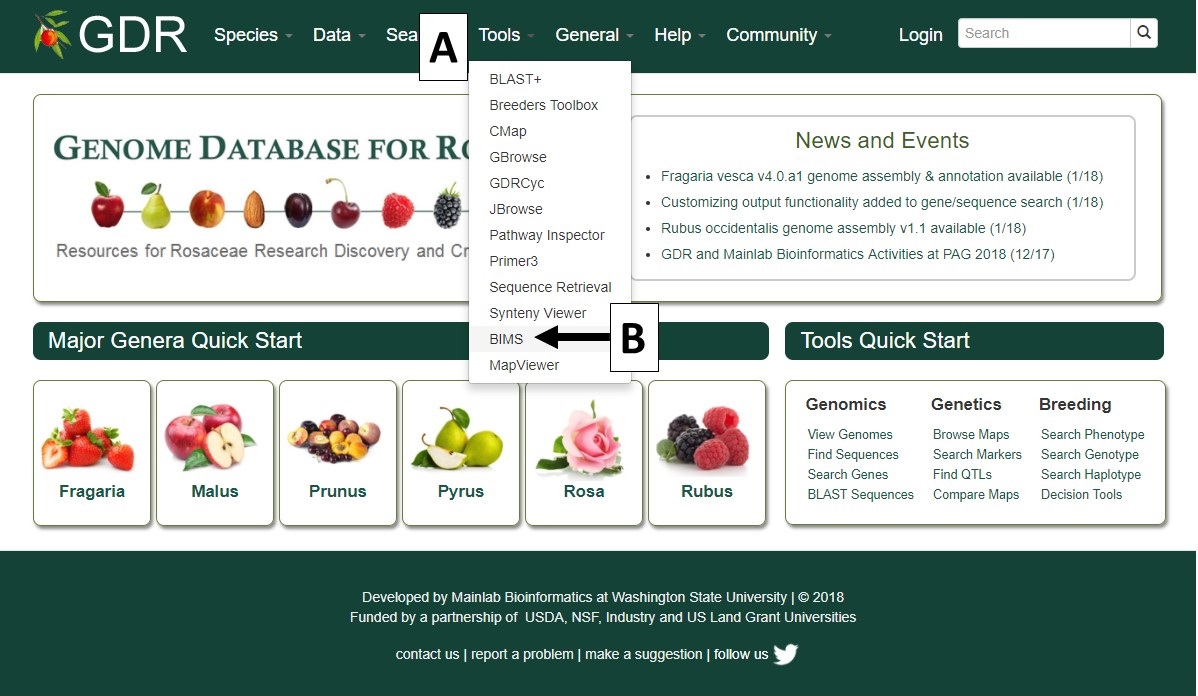
Figure 1. How to access BIMS.
Viewing Data
Viewing Data sookViewing Data
To view data that has already been loaded into BIMS, you first need to select a crop if the community database has data for multiple crops (Fig. 2A) and then choose the breeding program (Fig. 2B). Once the selections have been made, the selected crop and program names will appear in the upper left corner of the BIMS window (Fig. 3A). You can change the crop or program by clicking on the buttons in the upper left corner.
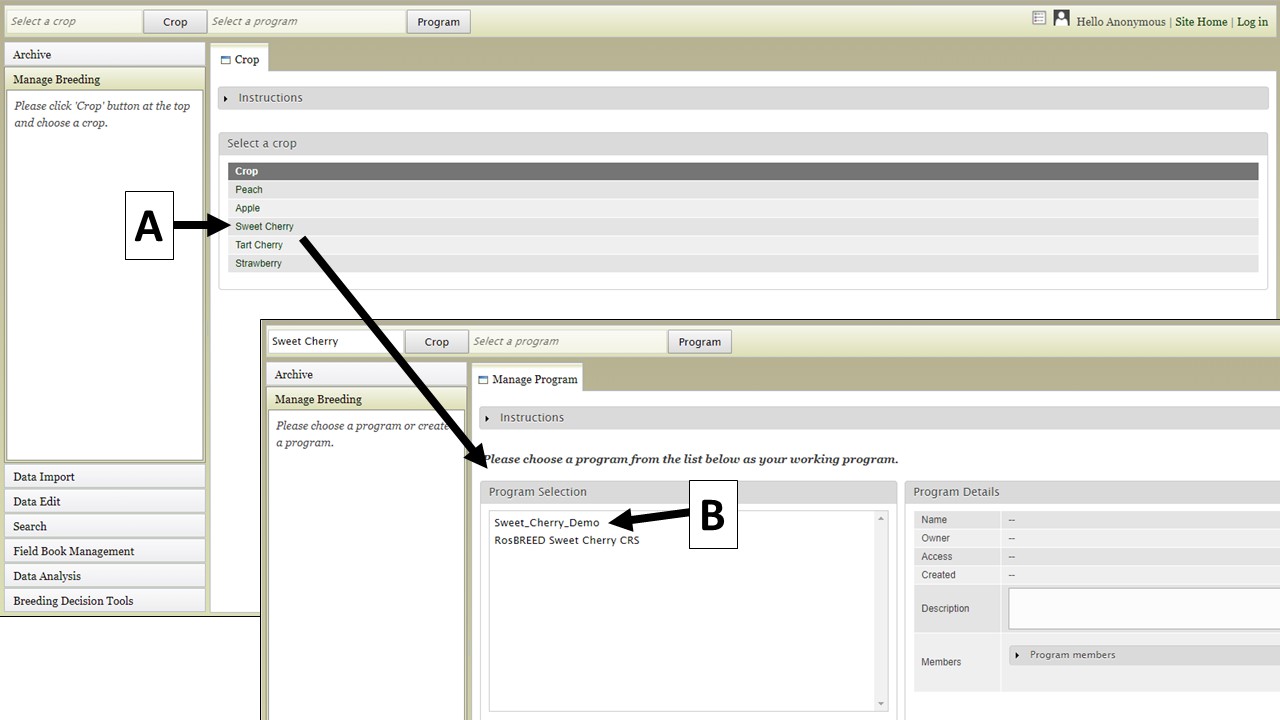
Figure 2. Selecting the Crop and Program in BIMS.
There are three main areas of the BIMS interface. The first part is the header region (Fig. 3A) which displays the current crop and program, allows users to change crop or program, has a link to the homepage of the community database (Site Home), and displays the user name. The second part of the interface is the accordion menu on the left side (Fig. 3B). This menu allows users to switch between different sections of the BIMS program. The last region is the tab region (Fig. 3C) and this is where users primarily interact with BIMS. Each tab in BIMS has an "Instructions" section that can be expanded by clicking on it. The "Instructions" have information on how to use that tab.
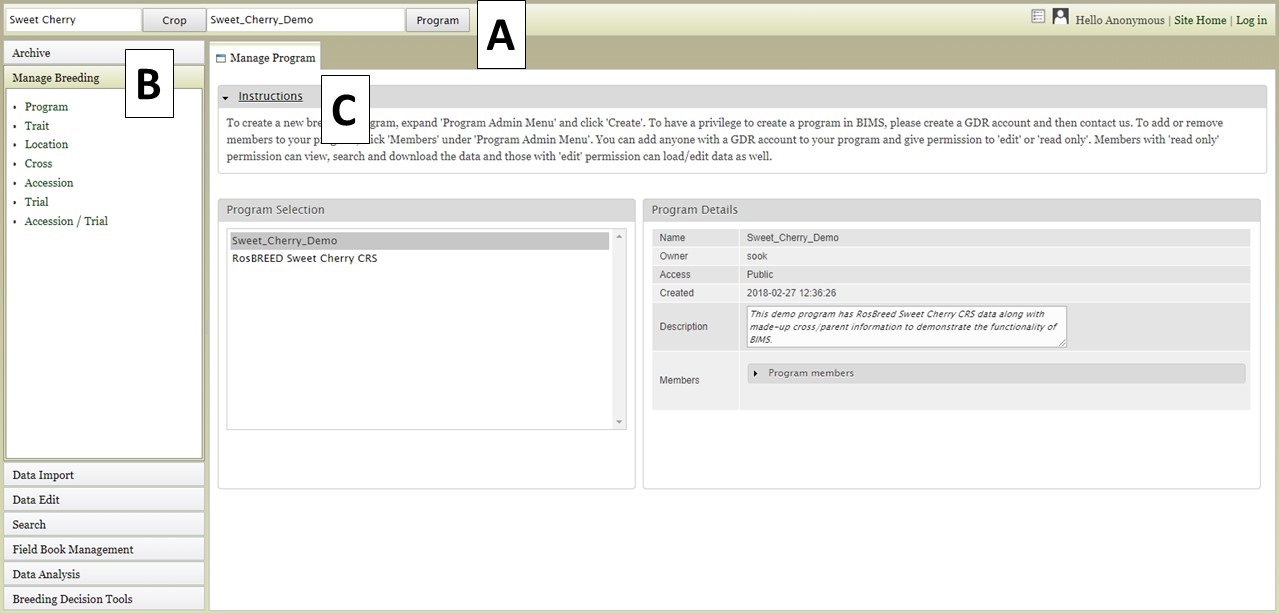
Figure 3. The main parts of the BIMS interface.
Once the crop and program have been loaded, you can explore the data that have been loaded into BIMS by clicking on the "Manage Breeding" section of the accordion menu. Under "Manage Breeding" there are links to view information about the Program, Trait, Location, Cross, Accession, and Trial. To view information about a certain trait, click on "Trait" (Fig. 4A) and the "Manage Trait" tab will appear. In that tab, click on the trait of interest (Fig. 4B). Once a trait is selected, the "Trait Details" will be displayed (Fig. 4C).
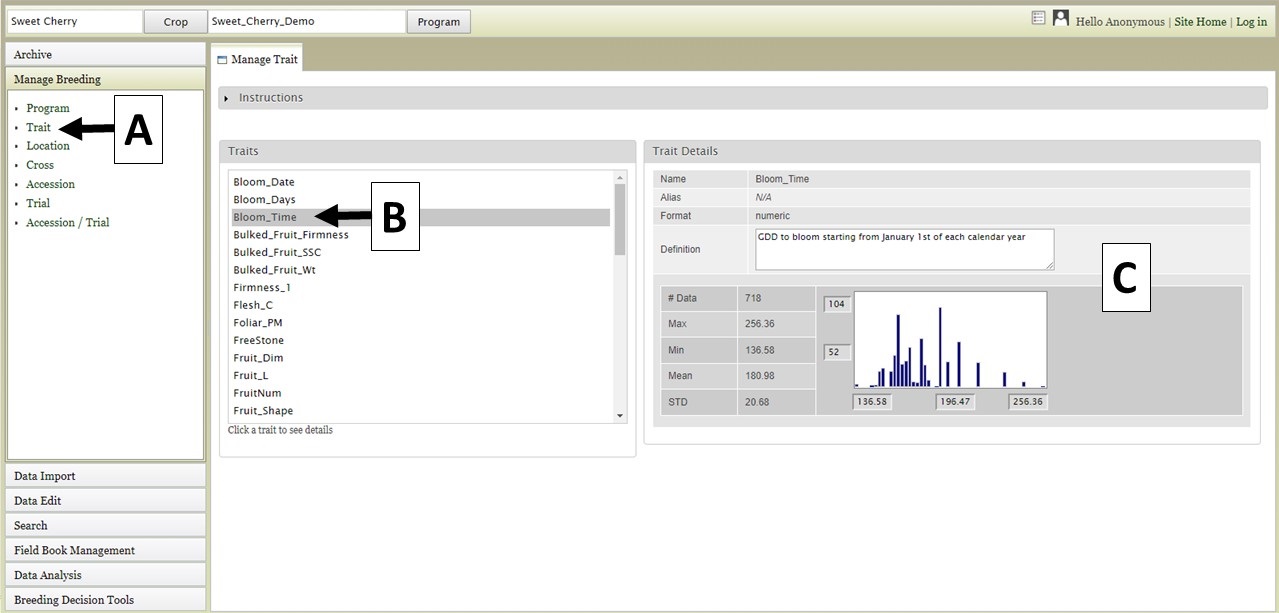
Figure 4. Selecting and viewing Trait Details.
If you are viewing data from a private breeding program, you can also edit the information for all the items under manage breeding. Breeders with private breeding programs will also see an "Actions" section (Fig. 5A) on the details sections for the trait, cross, etc. The "Actions" section allows breeders to edit the properties or delete the item. Below is the description of what will be deleted by clicking 'Delete’ button in each section.
- Trait page: all the trait values associated with the trait descriptor as well as the trait descriptor
- Location page: all the trait values associated with the location as well as the location name.
- Cross page: the parent information for the progeny of the cross as well as the detailed data of the cross
- Accession page: all the trait values associated with the accession as well as the accession details
- Trial page: all the trait values associated with the trial as well as the trial name
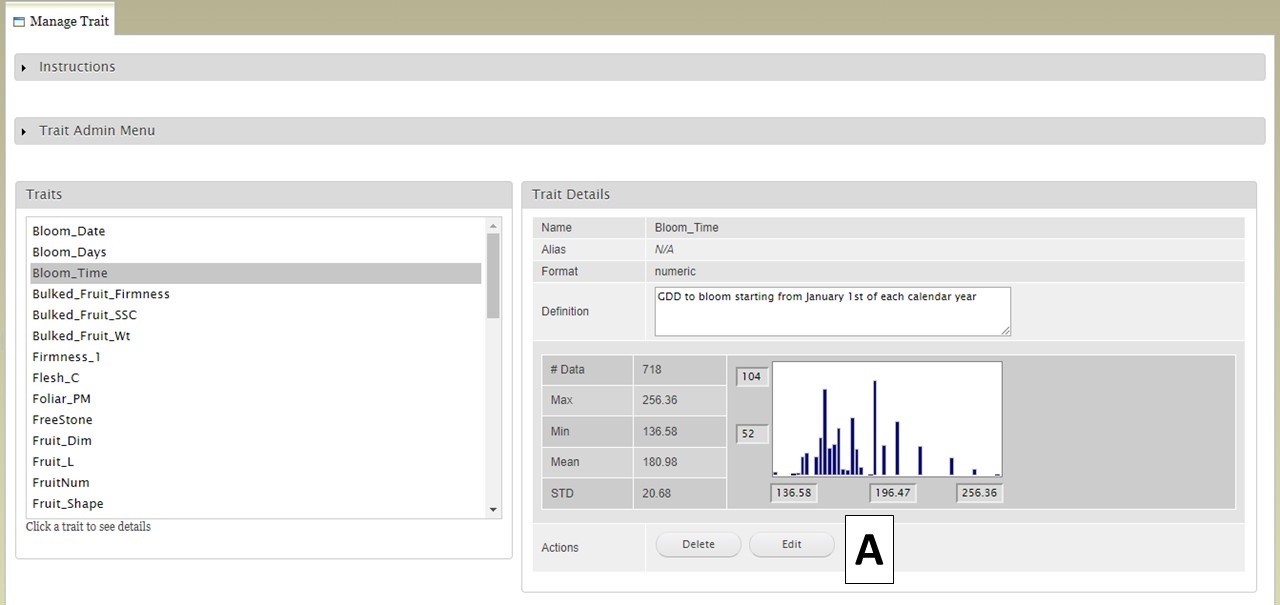
Figure 5. Editing abilities available to breeders with private programs.
You can also view information about the other data types under "Manage Breeding" by clicking on each type. For "Location," information about each location can be displayed. First select "Location" (Fig. 6A), then choose the location name (Fig. 6B), and then the details will appear (Fig. 6C).
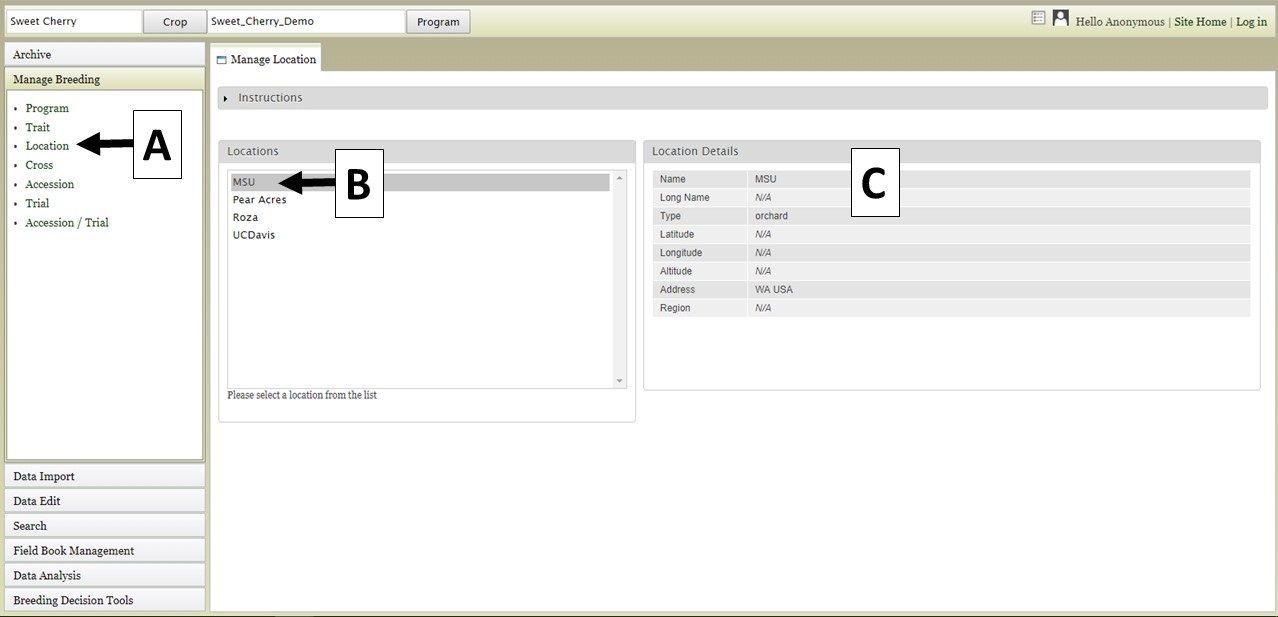
Figure 6. Location details.
For the "Cross" (Fig. 7), "Accession" (Fig. 8), and "Trial" (Fig. 9) data types, the data details are accessed the same way. First select the data type under "Manage Breeding" (Fig. 7A-9A), then select the one of the names (Fig. 7B-9B), and then the details will appear (Fig. 7C-9C). For these data types, in the "Details" section there is also a "View" button that opens another tab that displays further statistics/data.
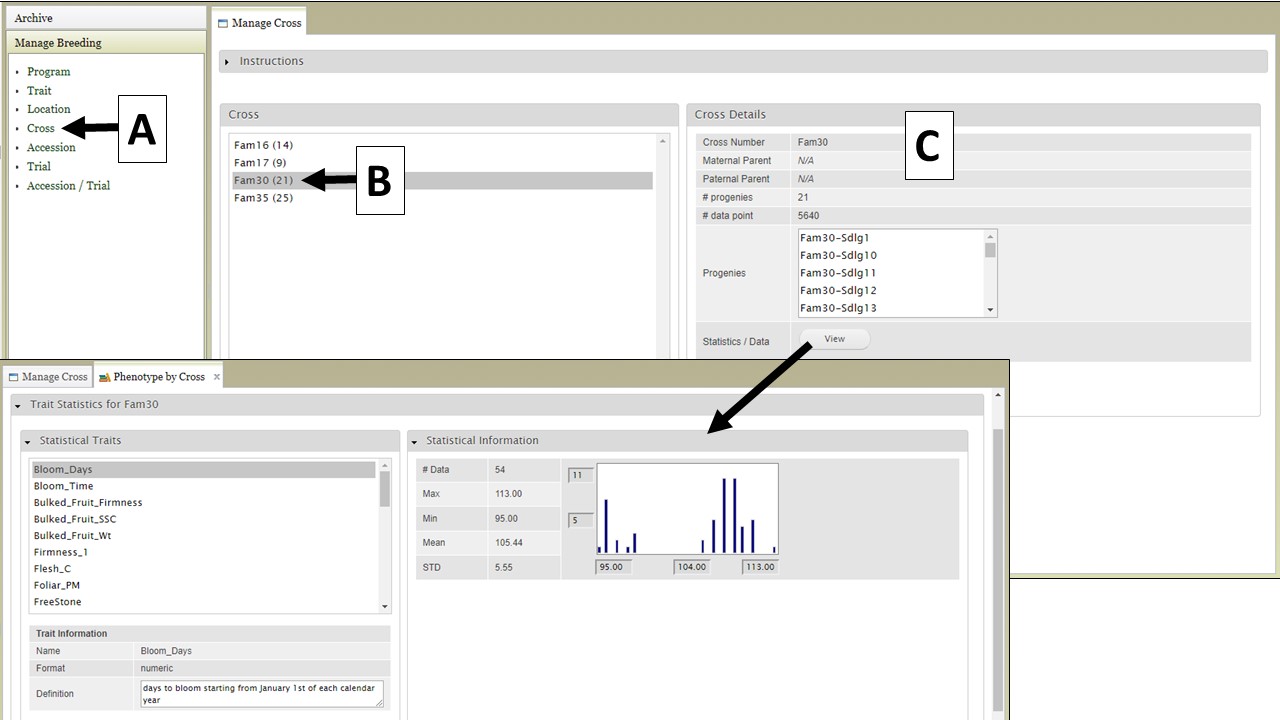
Figure 7. Cross details.
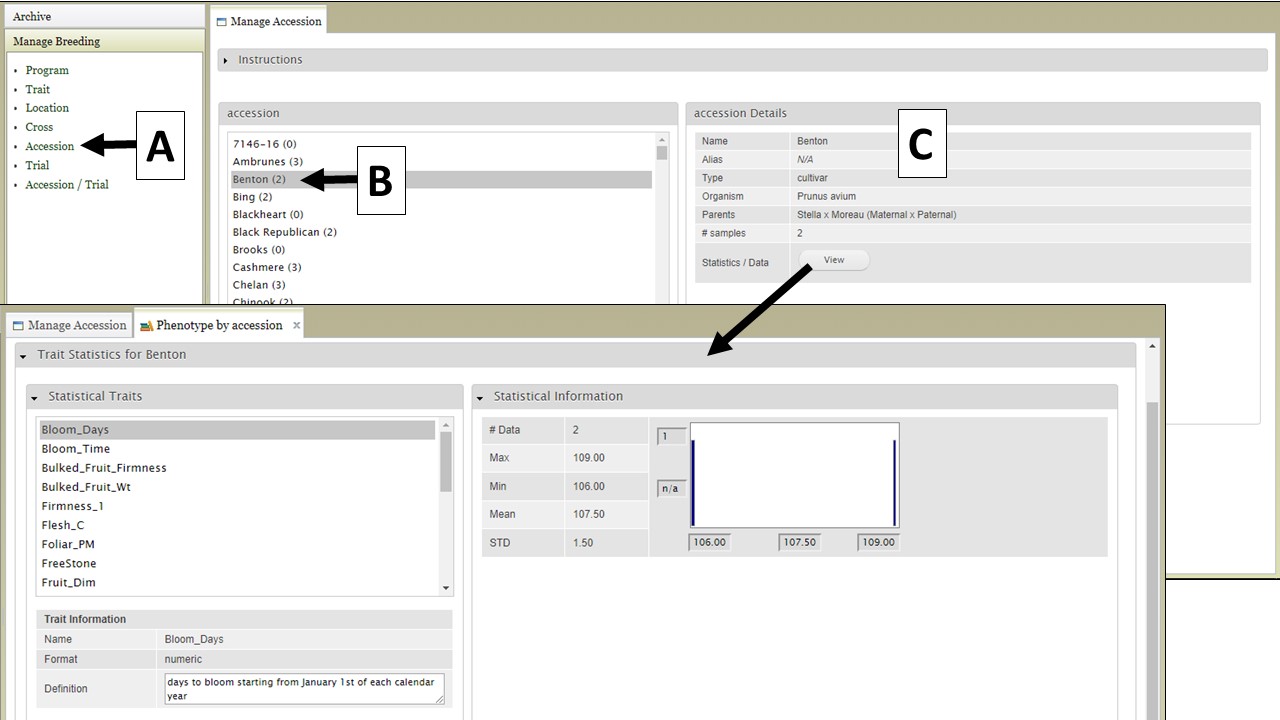
Figure 8. Accession details.
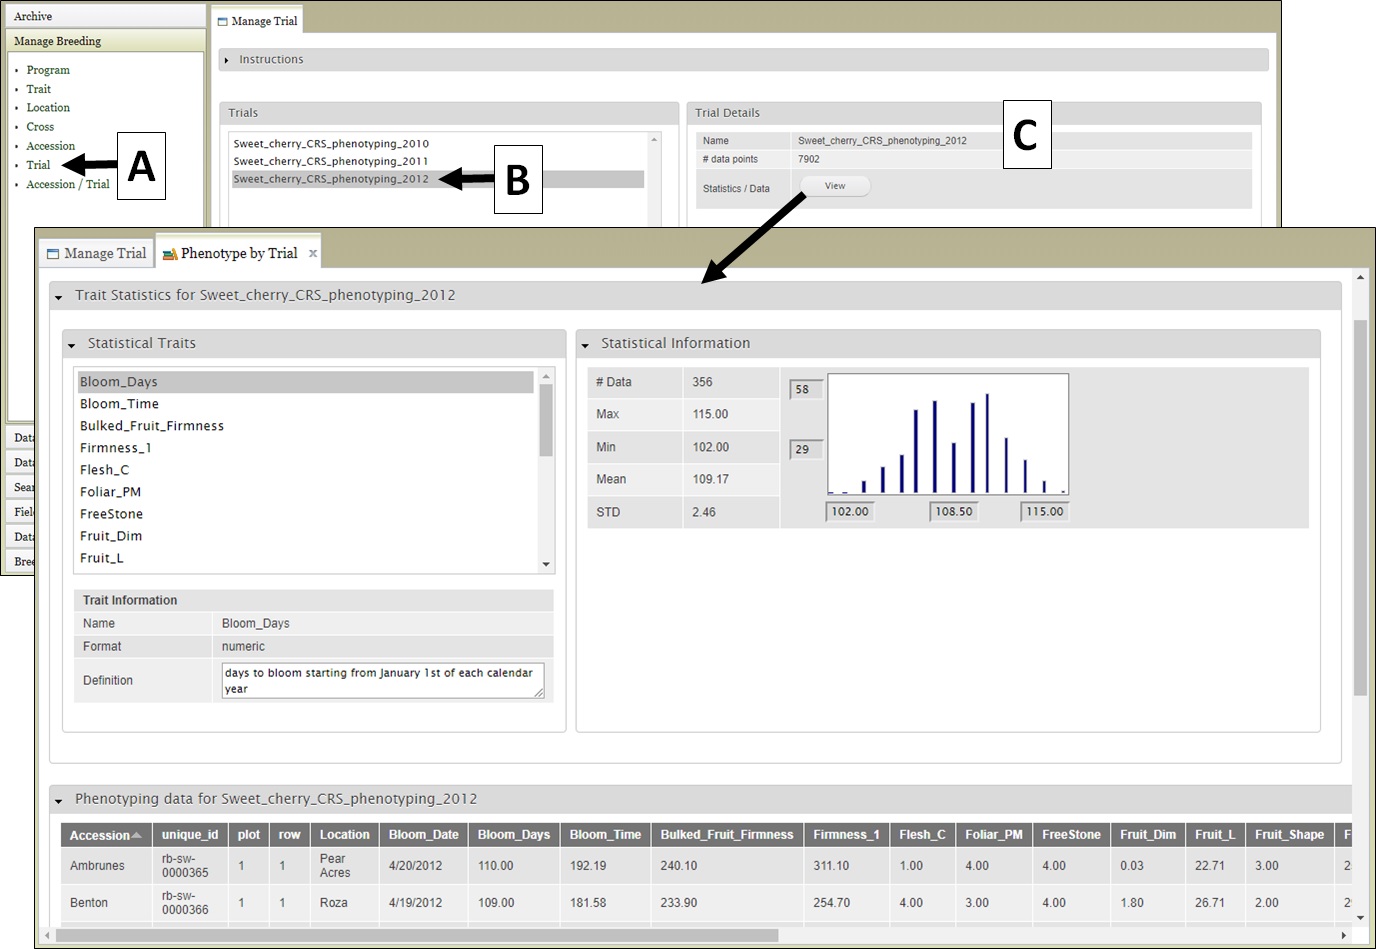
Figure 9. Trial details.
Searching Data
Searching Data sookSearching Data
The Search section of the accordion menu allows users to search phenotype, genotype, and cross data depending on the data in the program. Click on the "Search" section of the left side accordion menu and then click on "Phenotype" (Fig. 10A). This will open the "Search by Phenotype" tab (Fig. 10B). This guide explains only the phenotype search. A similar procedure is used for genotype search, but in genotype search, the genotypic file created can be downloaded from the User Account Page (top right corner beside the user icon).
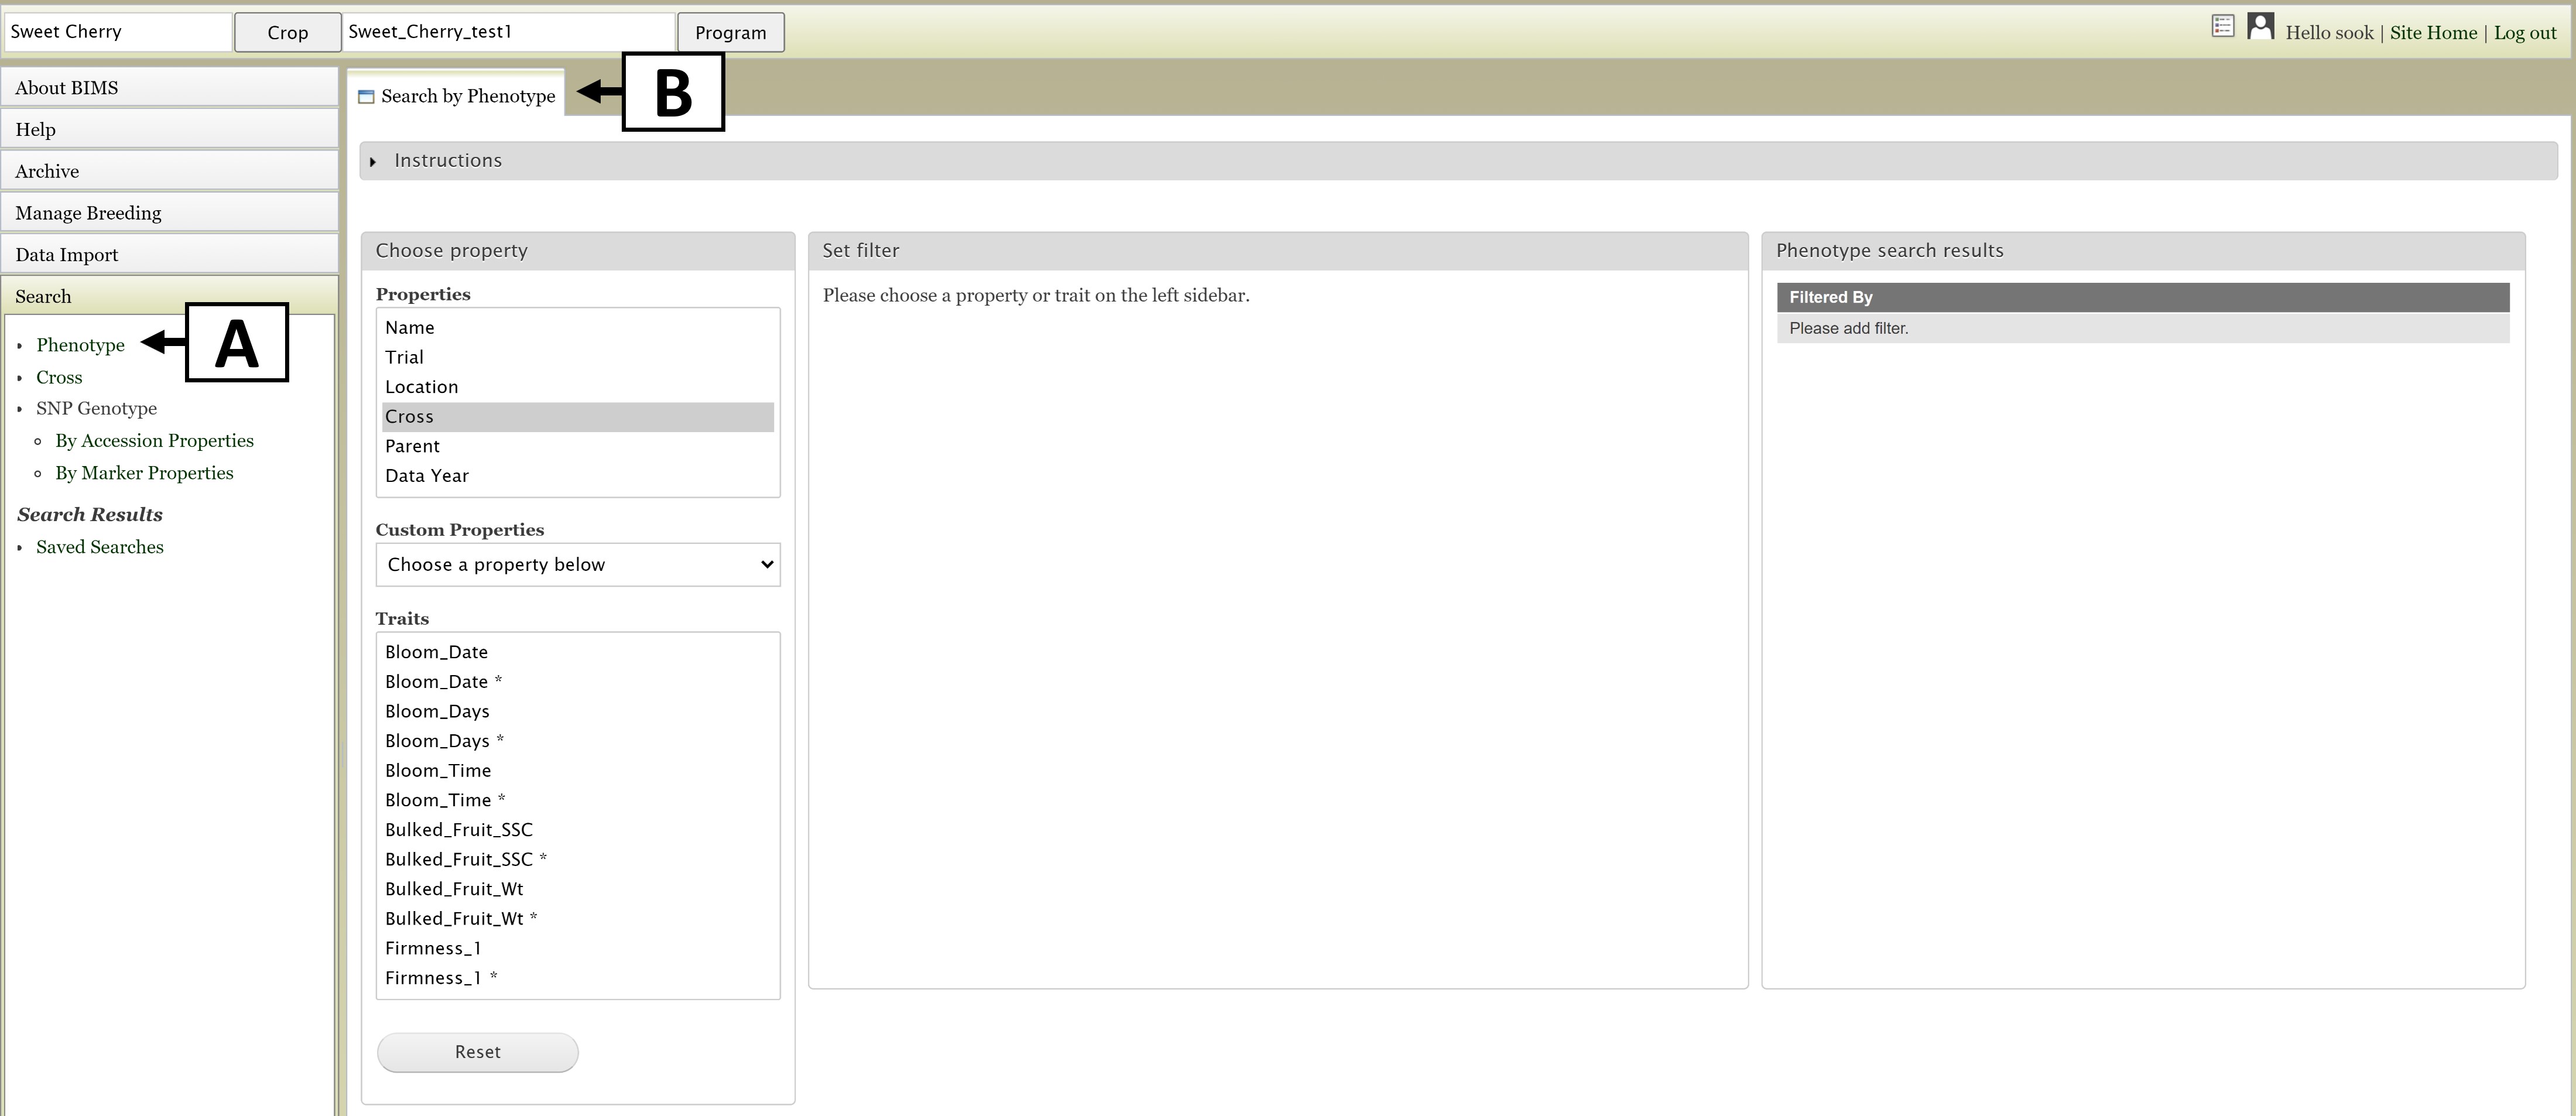
Figure 10. Opening the Search tab.
The first step to start a search is to select a property or trait under the "Choose property" section (Fig. 11A). In this example, we are choosing "Parent." After the property is selected, the "Set filter" section will populate with options for that data type (Fig. 11B). After selecting the options you want, click "Add." The selected filter will then appear in the "Search results" section (Fig. 11). If you want to reset the search, click the "Reset" button (Fig. 11C).
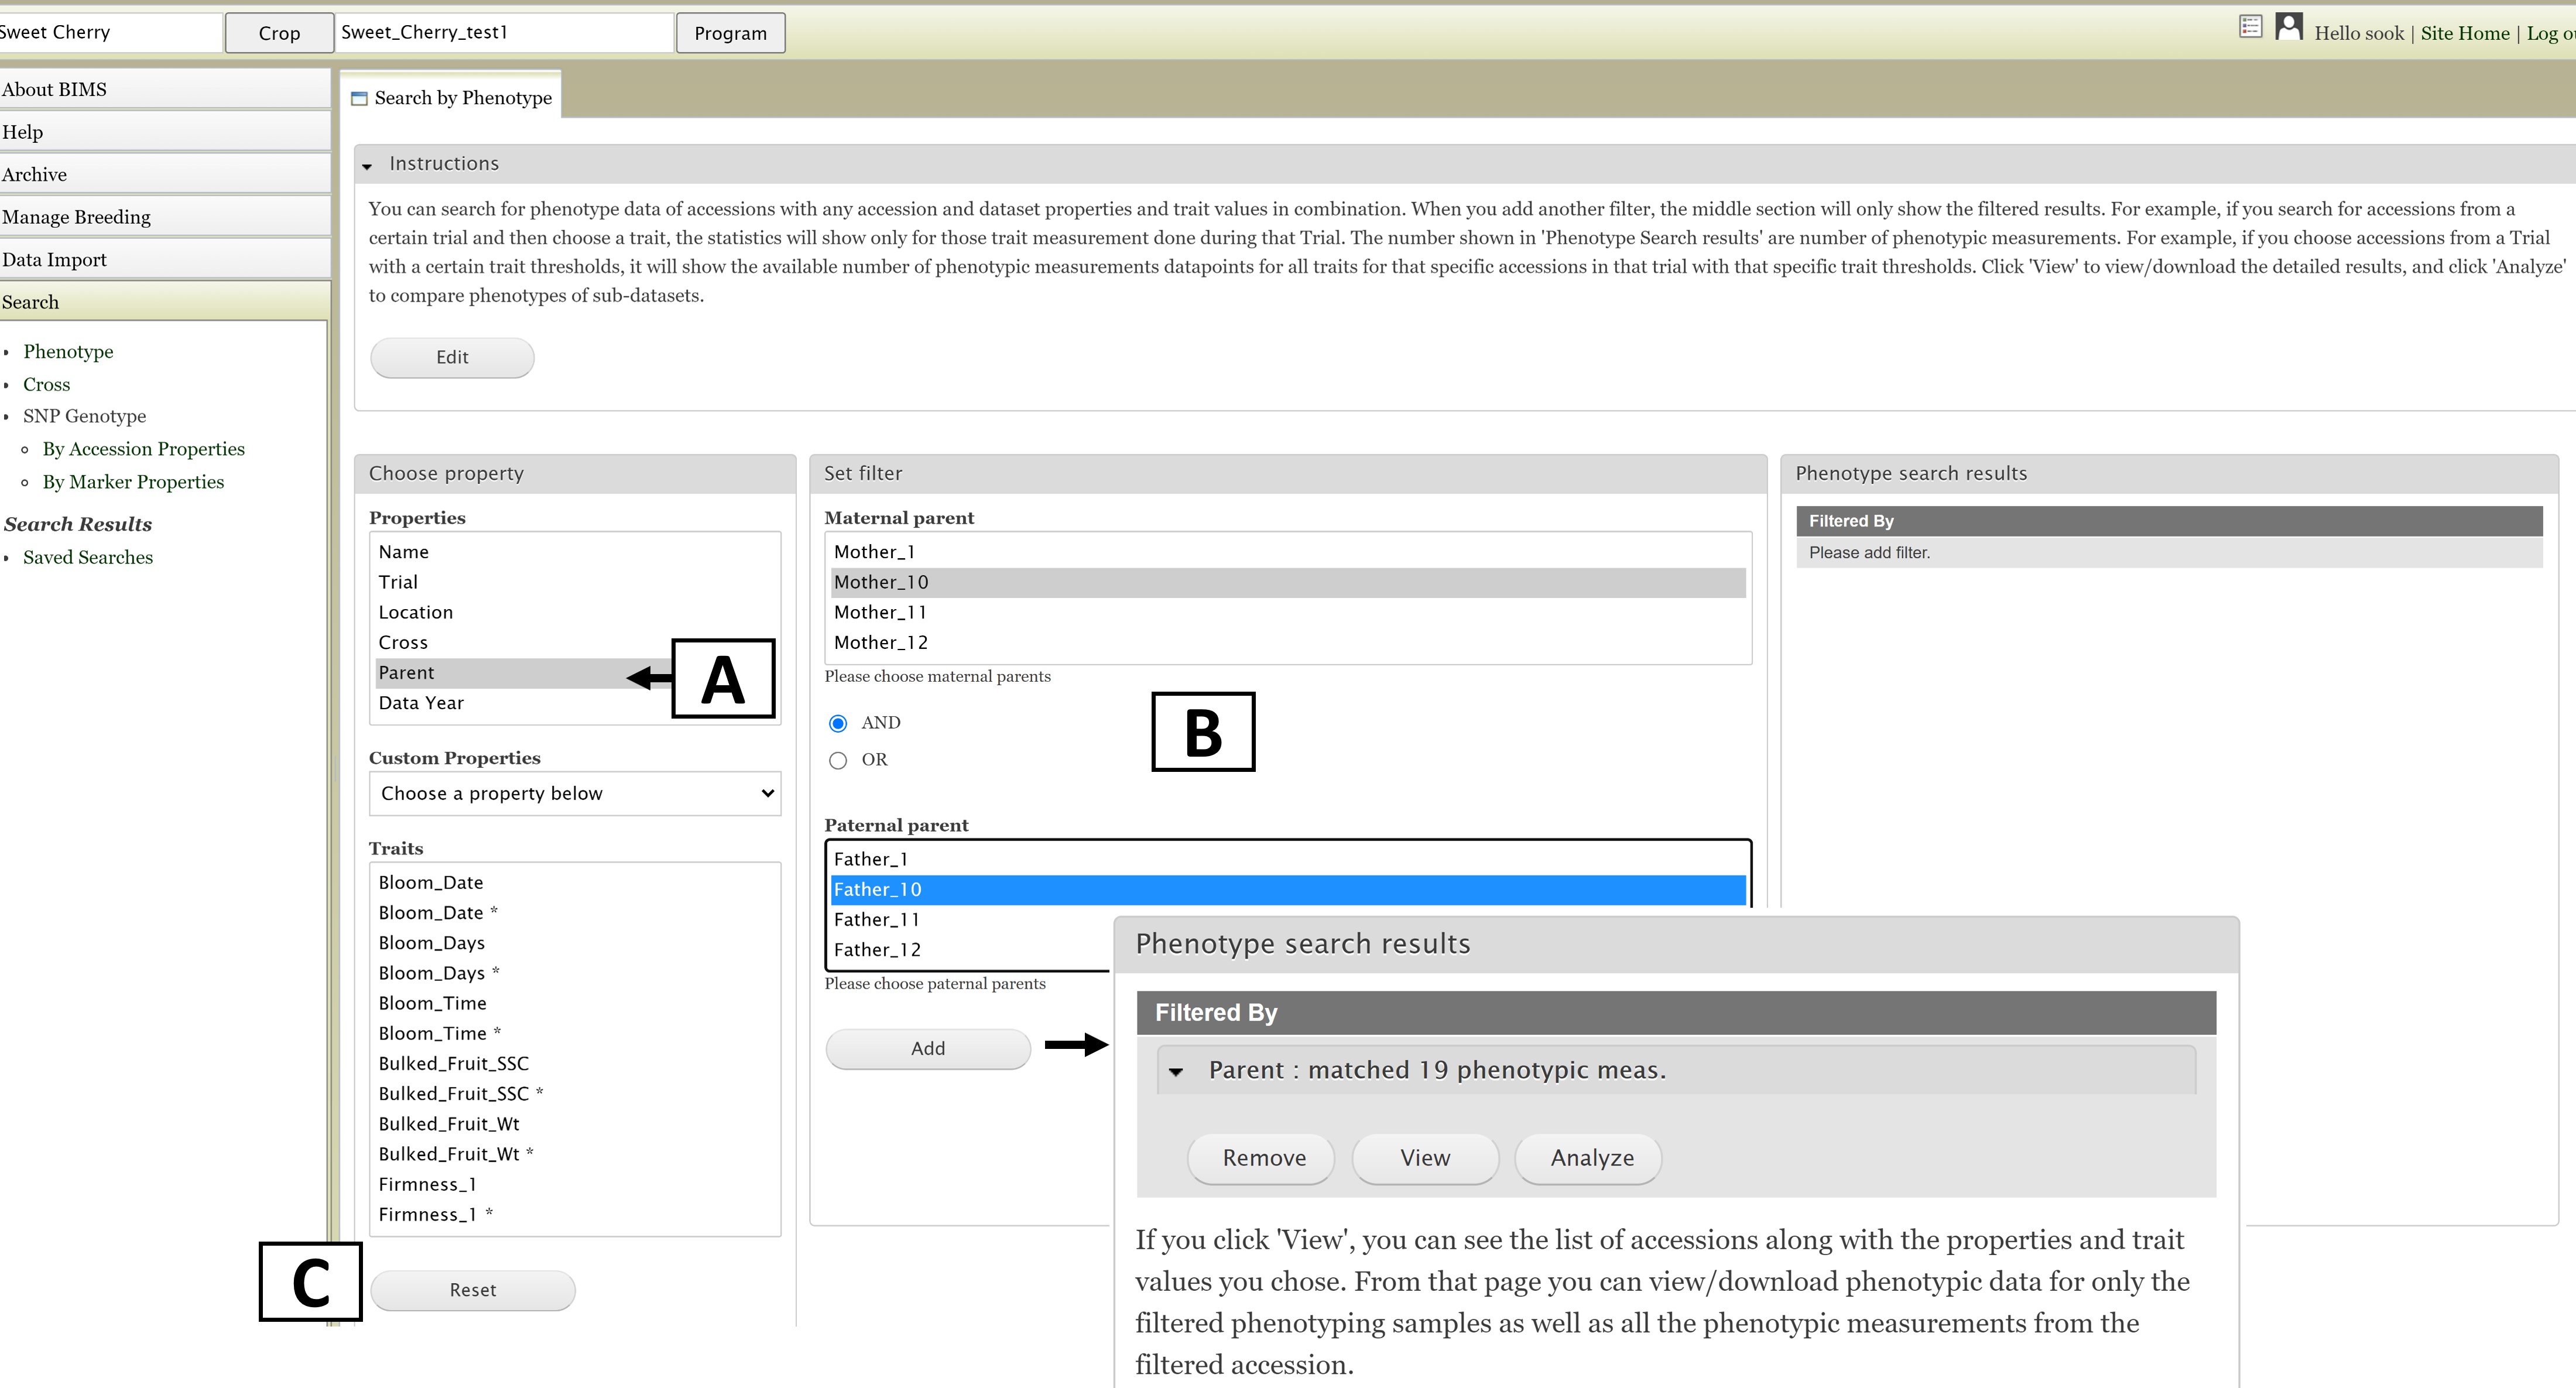
Figure 11. Selecting a Property and setting a Filter in the Search Tab.
You can further filter the search results by adding another property or trait under the "Choose property" section. In this example, we are further refining the search by adding the Fruit Shape trait (Fig. 12A). The "Set filter" section will show the data that are relevant for the previous filter you chose. For example, the statistics shown for Fruit Shape trait here is only for those accession from the parents you chose in the previous search. You can set the minimun and maximum value of this trait, and then click "Add" (Fig. 12B). The new filter is added to the "Search results" section and the selected filters can be removed with the "Remove" button under "Search results" (Fig. 12C). To view the search results, and to generate a file to export, click on "View" under "Search results" (Fig. 12C).
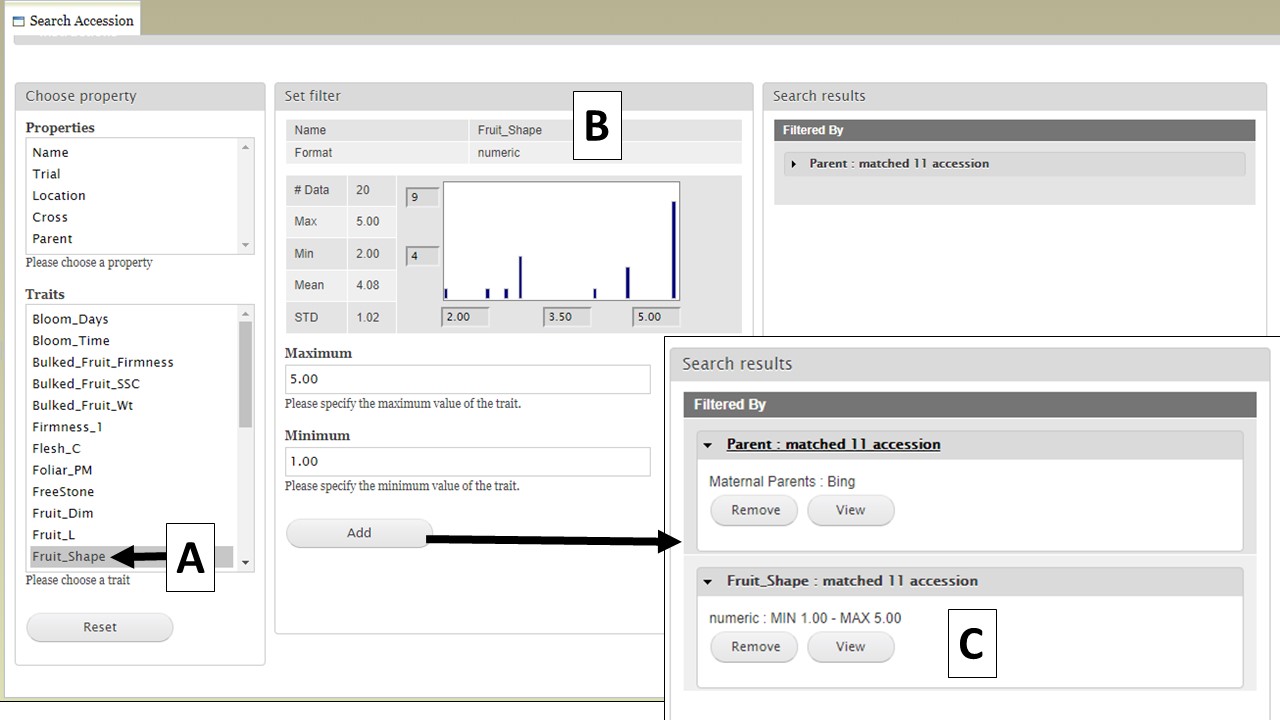
Figure 12. Adding more filters to the search and viewing results.
When the "View" button is clicked (Fig. 12C), a new tab opens called "Search Results" (Fig. 13). On this tab there is a "Column options" section (Fig. 13A) and a preview of the data table (Fig. 13B).
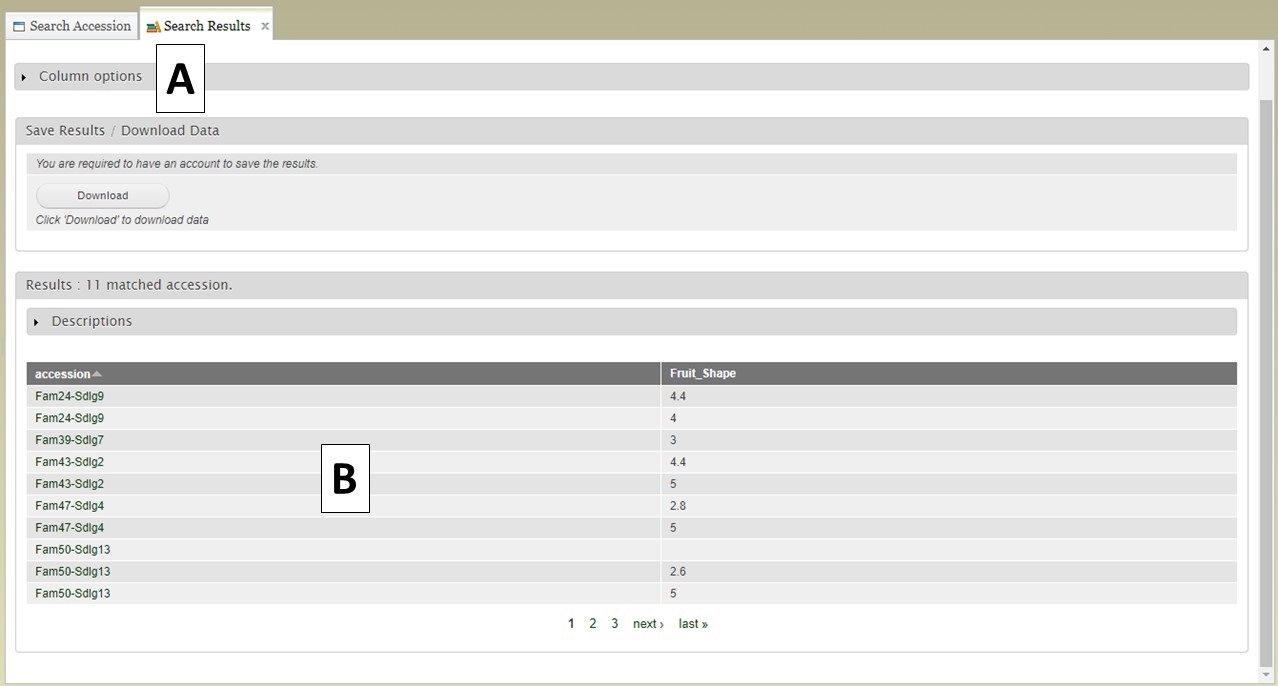
Figure 13. Search Results tab.
Users can add more information to the table before exporting the data. To do this, click on the "Column options" section to expand it (Fig. 14). There are two sections, "Properties" (Fig. 14A) and "Traits" (Fig. 14B). You can select additional items to display by clicking on the check boxes in these two sections. Once all the selections have been made, click "Update" (Fig. 14C).
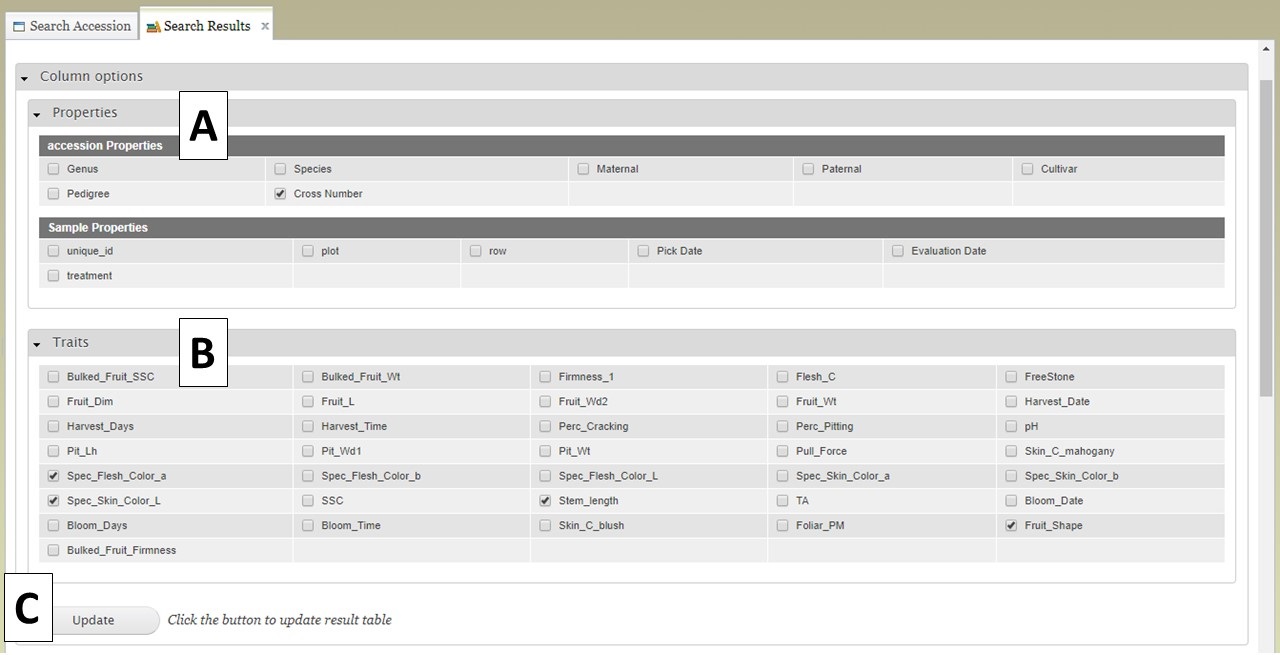
Figure 14. Adding more columns to search results table with Column Options section.
After selecting additional data to display on the table, you can preview the table on the "Search Results" tab (Fig. 15A) and see the original filters that were used to generate the initial table by clicking on "Descriptions" in the "Results" section (Fig. 15B). To download the data table, click on the "Download" button in the "Save Results / Download Data" section (Fig. 15C). If you do not see your browser start to downoad the file after clicking "Download," please make sure the pop-up was not blocked.
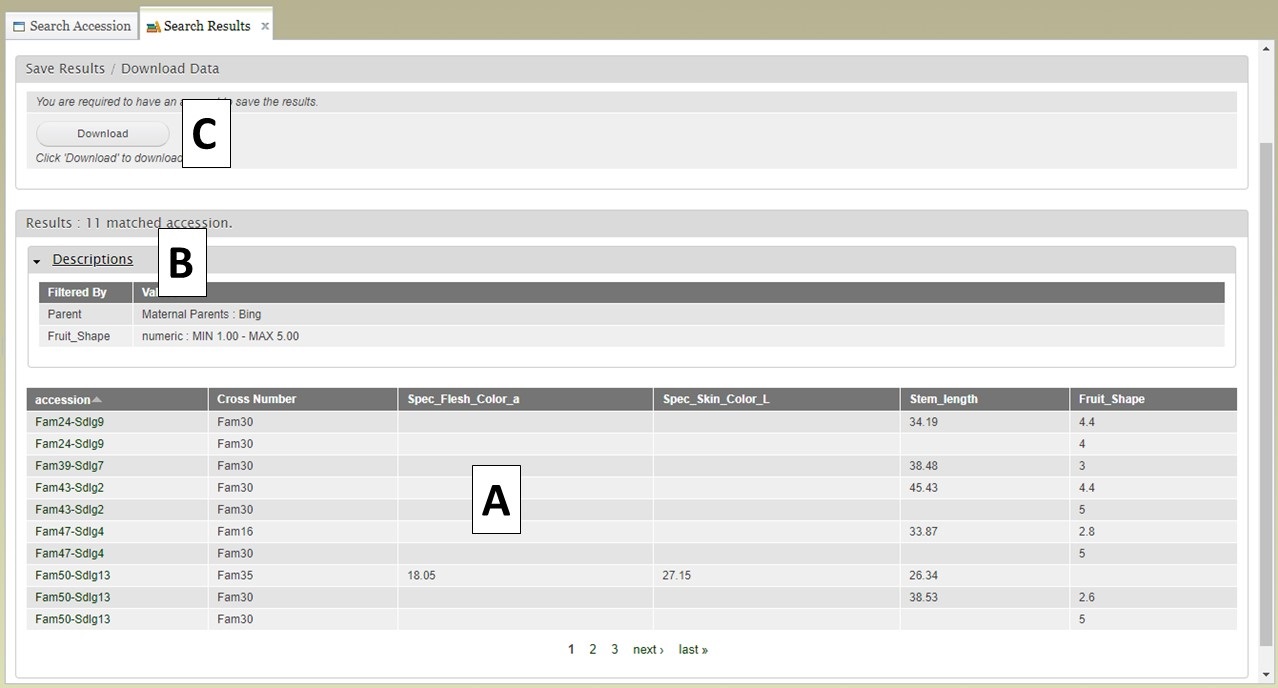
Figure 15. Downloading data from the Search Results tab.
BIMS generates a CSV file of the search results table (Fig. 16). This table is easily opened by Microsoft Excel and other programs.
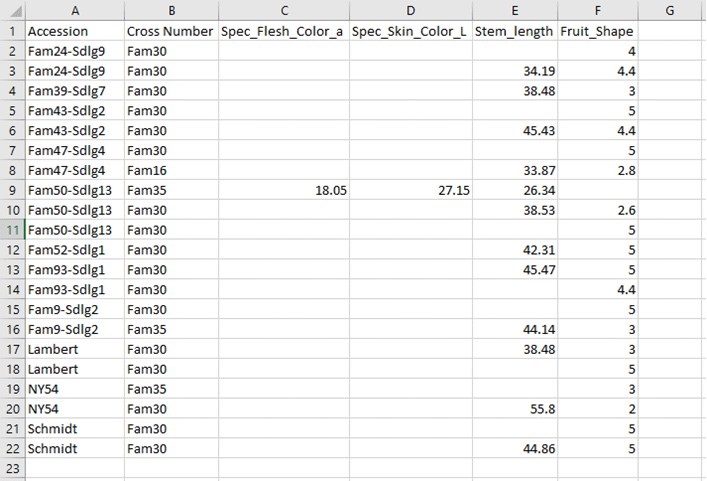
Figure 16. Example CSV file exported from BIMS.
If you have a GDR account, you can also save the search results to a list. You will see a "Save" button with boxes for a list name and description (Fig. 17A). This list will be saved to your program or to public program that you are in and accessed by clicking on "Search Results" in the "Search" section of the accordion menu (Fig. 17B). You can also see details about the saved lists and delete, view, or edit them (Fig. 17C).
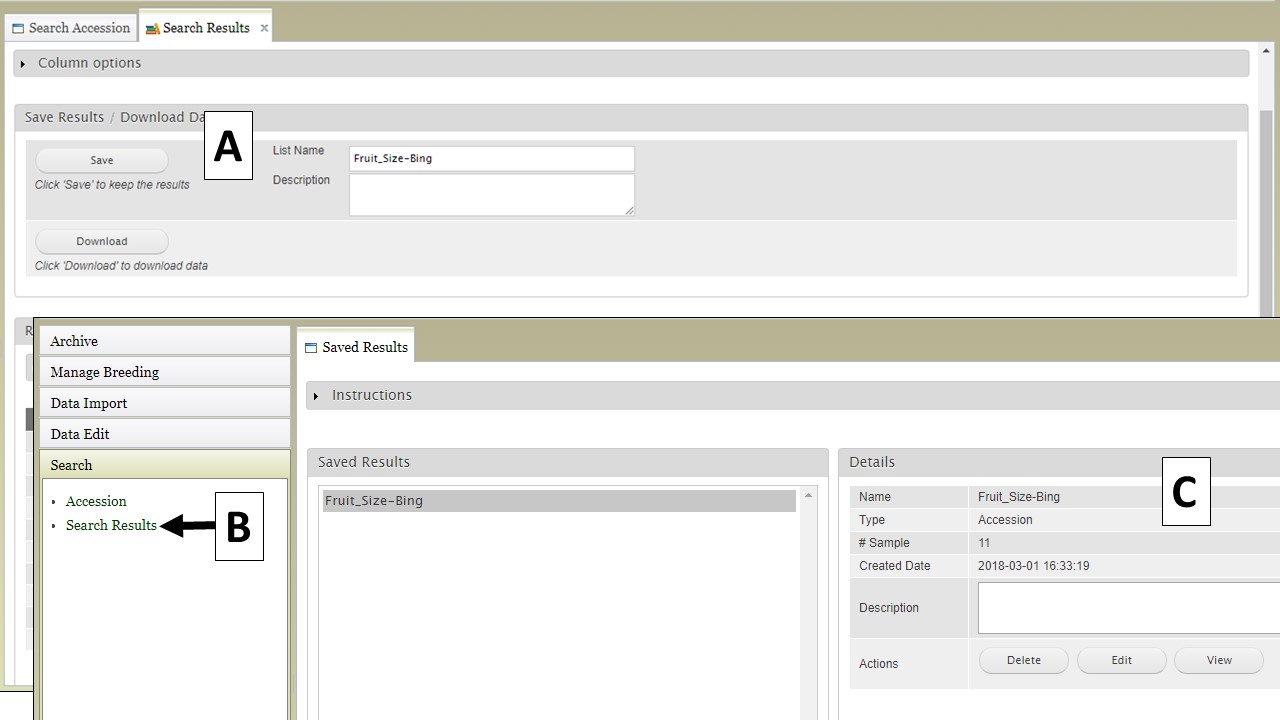
Figure 17. Saving lists from searches to private breeding programs.
Creating a New Breeding Program
Creating a New Breeding Program sookCreating a New Breeding Program
To start a new breeding program in BIMS, you must have an account for the community database with the appropriate access level. The first step in creating a new program is to select the appropriate crop. To change crops, click the "Crop" button in the header (Fig. 18A). Then select the crop from the list on the "Crop" tab (Fig. 18B). When the new crop is selected, the "Manage Program" tab will open and then you can open the "Program Admin Menu" section (Fig.18C). Click "Create" to make a new program.
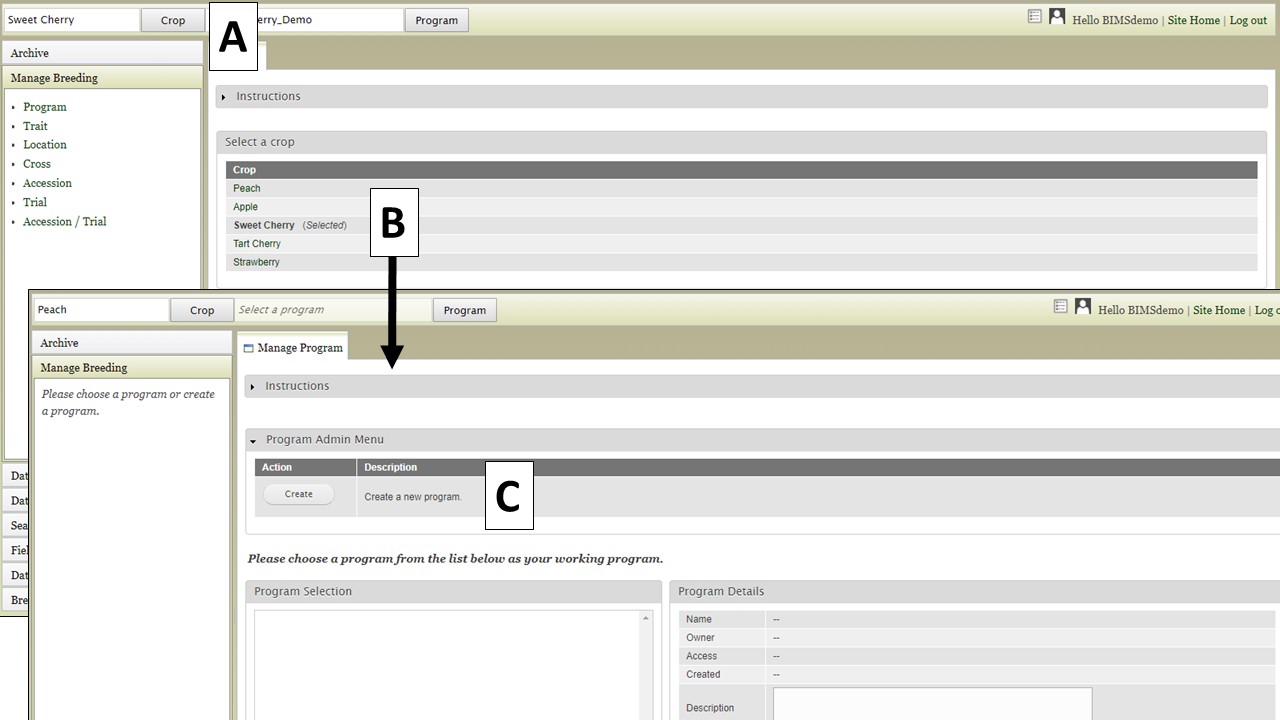
Figure 18. Switching crops and opening the Manage Program tab.
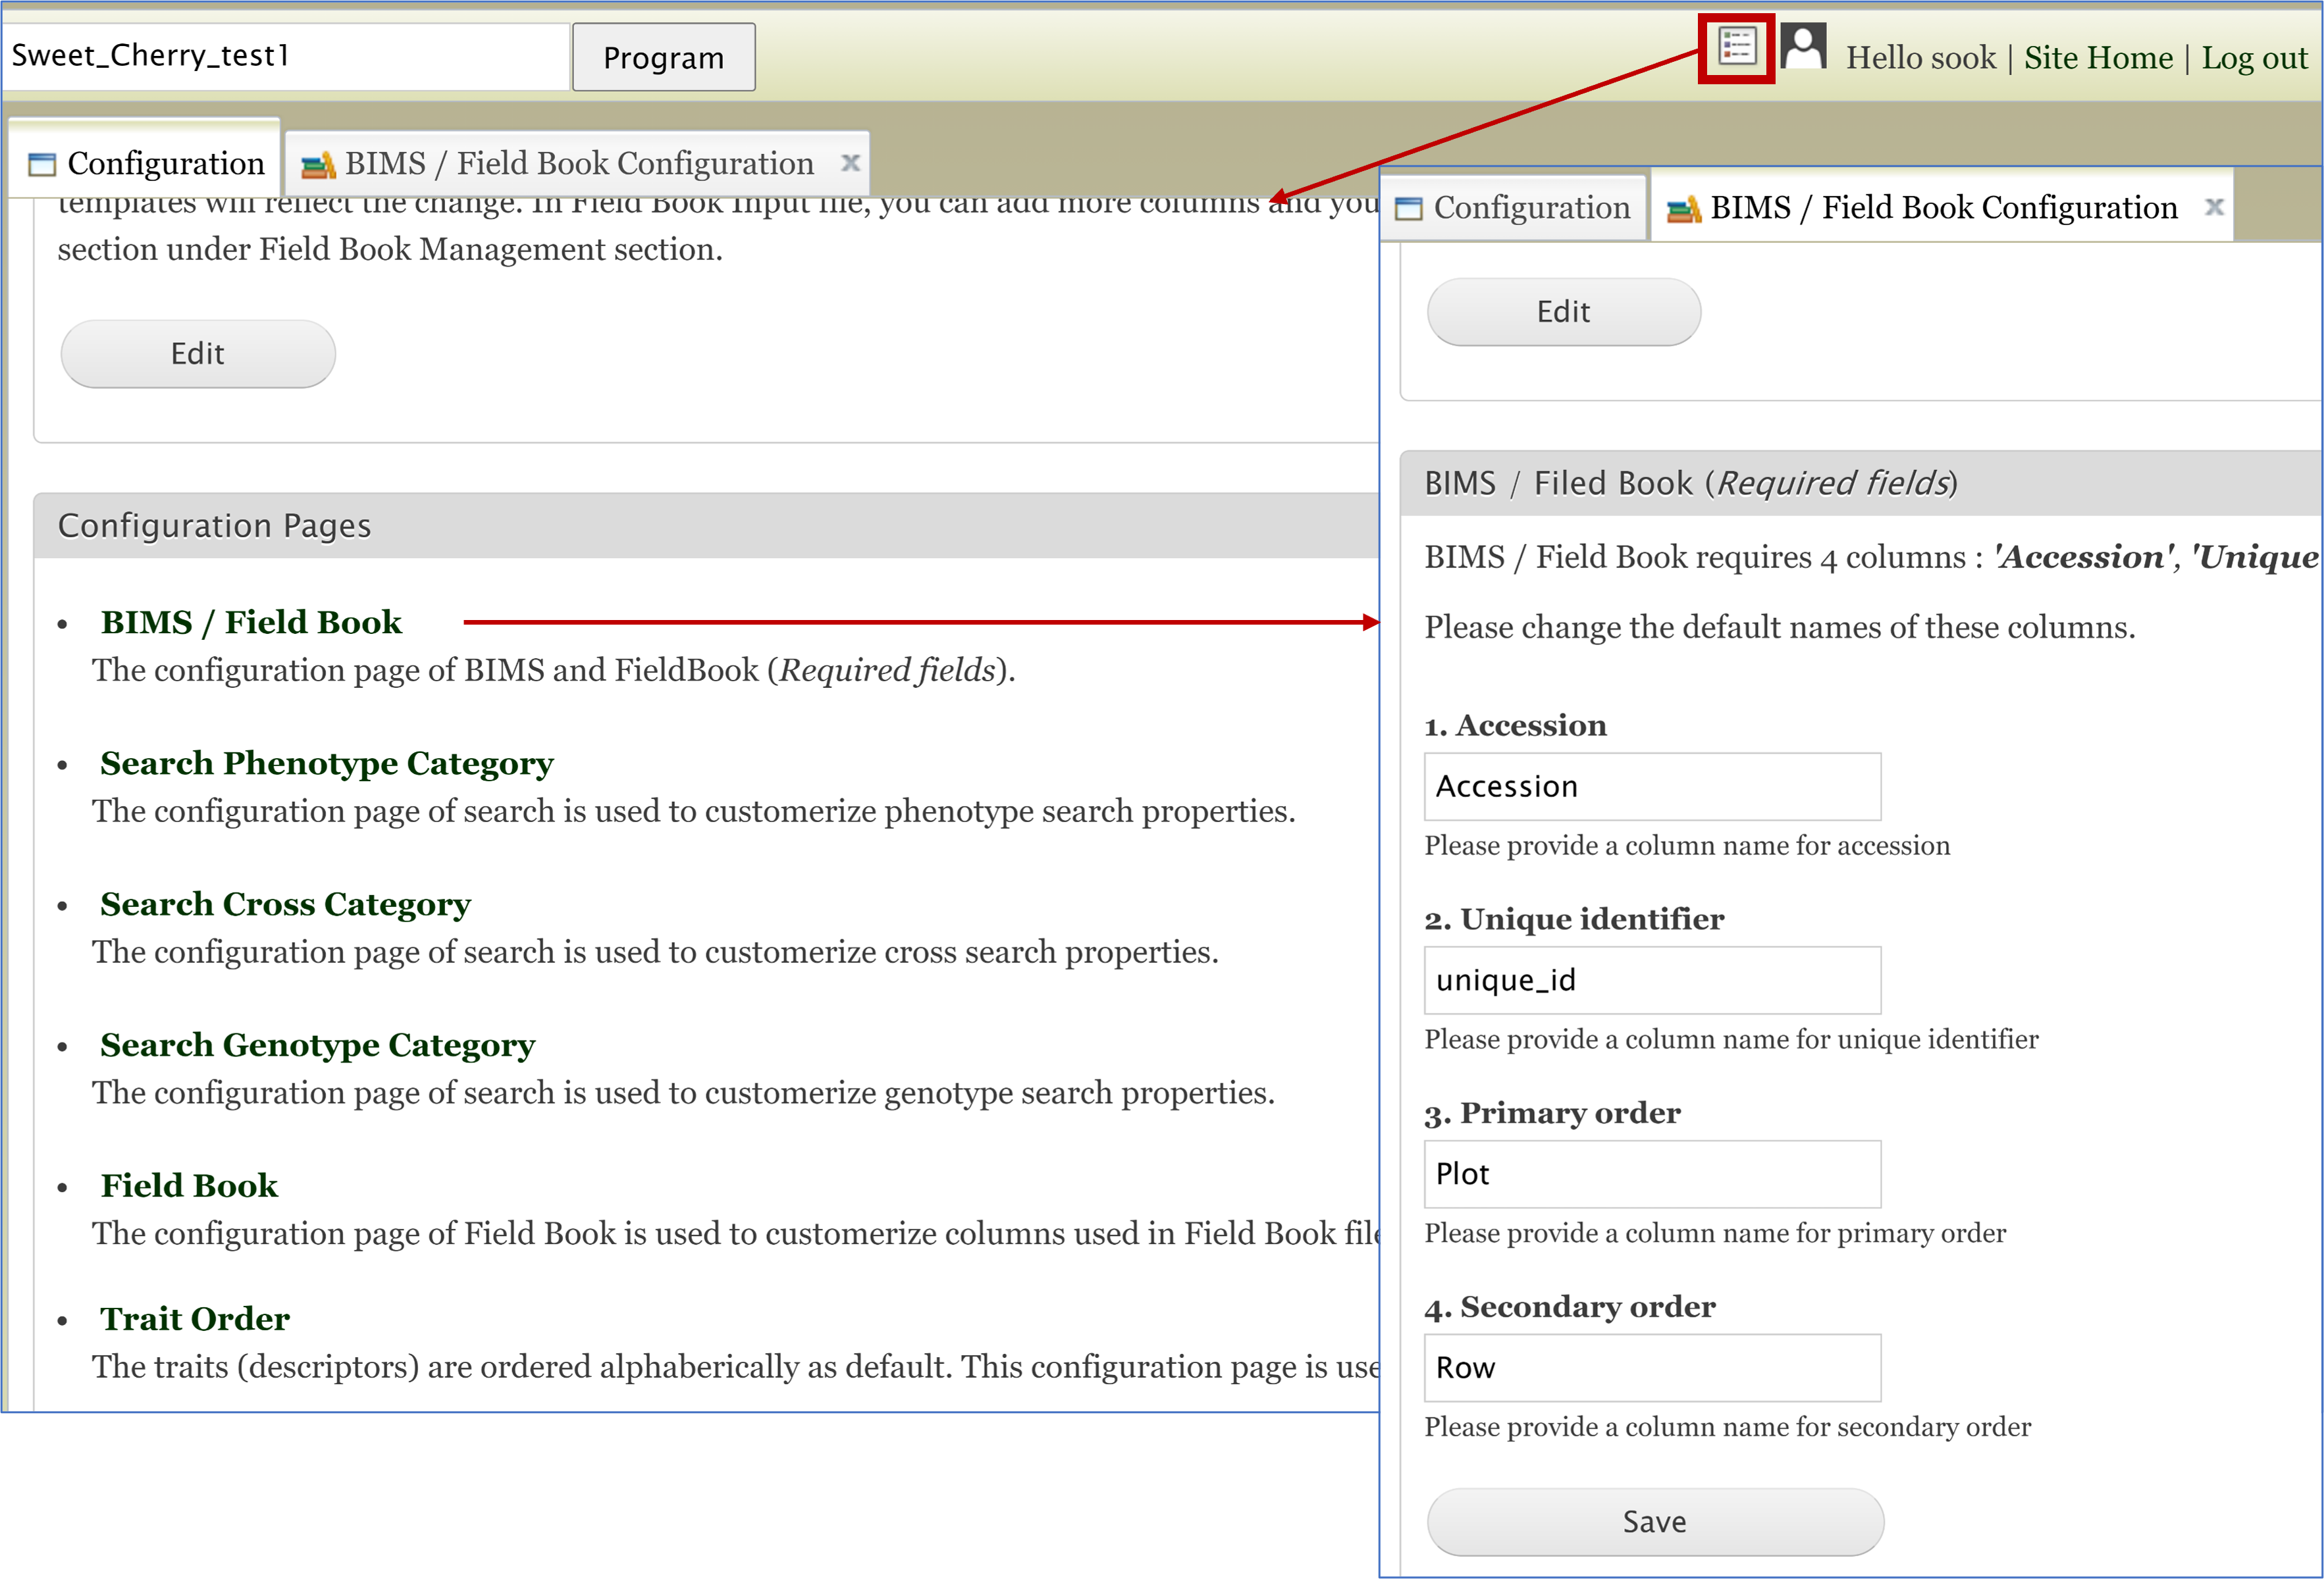
After clicking the "Create" button, the "Add Program" tab opens (Fig. 19A). Enter the new Program Name and make sure that the required column names are set to match your dataset (Fig. 19B). The four columns are required columns in phenotype sheet of the data template and if you change the column names here the column names in the phenotype sheet of the template for download will automatically change. If you use Field Book App for phenotype collection, use these column names in the input files. After you have created the program, you will have the option to add other database account holders as members of the breeding program (Fig. 19C). Once the program is created, data can be loaded to the program.
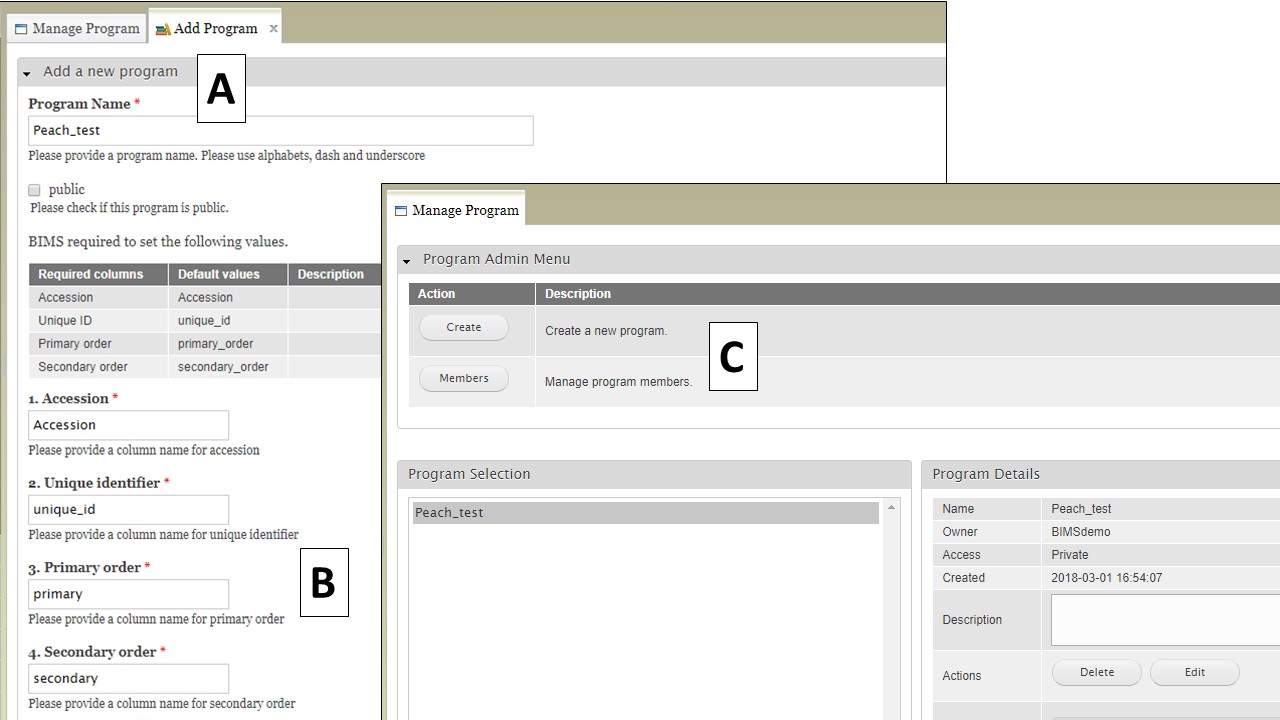
Figure 19. Creating a new program and adding members.
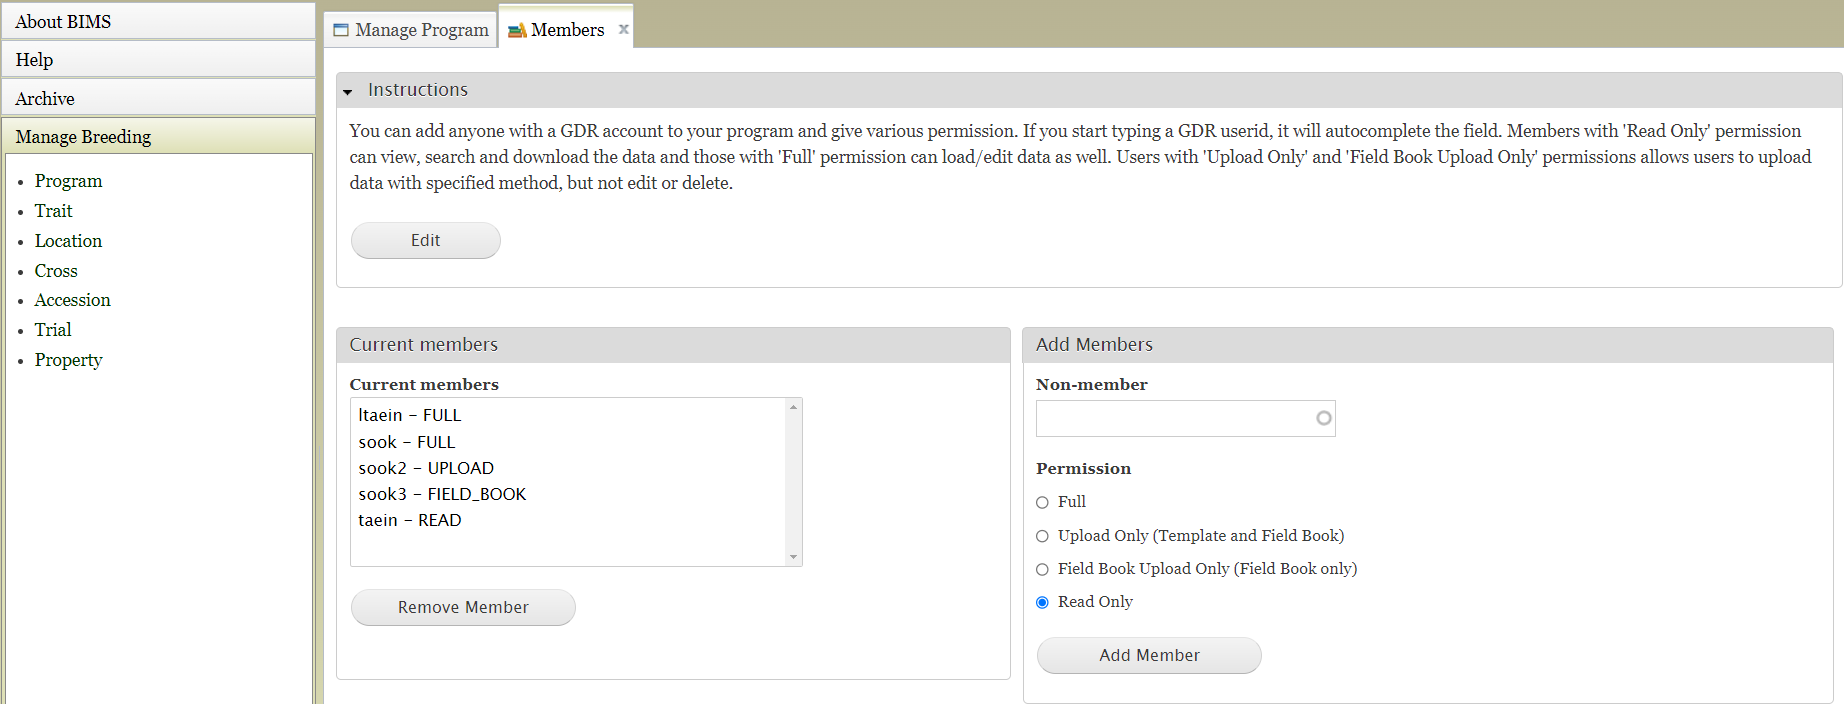
Managing Members/Permissions
Managing Members/Permissions sookManaging Members and their Permissions
There are currently four different permissions for BIMS members. To be a meber of a BIMS program, users first need to ask for an account in the hosting database (Breedwithbims.org, GDR, CottonGEN, GDV, CGD, or PCD).
- Full: Full permission to upload and edit data as well as view, search and download data.
- Upload Only (Template and Field Book): Permission to upload using any of the methods (templates, Field Book output files, Field Book data through BrAPI) as well as view, search and download data
- Field Book Upload Only (Field Book only): Permission to upload data from Field Book (output files or BrAPI) as well as to view, search and download data.
- Read Only: Permission to view, search, and download only
To add/delete or change their roles, click Program under 'Manage Breeding' on the left, expland Admin Menu for Program, and then click 'Members'.
In 'Member's tab, if you start typing a database userid in the 'Non-member' field under the Add Members section, it will autocomplete the field. Choose appropriate permission for the new member and click 'Add Member' button.
Entering Data into Templates
Entering Data into Templates sookEntering Data into Templates
This section describes in detail how to enter data in BIMS templates.
Template Overview
Template Overview sookTemplate Overview
To import data into BIMS, the data needs to be in the BIMS templates. Phenotype data can also be imported to BIMS using exported files from Field Book or BrAPI, but data other than phenotype, such as contact, dataset, site, cross, progeny, and accession, need to be loaded using templates.
Data templates are available for download in the Template list under the Data Import section on the left-hand accordion menu. In the Data Templates tab, users can view the description of each template and download the templates. Data templates are Excel files that contain metadata types as headings where users can enter data to be loaded into the database. In the current version of BIMS, templates are available for each of the following data types: property, contact, dataset, trait descriptor, site, accession, cross, progeny, marker, haplotype block, phenotype, genotype, haplotype, and image. There can be multiple templates for some data types.
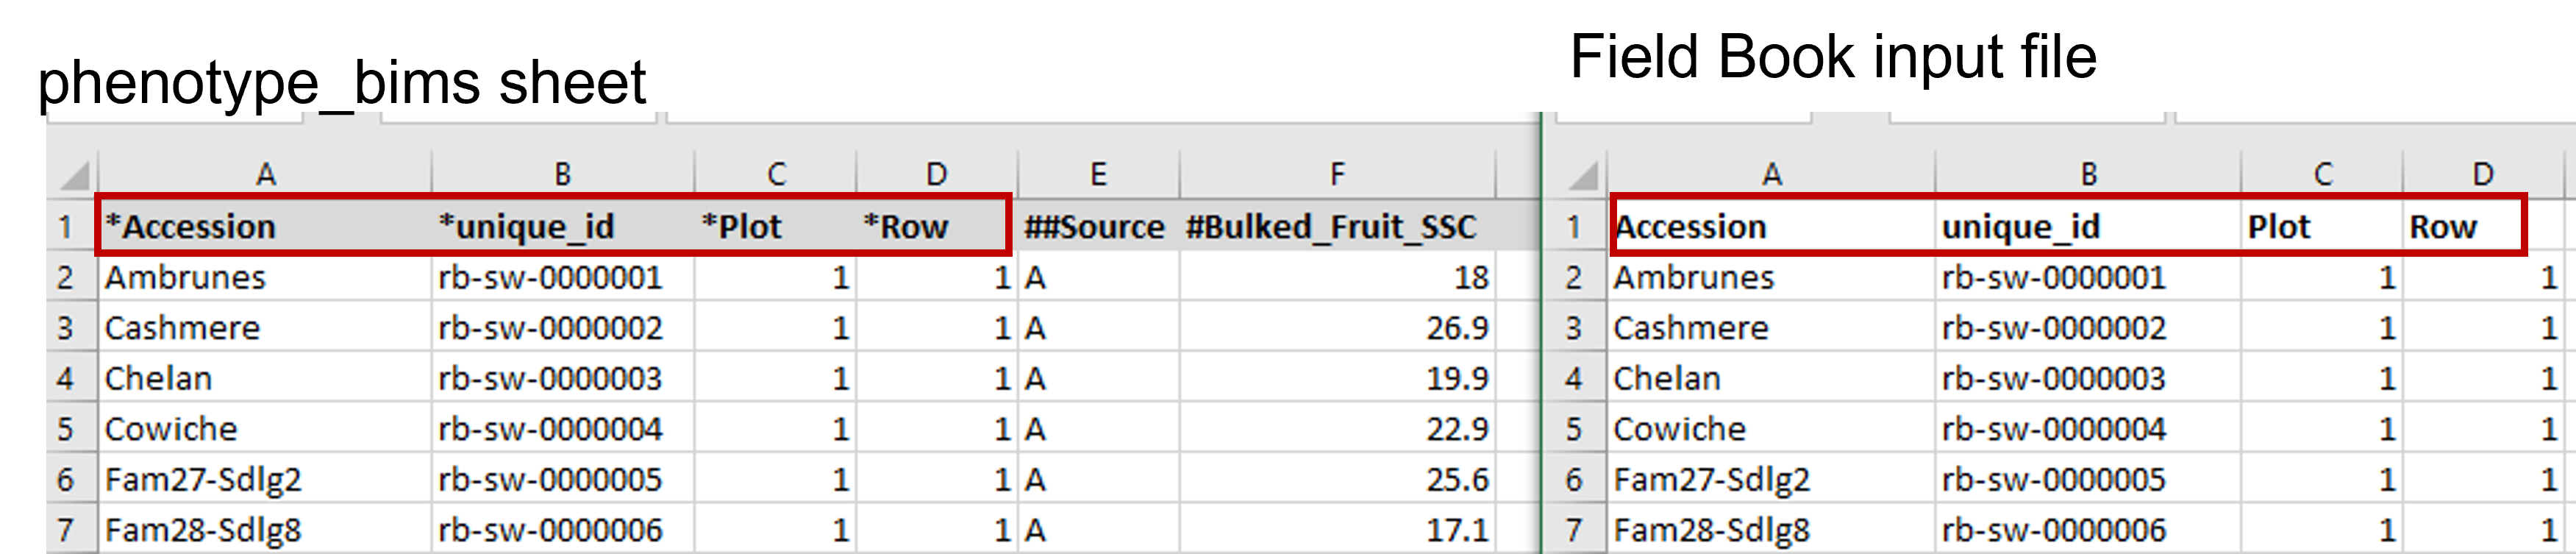
As explained in Creating a New Breeding Program section of the BIMS manual, users can choose to change the names of the required column names for Field Book App and the phenotype templates (phenotype_long_form_bims or phenotype_bims) of the template. This can be done when users create a new breeding program or in the BIMS/Field Book section of the configuration panel shown below. The change made here will be reflected in the template that the user downloads.
The same names of the four required columns should be used when preparing an input file for Field Book App. The figure below shows matching column names in the Field Book App input file and phenotype_bims template.
Different types of columns
In each template, the required columns have * as a prefix as shown above. Other columns can be used to enter data or left empty. Columns that are not specified in the templates will be ignored when loading data. Users can, however, make custom columns in some of the templates which should be specified in the property_bims and have ## as a prefix of the column name as shown above. In phenotype_bims, trait descriptor names are entered as column headings, and they need to have # as a prefix as shown above. The trait descriptor names need to match an entry in the descriptor_name column in the descriptor_bims if they have not been loaded to BIMS already. In the genotype_snp_wide_form_bims, marker names are entered as column headings, and they need to have $ as a prefix. The marker names need to match marker_name in the marker_bims if they have not been loaded to BIMS already. For some columns, only one of the specified terms can be entered as valid data. For example, valid entries for the type column in contact_bims are person, company, database, institution, lab, and organization. Those columns and their valid entries will be described in each data template section.
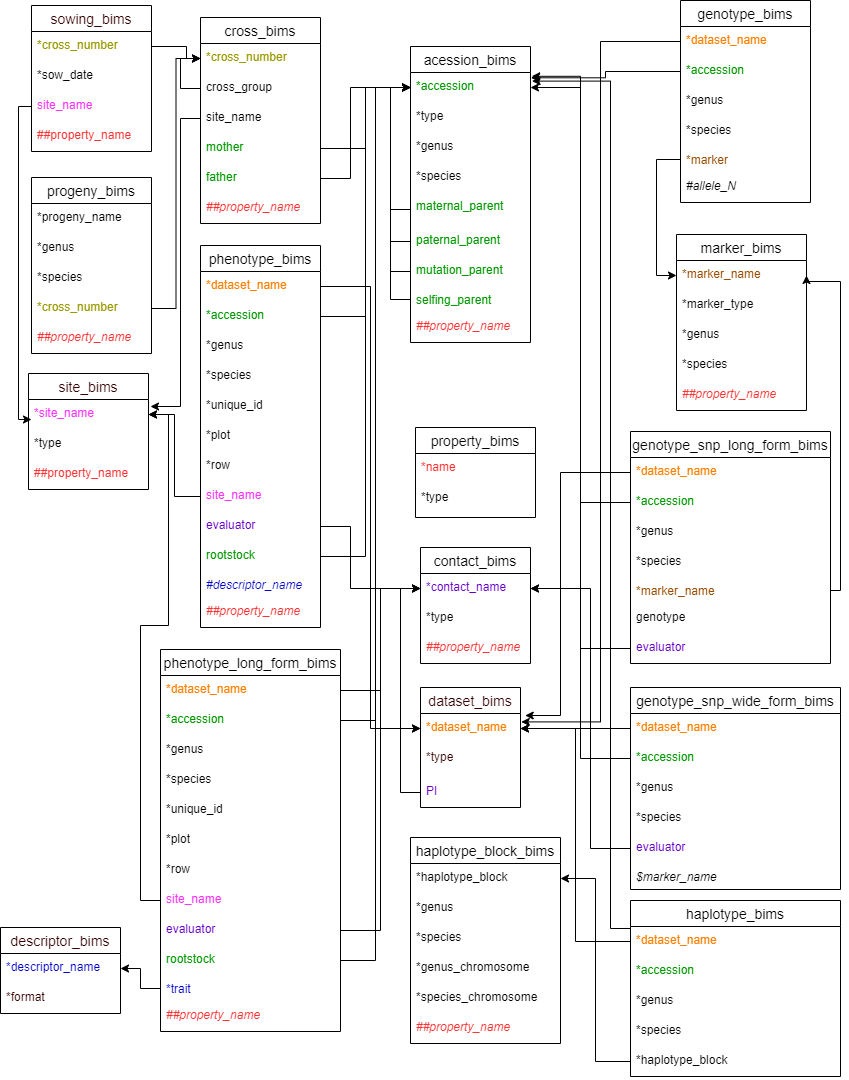
BIMS template diagram
BIMS template diagram sookBIMS template diagram
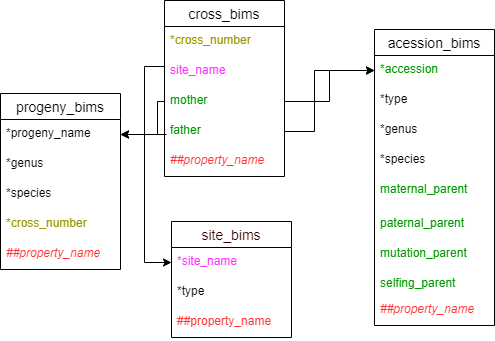
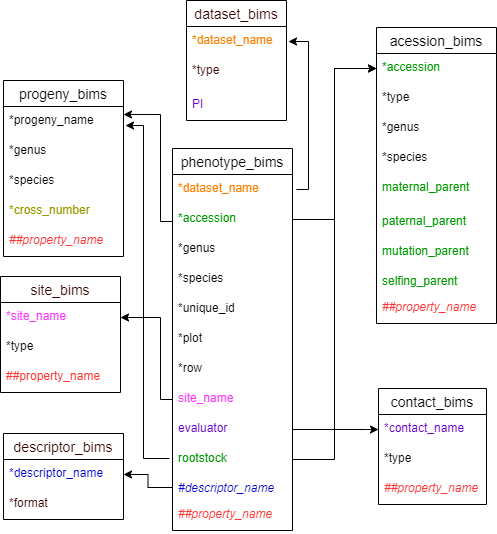
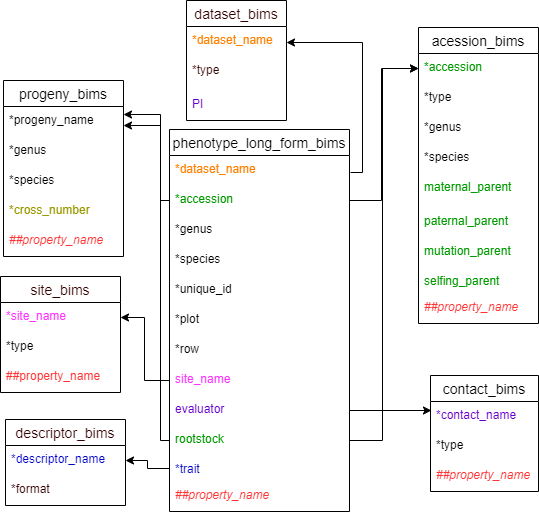
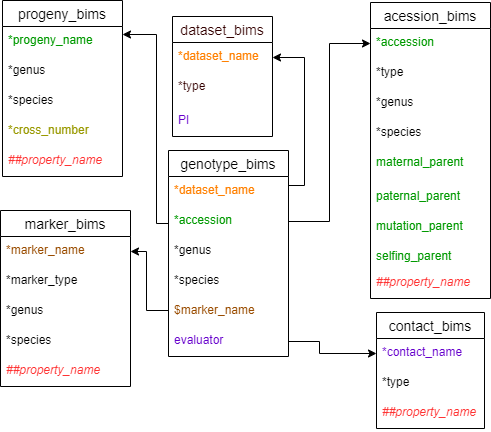
Data in some of the columns refer to data in other templates or data already entered to BIMS so the data needs to match exactly. For example, phenotype_bims has the dataset_name column and the data entry should match the data in the dataset_name column of the dataset_bims. Once an entry in the dataset_bims is loaded to BIMS or the dataset names are entered using the BIMS interface, users can enter it in phenotype_bims without entering the same entry again in dataset_bims. The data types that need to be entered to BIMS either using the template or the BIMS interface before being used in other templates include dataset, accession, trait descriptor, and site. Contact, custom property, marker, and haplotype block data can also be used in other templates and their detailed data need to be entered to BIMS using contact_bims, property_bims, marker_bims, and haplotype_bims. Entries in property_bims, descriptor_bims, and marker_bims can be used as column headings in some of the other templates and they need to have a special prefix when used as headings; # for descriptor_name, ## for property_name, and $ for marker_name.
Figure below shows all the templates available in BIMS with column names that are either required or have relationships with other columns. Matching column names have the same color and they are connected by an arrow. Arrows between property_name columns were omitted to make the diagram less busy. Progeny_name in progeny_bims can also be used, as well as accession in accession_bims, in entering accession information in other templates. However the arrows to the progeny_name in progeny_bims were skipped to make the diagram simpler. Matching columns in various templates do not always have the same column headings. For example, the evaluator column in phenotype_bims refers to a contact_name in contact_bims.
Property template
Property template sookProperty template
Users can make custom columns in some of the templates and those custom columns should be specified in the property_bims. Templates that can have custom columns include contact_bims, cross_bims, sowing_bims, site_bims, accession_bims, progeny_bims, marker_bims, haplotype_block_bims, phenotype_bims, genotype_snp_wide_form_bims, haplotype_block_bims, and marker_bims.
Below are descriptions for each of the columns in property_bims. Columns with * are required. Type is a validated column.
- *name: name of the property
- *type: type of the property. Valid data entries are contact, cross, sowing, site, accession, progeny, marker, haplotype_block, phenotype, snp, and haplotype_block.
- alias: alias for the property
- Definition: definition of the custom property
Different types of columns
In each template, the required columns have * as a prefix as shown above. Other columns can be used to enter data or left empty. Columns that are not specified in the templates will be ignored when loading data. Users can, however, make custom columns in some of the templates which should be specified in the property_bims and have ## as a prefix of the column name as shown above. In phenotype_bims, trait descriptor names are entered as column headings, and they need to have # as a prefix as shown above. The trait descriptor names need to match an entry in the descriptor_name column in the descriptor_bims if they have not been loaded to BIMS already. In the genotype_snp_wide_form_bims, marker names are entered as column headings, and they need to have $ as a prefix. The marker names need to match marker_name in the marker_bims if they have not been loaded to BIMS already. For some columns, only one of the specified terms can be entered as valid data. For example, valid entries for the type column in contact_bims are person, company, database, institution, lab, and organization. Those columns and their valid entries will be described in each data template section
Dataset template
Dataset template sookDataset template
Users can define a dataset in any way they want to, but a dataset in breeding data typically refers to a trial. For phenotyping data, a set of data can belong to the same dataset as long as a unique ID in the phenotype templates gives a single phenotype value per descriptor. For users who use the Field Book App for phenotype collection, a single input file for the app, with a unique ID in each row, typically corresponds to a single dataset. Since only one phenotypic value can be given to the same unique ID in the Field Book App input file, users can decide to make two different input files and save them as two different datasets to record phenotypic values collected by two different people. For genotyping data, a set of data can belong to the same dataset as long as an accession gives a single genotype per marker. The dataset template can be filled with other templates, and all the template sheets can be put in the same Excel file and uploaded together.
Below are descriptions for each of the columns in dataset_bims. Columns with * are required. Type and sub_type are validated columns.
- *dataset_name: name of the dataset
- *type: type of the dataset. Valid data entries are phenotype and genotype.
- sub_type: subtype of the dataset. Valid subtype of genotype dataset includes SSR, SNP and haplotype.
- description: general description of the dataset
- PI: main breeder of the program or principal Investigator of the dataset for collaborative projects. It should match an entry in the contact_name column of the contact_bims.
- ##property_name: user specified custom columns that should have ## as a prefix. It should match an entry in propery_bims with the type specified as dataset.
Contact template
Contact template sookContact template
Contact_bims template is used to enter data related to a person or an institution. The contact entry can then be used in other templates such as phenotype_bims and accession_bims. In phenotype_bims, for example, there is a column called collector and users can enter one of the entries in contact_bims. In accession_bims, there is a column called germplasm_center and users can use one of the entries in contact_bims.
Below are descriptions for each of the columns in contact_bims. Columns with * are required. Type is a validated column.
- * contact_name: name of the contact. For contact_name of a person, it is recommended to enter full name (eg. John M. Smith).
- alias: any alias of the contact
- * type: type of the contact. Valid entries are person, company, database, institution, lab, and organization.
- first_name: First name of the person
- last_name: Last name of the person
- ORCID: ORCID (Open Researcher and Contributor ID) which is a nonproprietary alphanumeric code to uniquely identify scientific and other academic authors and contributors.
- institution: name of the institution the person belongs to. This doesn’t have to be a separate entry in contact_bims.
- lab: name of the lab the person belongs to. This doesn’t have to be a separate entry in contact_bims.
- address: address of the contact
- email: email address of the contact
- phone: phone number of the contact
- fax: fax number of the contact
- title: job title of the person
- state: state of the contact
- country: country of the contact
- source: source of the data when the contact information is obtained from other databases
- last_update: date of the last update
- url: URL of homepage of the contact
- comments: any comments of the contact
- keywords: a maximum of 5 keywords that best describe the person's area of work
- ##property_name: user specified custom columns that should have ## as a prefix. It should match an entry in propery_bims with the type specified as contact.
Site template
Site template sookSite template
Site_bims is used to collect the data of the location of the crop.
Below are descriptions for each of the columns in site_bims. Columns with * are required. Type is a validated column.
- * site_name: name of the site
- site_long_name: long name of the site.
- * type: type of the location. Valid entries are greenhouse, open field, orchard, seedling block, and retail.
- latitude : the decimal latitude coordinate of the georeference, using positive and negative signs to indicate N and S, respectively.
- longitude: the decimal longitude coordinate of the georeference, using positive and negative signs to indicate E and W, respectively.
- altitude : the altitude (elevation) of the location in meters. If the altitude is only known as a range, enter the average.
- geodetic_datum: the geodetic system on which the geo-reference coordinates are based. For geo-references measured between 1984 and 2010, this will typically be WGS84.
- country: country of the location
- state: state of the location
- region: region of the location
- address: the entire address except the country
- comments: any further comments on the site
- ##property_name: user specified custom columns that should have ## as a prefix. It should match an entry in propery_bims with the type specified as site.
Descriptor template
Descriptor template sookDescriptor template
Descriptor_bims is used to enter trait descriptors used in phenotyping. To support the use of Field Book App, the format of the trait descriptors are validated to be the same as those in Field Book App.
Below are descriptions for each of the columns in descriptor_bims. Columns with * are required. Format is a validated column.
- *descriptor_name: any trait descriptor that a breeder uses in their own program. These descriptors can be used as column heads in phenotype_bims, with a '#' prefix.
- alias: alias of the descriptor.
- *format: The format of the descriptor. Valid entries are audio, boolean, categorical, counter, date, disease_rating, location, multicat, numeric, percent, photo, and text.
- valid format for date type: d-m-yyyy, dd-mm-yyyy, yyyy-m-d, yyyy-mm-dd, d/m/yyyy, dd/mm/yyyy, yyyy/m/d, or yyyy/mm/dd. Note year should be in four digits.
- trait_name: Breeders normally leave this column empty. This is only to specify crop trait ontology terms for specific reasons.
- categories: The values of the categorical descriptor separated by '/' (eg. red/white/pink). Only the categories described here can be entered into BIMS as valid values of categorical descriptors used in phenotype_bims and phenotype_long_form_bims.
- data_unit: unit for the trait descriptor
- minimum: the minimum value of the descriptor
- maximum: the maximum value of the descriptor
- defaultValue: the default value of the descriptor
- definition: definition of the descriptor
Accession template
Accession template sookAccession template
Accession_bims is used to enter data of accessions in the program. As described in the Template Overview section of the BIMS manual, if users change ‘accession’ to something else (i.e. stock), the names of the tab and the column downloaded in their BIMS program will reflect that change. For example if they change accession to stock, the name of the tab will change from accession_bims to stock_bims and the name of the column will change from accession to stock.
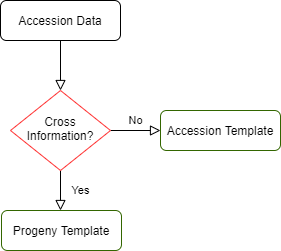
Accessions are subjects that are used in phenotyping, genotyping, and crossing. This data can be entered either in accession_bims or progeny_bims. As shown below, if the accession is from a specific cross and it has associated cross information, the data can be entered in progeny_bims. Otherwise the accession data can be entered in accession_bims.
Below are descriptions for each of the columns in accession_bims. Columns with * are required. Type is a validated column.
- * accession: name of accession. The most important ID or name (unique and stable at least within the breeding program) should be in this column.
- * type: type of the accession. Valid options are cultivar, breeding_research_material, and wild_unimproved for an individual accession. Population can be used for a group of individuals.
- * genus: genus of the accession
- * species: species name of the accession. Enter ‘sp.’ when the actual species name cannot or need not be specified. Enter the plural form ‘spp.’ when referring to several species within the genus. Please check if your species exists in our database by going to Data Import-Data Lookup-Organisms in BIMS. If they do not exist, please contact us.
- GRIN_ID: Accession ID (ACID) in the GRIN database, if it is known. Multiple GRIN ID, separated by comma, can be added.
- subspecies: subspecies name.
- secondary_ID: alternate ID or name that is commonly used to refer to the entry. This represents an alias of importance and it does not have to be entered in the alias column separately.
- maternal_parent: accession name of the maternal parent. This needs to be entered as a separate row in accession_bims.
- paternal_parent: accession name of the paternal parent. This needs to be entered as a separate row in accession_bims.
- mutation_parent: name of the accession used in the mutant breeding. This needs to be entered as a separate row in accession_bims.
- selfing_parent: name of the accession used in self-fertilization. This needs to be entered as a separate row in accession_bims.
- alias: a concatenation of all other less commonly used names or designations for the entry. The format is 'Alias type1:Alias1; Alias type2:Alias2' (e.g. Collector:98HT-227; Site:W6 21306). When there is no specific type for aliases, just write the aliases without the specific type (e.g. ABC-1; 21306).
- cultivar: cultivar name if It is a named cultivated variety. It can be the same as the accession name.
- pedigree: any additional pedigree information when the exact parents are not known, or any additional information beyond just parents (e.g. Red-fruit sport of Jonathan, Pyrus sp. X Cydonia sp., etc).
- origin_detail: detailed description of the origin of the accession
- origin_country The original country for the variety (especially for wild variety).
- population_size: only for type 'population'.
- germplasm_center: germplasm center or lab where the accession is distributed.
- description: any description for the accession
- comments: any comments on the accession
- ##property_name: user specified custom columns that should have ## as a prefix. It should match an entry in propery_bims with the type specified as accession.
Cross template
Cross template sookCross template
Cross_bims is used to enter data related to a cross that is performed in the breeding program. Users can choose to treat cross_number as a specific parental set, or a specific cross done on a certain date.
Below are descriptions for each of the columns in cross_bims. Columns with * are required.
- site_name: site information where the cross was done. It should match an entry in the site_name column of the site_bims template.
- * cross_number: ID number or name for a specific cross.
- mother : name of the seed parent for the cross. It should match an entry in the accession_name column of the accession template or progeny_name in the progeny template.
- mother_location: location details for the mother of this cross
- father: name of the pollen parent for the cross. It should match an entry in the accession_name column of the accession_bims or progeny_name in the progeny_bims.
- father_location: location details for the father of this cross
- cross_date: date for the cross
- comments: any comments on the cross
- ##property_name: user specified custom columns that should have ## as a prefix. It should match an entry in propery_bims with the type specified as cross.
Package template
Package template sookPackage template
Package_bims is used to keep track of the number of seeds that are sown. Breeders can sow seeds from the same cross multiple times and this template can be used to record how many seeds have been sown at a particular date. Seeds from the same cross may be put into one or multiple seed packages.
Below are descriptions for each of the columns in sowing_bims. Columns with * are required.
- *package_number: ID number or name of a seed package
- cross_number: ID number or name of a cross where the seed came from. It should match an entry in the cross_number column of the cross_bims template.
- cross_date: when the cross_number represents a parental set that have been done multiple times, a specific cross date for the package can be entered
- * sow_date: The date of the sowing
- num_seeds_sown: the number of the seeds sown
- notes: Any notes on the sowing
- ##property_name: user specified custom columns that should have ## as a prefix. It should match an entry in propery_bims with the type specified as sowing.
Progeny template
Progeny template sookProgeny template
Progeny_bims is used to enter accession data with cross information. The accession data that are entered in the progeny_bims do not need to be entered again in accession_bims, and the entry in progeny_name can be used in accession or rootstock columns in other templates.
Below are descriptions for each of the columns in progeny_bims. Columns with * are required.
- * progeny_name: name of the progeny
- alias: Multiple aliases of the progeny can be entered here. The format is 'alias type1:alias1; alias type2:alias2'. When there is no specific type for an alias, just write the aliases without the specific type.
- * genus: genus of the progeny
- * species: species name of the progeny. Enter ‘sp.’ when the actual species name cannot or need not be specified. Enter the plural form ‘spp.’ when referring to several species within the genus.
- * cross_number: Specific ID of a cross that generated the progeny; Must also be found in the cross_bims template.
- description: Any other descriptive data about the selection or seedling.
- comments: Comments on the progeny.
- advanced_to_2nd: Yes if it is advanced to 2nd phase, No otherwise. Leave it empty if the selection decision is yet to be made.
- advanced_to_3rd: Yes if it is advanced to 3rd phase, No otherwise.
- advanced_to_4th: Yes if it is advanced to 4th phase, No otherwise.
- ##property_name: user specified custom columns that should have ## as a prefix. It should match an entry in propery_bims.
Phenotype template
Phenotype template sookPhenotype template
There are two templates that can be used to enter phenotype data. Two templates are the same except that descriptors are entered as column headings in phenotype_bims and as data in the trait column in phenotype_long_form_bims. As a result, there will be one row per each sample for phenotyping in phenotype_bims and there will be multiple rows per each sample for phenotyping in phenotype_long_form_bims as shown in the diagram below. As shown below, the descriptors in phenotype_bims template should have # prefix.
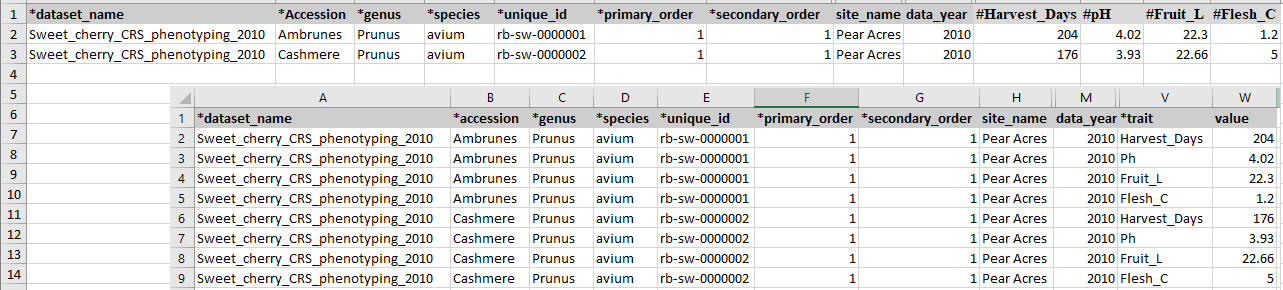
As explained in the Creating a New Breeding Program section, the names of the four columns, accession, unique_id, primary_order, and secondary_order, can be changed and the downloaded template will reflect the change. The unique_id represents a unique phenotyping sample and it should be unique within the dataset name. The columns primary_order and secondary_order are for the plot design such as plot and row. If those are not relevant for the program, breeders can just add the same number for each row as shown in the figure above. If there are any data for specific samples, such as specific sample treatment, users can specify it in the property_bims and use it as a column heading with ## as a prefix.
Below are descriptions for each of the columns in phenotype_bims. Columns with * are required.
- * dataset_name: name of the phenotyping dataset. It should match a 'dataset_name' column entry in the dataset_bims.
- * accession: ID of the accession that has been phenotyped. It should match an 'accession' column entry in accession_bims or ‘progeny_name' column entry in progeny_bims.
- * genus: genus to which the accession belongs to.
- * species: species name. Enter 'sp.' to represent one unknown species, 'spp.' to represent multiple unknown species.
- * unique_id: Unique ID of the sample. It should be unique within the dataset.
- * primary_order: The primary order of a sample
- * secondary_order: The secondary order of a sample
- clone_ID: ID of a specific clone if available (e.g. individual tree).
- evaluator: person who did the phenotyping. Multiple persons can be entered with ';' in between. It should match the contact_name of contact_bims.
- site_name: site information where the accession for the phenotyping is planted. It should match 'site_name' in the site_bims.
- rootstock: name of the rootstock in tree breeding program if the scion is being phenotyped. It should match an 'accession' column of accession_bims.
- plant_date: date of the planting
- data_year: phenotyping year if only year is known
- evaluation_date: date of phenotype evaluation
- pick_date: date of the sample collection if the collection is done on a different date than the phenotype evaluation.
- previous_entry: accession of the previous entry if the name of the accession has been changed after initial trials.
- barcode: barcode
- fiber_pkg: group of samples for phenotyping, can contain samples from multiple germplasm (used mainly by cotton breeders).
- storage_time: time between collection and phenotyping.
- storage_regime: the condition of sample storage between the collection and phenotyping.
- comments: any comments for the phenotyping.
- #descriptor_name: special columns (#) : The name of the marker is entered as a column heading with ‘#’ as a prefix. It should match the ‘descriptor_name’ column entry in the descriptor_bims. The phenotypic values are entered in the cell.
- ##property_name: user specified custom columns that should have ## as a prefix. It should match an entry in propery_bims with the type specified as phenotype
Diagram below shows the diagram of phenotype_bims along with the other templates where the columns in phenotype_bims should match. Accession and rootstock can match either accession in accession_bims or progeny_name in probeny_bims. Descritor_names in descriptor_bims can be used as column headings in phenotype_bims with # prefix.
Below are descriptions for each of the columns in phenotype_long_form_bims. Columns with * are required.
- * dataset_name: name of the phenotyping dataset. It should match a 'dataset_name' column entry in the dataset_bims.
- * accession: ID of the accession that has been phenotyped. It should match an 'accession' column entry in accession_bims or ‘progeny_name' column entry in progeny_bims.
- * genus: genus to which the accession belongs to.
- * species: species name. Enter 'sp.' to represent one unknown species, 'spp.' to represent multiple unknown species.
- * unique_id: Unique ID of the sample. It should be unique within the dataset.
- * primary_order: The primary order of a sample
- * secondary_order: The secondary order of a sample
- clone_ID: ID of a specific clone if available (e.g. individual tree).
- evaluator: person who did the phenotyping. Multiple persons can be entered with ';' in between. It should match the contact_name of contact_bims.
- site_name: site information where the accession for the phenotyping is planted. It should match 'site_name' in the site_bims.
- rootstock: name of the rootstock in tree breeding program if the scion is being phenotyped. It should match an 'accession' column of accession_bims.
- plant_date: date of the planting
- data_year: phenotyping year if only year is known
- evaluation_date: date of phenotype evaluation
- pick_date: date of the sample collection if the collection is done on a different date than the phenotype evaluation.
- previous_entry: accession of the previous entry if the name of the accession has been changed after initial trials.
- barcode: barcode
- fiber_pkg: group of samples for phenotyping, can contain samples from multiple germplasm (used mainly by cotton breeders).
- storage_time: time between collection and phenotyping.
- storage_regime: the condition of sample storage between the collection and phenotyping.
- comments: any comments for the phenotyping.
- *trait: name of the trait descriptor
- value: The phenotypic value
- ##property_name: user specified custom columns that should have ## as a prefix. It should match an entry in propery_bims with the type specified as phenotype
Diagram below shows the phenotype_long_form_bims template along with the other templates where the columns in phenotype_long_form_bims should match. Accession and rootstock can match either accession in accession_bims or progeny_name in probeny_bims. Descritor_names in descriptor_bims can be used as data in the trait column.
SNP genotype template
SNP genotype template sookSNP genotype template
As with the phenotype data, there are two templates that can be used to enter SNP genotype data. Two templates are the same except that marker names are entered as column headings in genotype_snp_wide_form_bims and as data in the marker_name column in genotype_snp_long_form_bims. As a result, there will be one row per each accession in genotype_snp_wide_form_bims and there will be multiple rows per each accession in genotype_snp_long_form_bims as shown in the diagram below. As shown below, the marker names in genotype_snp_wide_form_bims should have a $ prefix.
| *dataset_name | *Accession | *genus | *species | *marker_name | genotype | evaluator | institutional_name | sample_name |
| DC_2015_dataset | Grendadier | Malus | x domestica | AFL1 | T|G | G001 | ||
| DC_2015_dataset | Beacon | Malus | x domestica | AFL1 | G|G | B0001 | ||
| DC_2015_dataset | Grendadier | Malus | x domestica | AFL2 | T|T | G001 | ||
| DC_2015_dataset | Beacon | Malus | x domestica | AFL2 | T|C | B0001 | ||
| DC_2015_dataset | Grendadier | Malus | x domestica | GDsnp00002 | T|G | G001 | ||
| DC_2015_dataset | Beacon | Malus | x domestica | GDsnp00002 | T|T | B0001 |
| *dataset_name | *Accession | *genus | *species | $AFL1 | $AFL2 | $GDsnp00002 |
| DC_2015_dataset | Grendadier | Malus | x domestica | T|G | T|T | T|G |
| DC_2015_dataset | Beacon | Malus | x domestica | G|G | T|C | T|T |
Below are descriptions for each of the columns in genotype_snp_wide_form_bims. Columns with * are required.
- * dataset_name: name of the phenotyping dataset. It should match a 'dataset_name' column entry in the dataset_bims.
- * accession: ID of the accession that has been phenotyped. It should match an 'accession' column entry in accession_bims or ‘progeny_name' column entry in progeny_bims.
- * genus: genus to which the accession belongs to.
- * species: species name. Enter 'sp.' to represent one unknown species, 'spp.' to represent multiple unknown species.
- $ marker_name: The name of the marker is entered as a column heading with ‘$’ as a prefix. It should match the ‘marker_name’ column entry in marker_bims.
- The alleles are entered in the cell with '|' in between (e.g. A|T)
- empty cell or '-' means missing data
- '$' means null, some people use '$$' for confirmed null (confirmed using parental data), and some just use 'null' instead of '$'
- A missing value means we don't know what the target nucleotide flanking the probe sequence is whereas a null allele means that the probe sequence is either absent in the genome or that it is so different that the probe does not bind properly. Thus, a missing value represents data not available whereas a null allele is an actual value.
- The alleles are entered in the cell with '|' in between (e.g. A|T)
- evaluator: Person who did the genotyping. Multiple persons can be entered with ';' in between. It should match the contact_name'of the contact_bims.
Diagram below shows the diagram of genotype_snp_wide_form_bims along with the other templates where the columns in genotype_snp_wide_form_bims should match. Accession can match either accession in accession_bims or progeny_name in probeny_bims. The data in the marker_name column in marker_bims can be used as column headings in genotype_snp_wide_form_bims with $ prefix.
Below are descriptions for each of the columns in genotype_snp_long_form_bims. Columns with * are required.
- * dataset_name: name of the genotyping dataset. It should match a 'dataset_name' column entry in the dataset_bims.
- * accession: ID of the accession that has been phenotyped. It should match an 'accession' column entry in accession_bims or ‘progeny_name' column entry in progeny_bims.
- * genus: genus to which the accession belongs to.
- * species: species name. Enter 'sp.' to represent one unknown species, 'spp.' to represent multiple unknown species.
- * marker_name: The name of the marker. It should match the ‘marker_name’ column entry in marker_bims.
- genotype: Type the alleles with '|' in between (e.g. A|T)
- empty cell or '-' means missing data
- '$' means null, some people use '$$' for confirmed null (confirmed using parental data), and some just use 'null' instead of '$'
- A missing value means we don't know what the target nucleotide flanking the probe sequence is whereas a null allele means that the probe sequence are either absent in the genome or that it is so different that the probe does not bind properly. Thus, a missing value represents data not available whereas a null allele is an actual value.
- evaluator: Person who did the genotyping. Multiple persons can be entered with ';' in between. It should match the contact_name'of the contact_bims template.
Diagram below shows the diagram of the genotype_snp_long_form_bims along with the other templates where the columns in genotype_snp_long_form_bims should match. Accession can match either accession in accession_bims or progeny_name in probeny_bims.
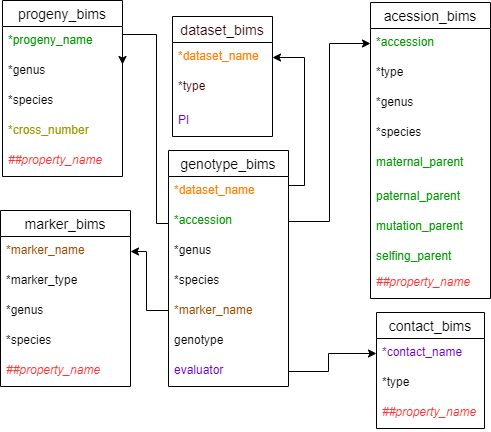
Image Templates
Image Templates sookImage Templates
There are four templates where the metadata for image files can be entered depending on the types of images. Types of images are explained in 'Importing Image Data' page. These templates need to be loaded before the actual zipped image files are loaded. If the image files are sent by BrAPI from Field Book app, the templates do not need to be loaded. Details of the columns for each of the templates can be found in Data Import-Excel Data Templates-Template list. Just click 'view' in Details column of the table.
- sample_image_bims
- accession_image_bims
- descriptor_image_bims
- marker_image_bims
Marker template
Marker template sookMarker template
The marker_bims template is used to enter marker data. Data for markers of any type can be entered.
Below are descriptions for each of the columns in marker_bims. Columns with * are required.
- dataset_name: name of the genotyping dataset. It should match a 'dataset_name' column entry in the dataset_bims template. This is used only when users need to keep the record of the dataset name for which a particular marker name was used.
- * marker_name: name of the marker.
- * marker_type: marker type such as SSR and SNP.
- * genus: The genus name of the organism from which the marker was developed.
- * species: The species name of the organism from which the marker was developed. Enter 'sp.' to represent one unknown species, 'spp.' to represent multiple unknown species.
- Alias: other names used for the marker. Multiple aliases, separated by a semicolon (;), can be added.
- SS_ID: the submitted SNPs (SS) number given by NCBI.
- RS_ID: the refSNP (RS) number given by NCBI.
- comments: Any comments about the marker.
- ##property_name: user specified custom columns that should have ## as a prefix. It should match an entry in propery_bims with the type specified as marker
- ###property_name: custom properties that are associated with markers in the specific dataset can be entered by three pound signs (###)
Match marker template
Match marker template sookMatch marker template
The match_marker_bims template is used to merge marker information in the community database and the private database in BIMS. Users can enter the marker names in the community database and the matching marker names in their BIMS program to access other information on the markers such as genome positions and primer sequences stored in the community database.
Below are descriptions for each of the columns in match_marker_bims. Columns with * are required.
- * BIMS: Marker name in BIMS.
- * Chado: Marker name in Chado (community database).
Importing Data Using Templates
Importing Data Using Templates sookImporting Data Using Templates
To import data into BIMS, the data need to be in BIMS templates. Phenotype data can either needs to be files exported from Field Book or data entered into the BIMS templates. To download the BIMS templates, click on the "Data Import" section of the left-hand accordion menu and then click on "Template List" (Fig. 20A). You will then see the "Data Templates" tab that has information about each template and links to download the template (Fig. 20B). You can also download all the templates as a single Excel file by clicking below (Fig. 20C).
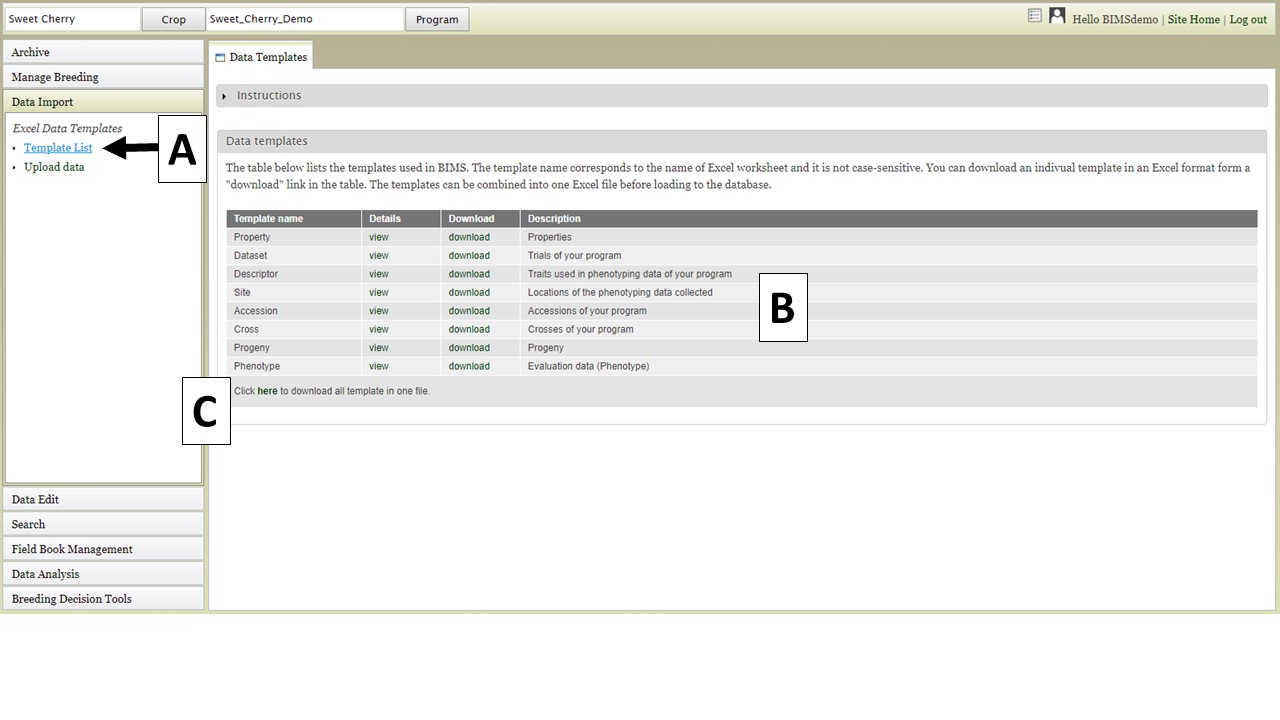 Figure 20. Downloading BIMS data templates.
To upload data files, click on the "Upload data" link (Fig. 21A) under the "Data Import" section and the "Upload Data" tab will open. Then, under the "Upload data by Excel template" section on the right side of the "Upload Data" tab, select the data file and click "Upload" (Fig. 21B). Enter a file description if desired, and once the file has uploaded, click "Submit". The file name will then appear in the "Uploaded Files" section (Fig. 21C).
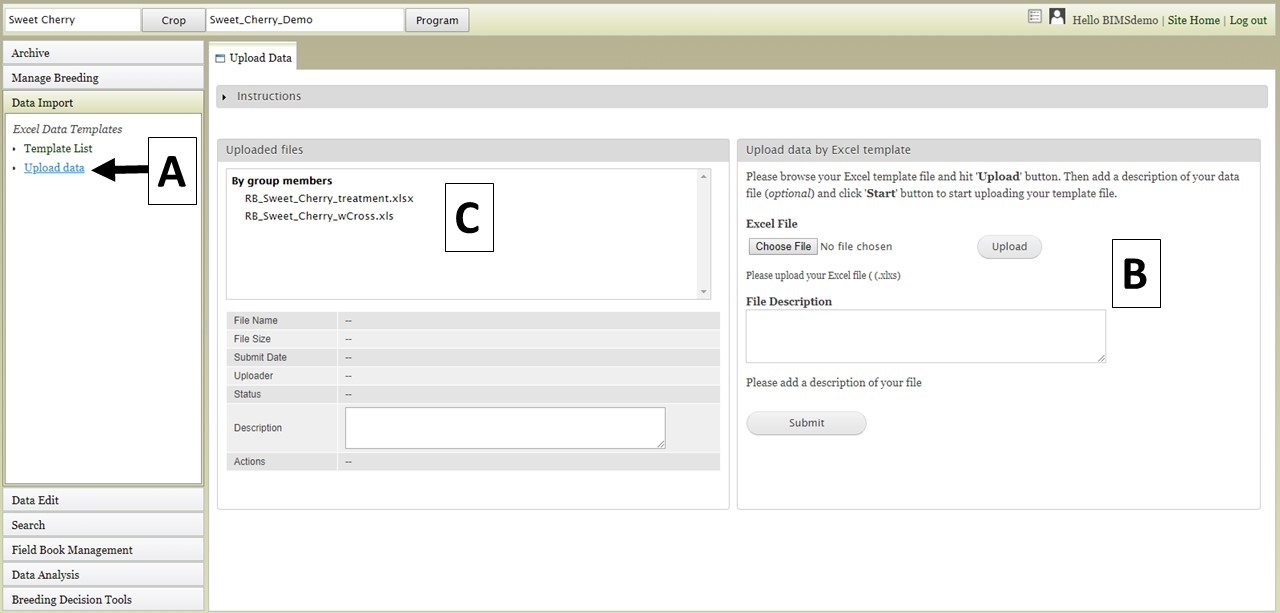
Figure 21. Upload Data tab in BIMS.
To view the progress of an upload job, click on the file name under "Uploaded files" (Fig. 22A). Summary information about the file will appear below and then click the "View" button (Fig. 22B). The "Upload Job" tab appears and will show the "Job Details" table (Fig. 22C). On the table you can see the job progress. If the job is still running, you can click the "Refresh" button to update the job progress.
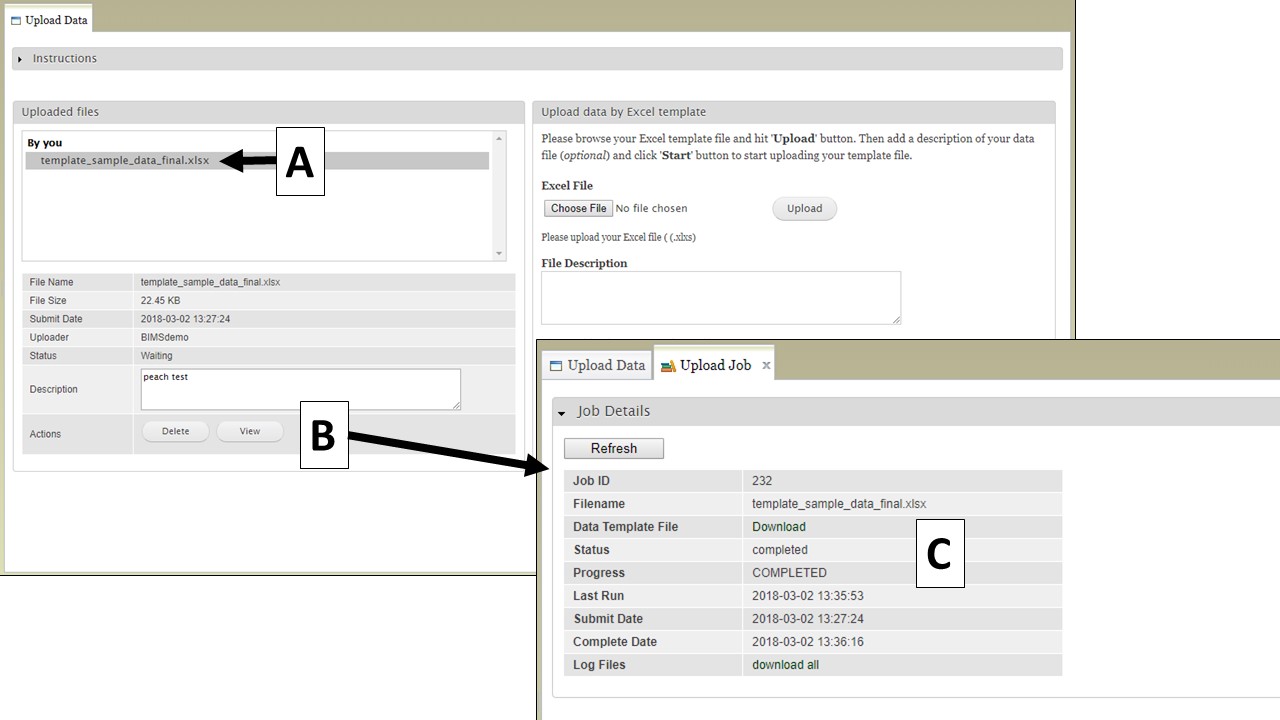
Figure 22. How to view upload job progress.
BIMS also provides links to log files on the "Upload Job" tab. When a job successfully loads, there are three types of logs: New Data Logs, Warning Logs, and Duplicate Logs. To view the logs, first expand the log type section you want to view and then click on "view" (Fig. 23A) to see the log messages (Fig. 23B). New Data Logs describe the new data that was loaded. Warning Logs indicate if any data was skipped due to incorrect column headers or typos, but this data was not critical for BIMS to load data so the job still completed. It is recommended that you look at the Warning Logs to make sure data was not omitted accidently. The Duplicate Logs display what data was a duplication of data already present in BIMS.

Figure 23. BIMS upload job logs.
But what happens if there is an error in the data that causes the upload job to fail? If an upload job fails, you will see "FAILED" under the job progress (Fig. 24A). An Error Log section will also be available on the "Uploading Job" tab. Expand the Error Log section and click on "view" (Fig. 24B) to see the error messages (Fig. 24C). Use the Error Log information to correct the original file.
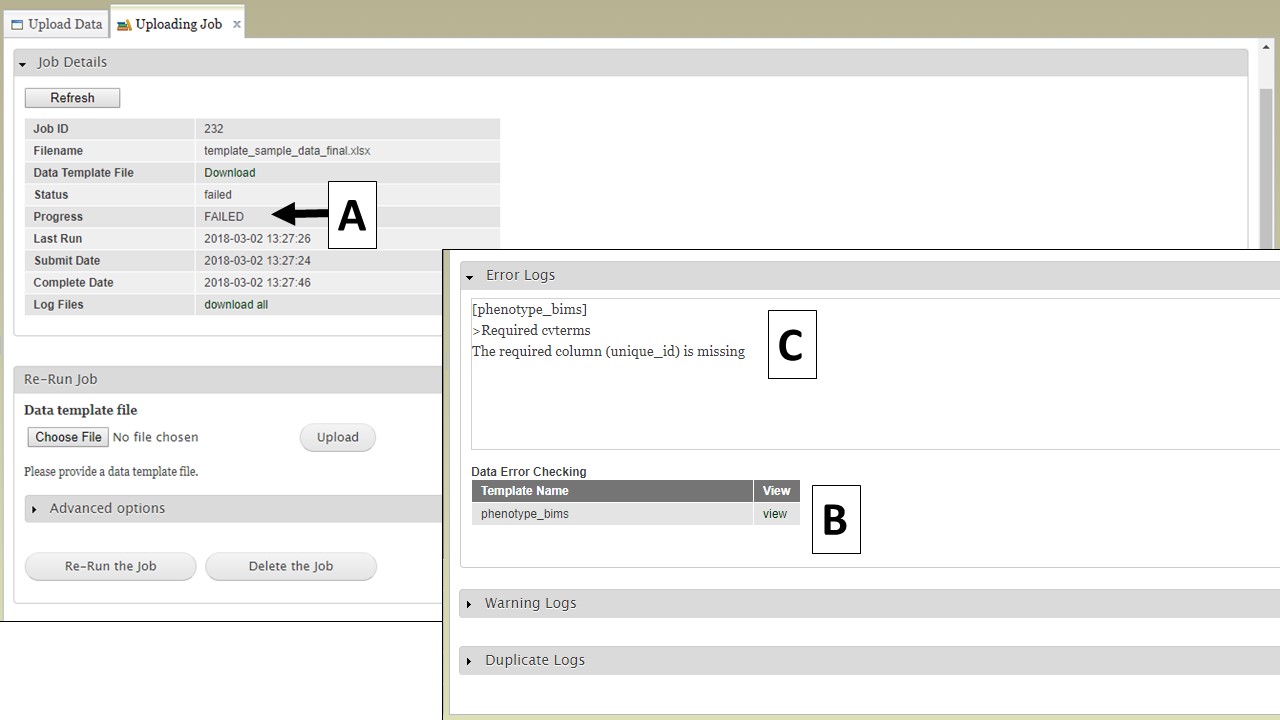
Figure 24. Failed jobs and the Error Logs
To re-run a failed job, use the "Re-Run Job" section on the "Uploading Job" tab. Select and upload the revised file (Fig. 25A) and then click the "Re-Run the Job" button (Fig. 25B). To monitor the re-run progress, click on the "Refresh" button (Fig. 25C). If the error was something that you did online not in the template, for example you had a typo in the configuration setting, it is best not to use Re-Run Job, but go back and start the loading process again.
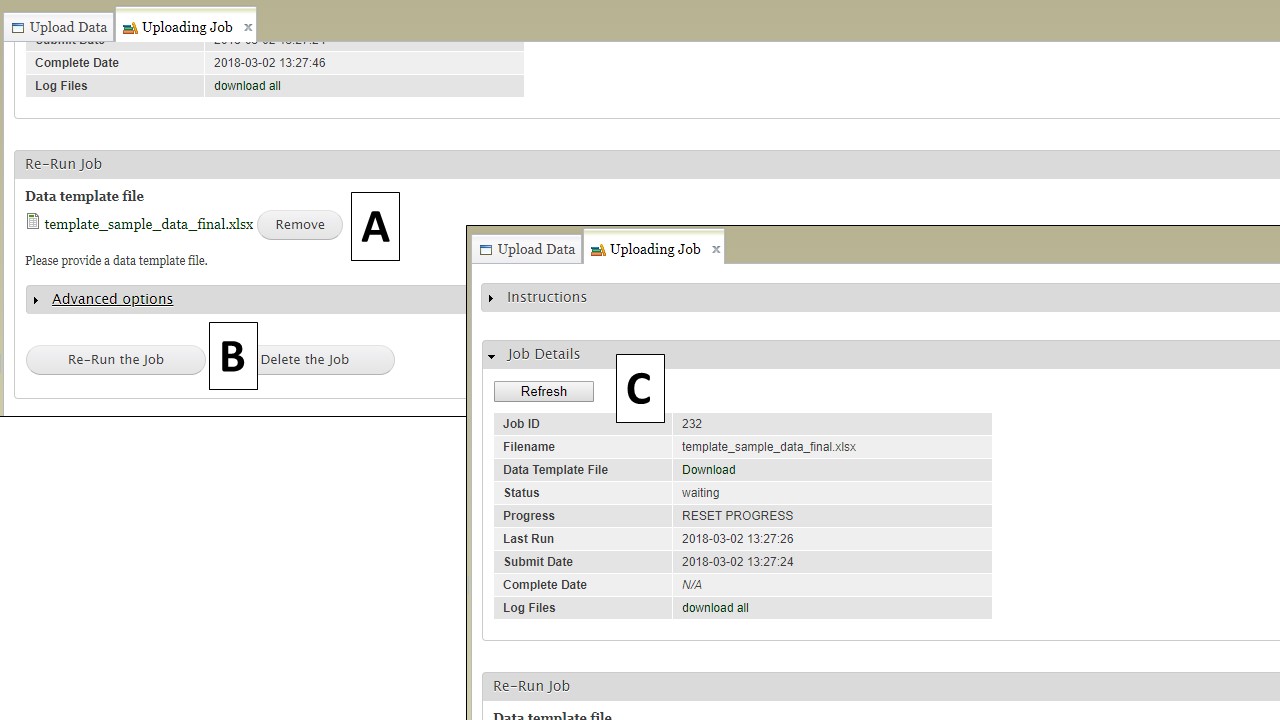
Figure 25. Re-running a job.
Deleting a job.
Simply deleting a job from 'uploaded files' section does NOT remove your data from your breeding program. You must delete the trial that contains the data. However, deleting a trial only removes samples (unique_ids) and associated phenotypic data. If you want to delete accessions and trait names, you must do so individually from Manage Breeding, or you may contact us.
Importing Public Data
Importing Public Data sookImporting Public Data
Users can upload publicly available phenotype or genotype data in the community database to their program. Figure below shows the tab where users can view and import public phenotype data for their crop. The tab lists trait descriptor groups and then phenotypic data for each descriptor group. The table at the bottom shows the status of imported phenotypic data. After the phenotype data are imported, users can view and search the data in each appropriate section of BIMS.
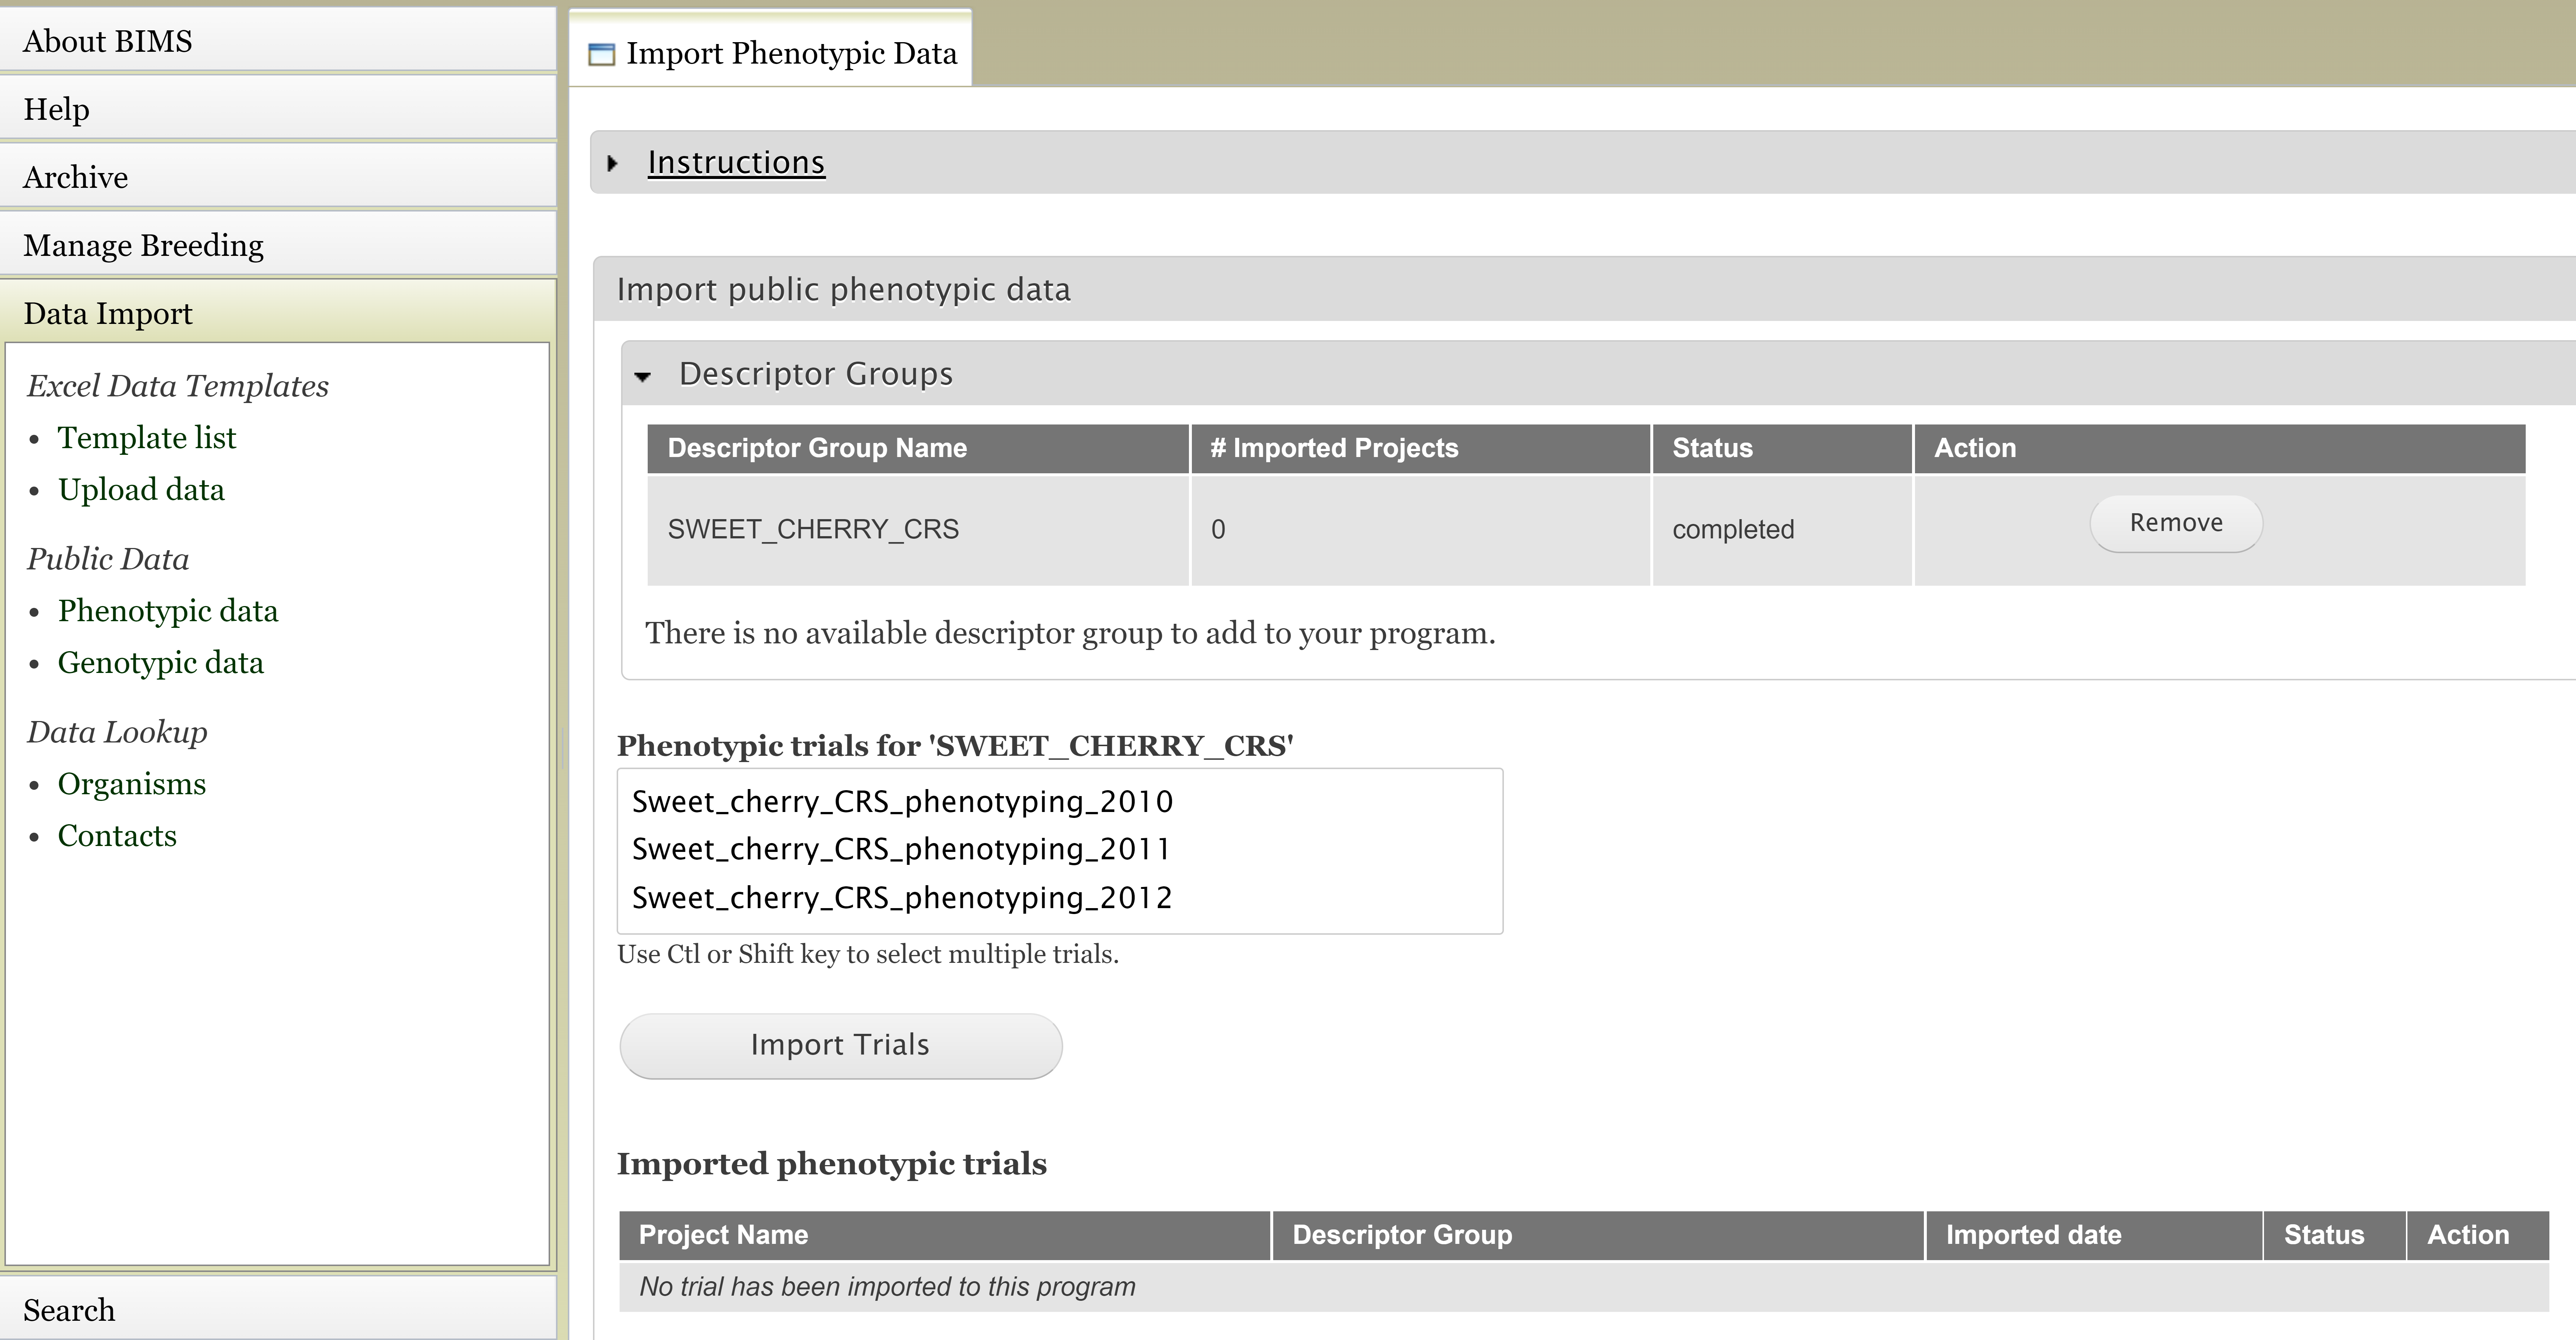
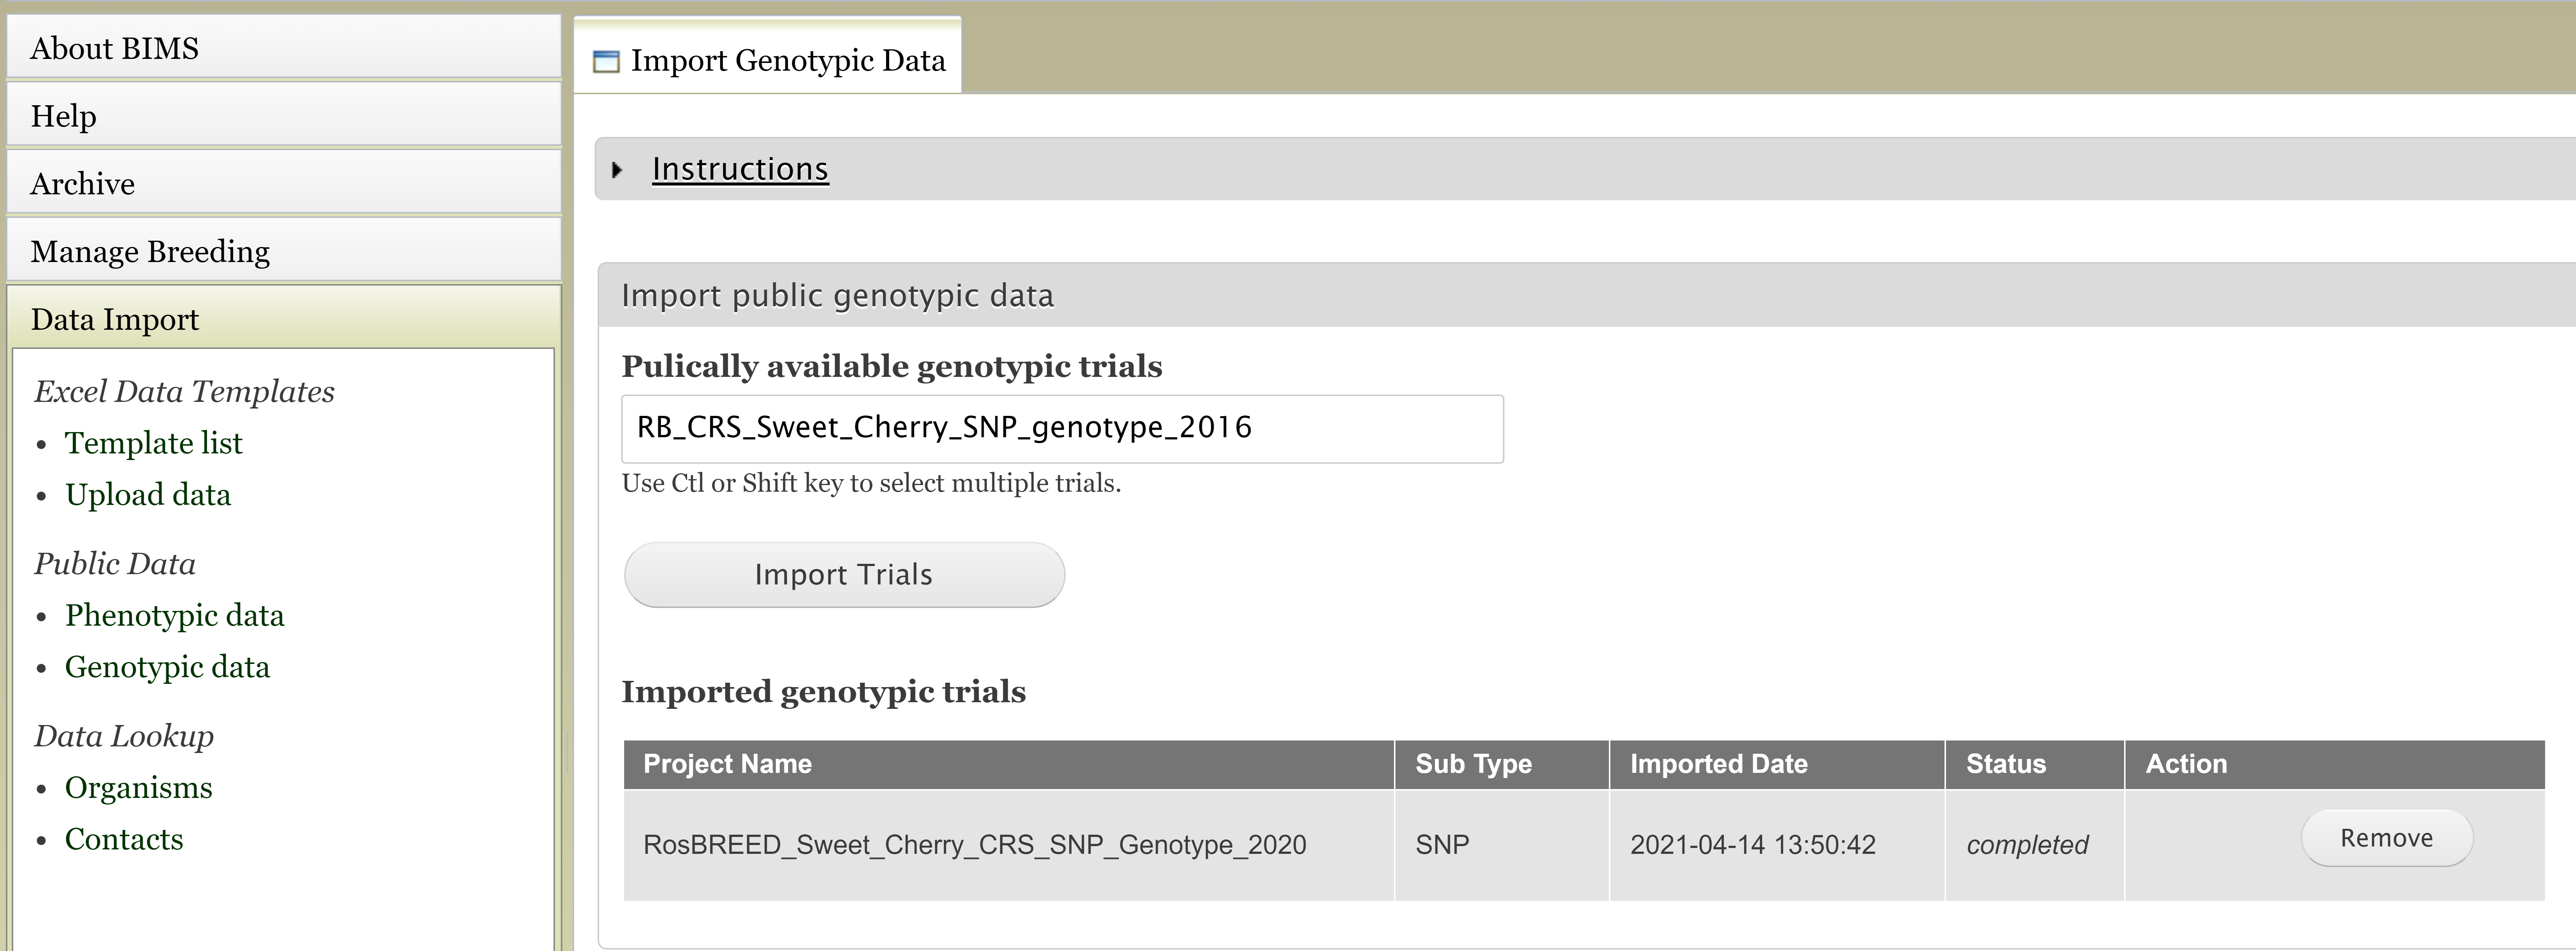
Figure below shows the tab where users can view and import public genotype data for their crop.
Field Book Management
Field Book Management sookField Book Management
For breeders using the Field Book App, BIMS can help generate the trait and field input files to configure Field Book for data entry and BIMS can also import data in the trait and field files from Field Book. For ongoing trials, BIMS can also help breeders sync data between different devices by loading the exported data from multiple devices into BIMS and generating an input file with combined information. When breeders first create their programs, they have chosen the names for the four required columns. These columns should match the column names in Field Book Input file, and breeders make sure they match and change if needed. The configuration settings can be accessed either by clicking on "Configuration" under the "Field Book Management" section on the left-hand accordion menu (Fig. 26A) or by clicking on the icon in the header (Fig. 26B). On the "Configuration" tab (Fig. 26C) there are two sections; "Field Book required columns" and "Field Book custom columns". The first section is to set names for Accession and the three required columns in Field Book Input file, the second section is for users to choose the optional columns that they want to add in the Field Book Input file. When they generate Field Book Input file, these optional columns will show up for breeders to choose for each Field Book Input file that they generate.
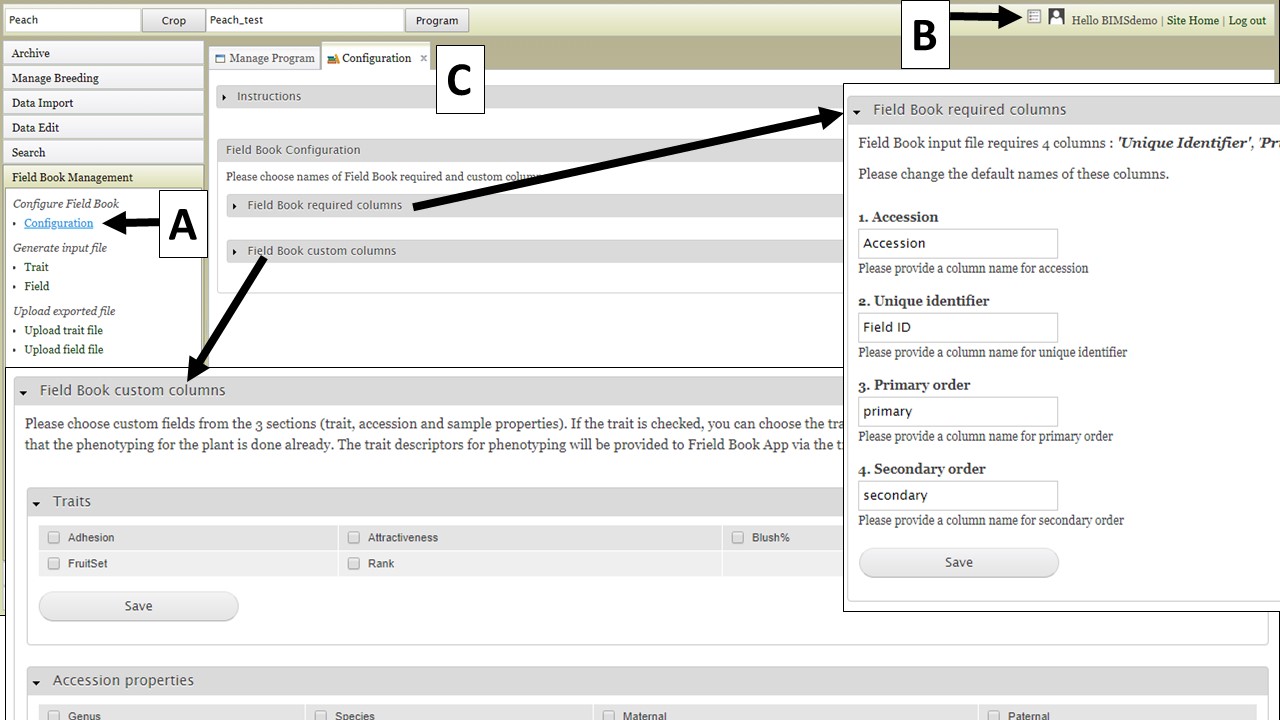
Figure 26. Field Book configuration options.
Two different files types for input into Field Book can be generated using BIMS. The first file type is the Trait (.trt) file when breeders want to add traits to Field Book using a file instead of creating one by one in Field Book App. This file contains the details on the phenotypic traits being recorded. To generate this file, click on "Trait" (Fig. 27A) and the "Trait" tab will open. On the "Trait" tab, there will be a list of traits that have already been loaded into the program on BIMS (Fig. 27B). Select the traits you want to export and then click the "Generate" button (Fig. 27C). A .trt file will then download.
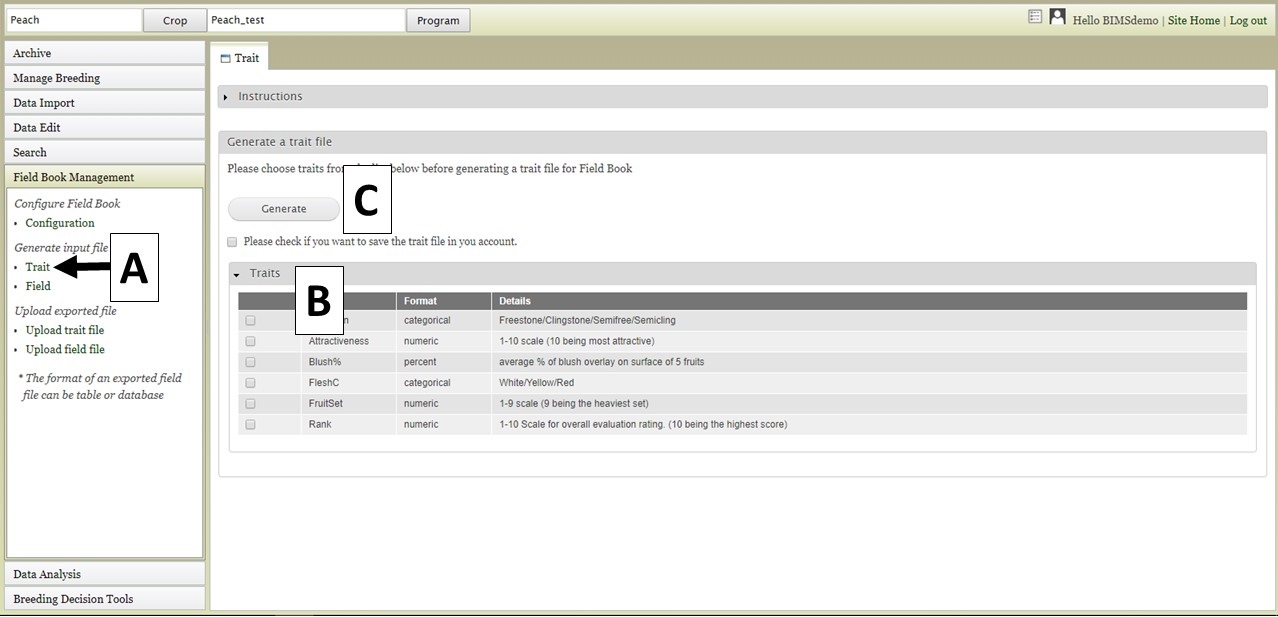
Figure 27. Generating Trait file for Field Book.
The Field file (.csv) can also be generated for import into Field Book. This file has the list of accessions and columns for the required columns (unique identifier, primary order, secondary order). The Field file is generated by clicking on "Field" (Fig. 28A) to open the "Field" tab. On the "Field" tab there are three options for generating the file (Fig. 28B). The first option is to generate a "New Trial". This can be used when breeders want to do another trail with accessions that are already in the database. If you have saved an accession list from a previous search (see Searching Data section), the option to use that list is available (Fig. 28C). You can also select other accession properties to add to the file. To generate the file, click the "Generate" button (Fig. 28D) and the file will download. In the generated file from this "New Trial" option, only the accession is provided and the three required colums (the unique identifier, primary order, and secondary order) will be empty since they depend on the planting design. The breeders should fill in those columns before importing into Field Book App.
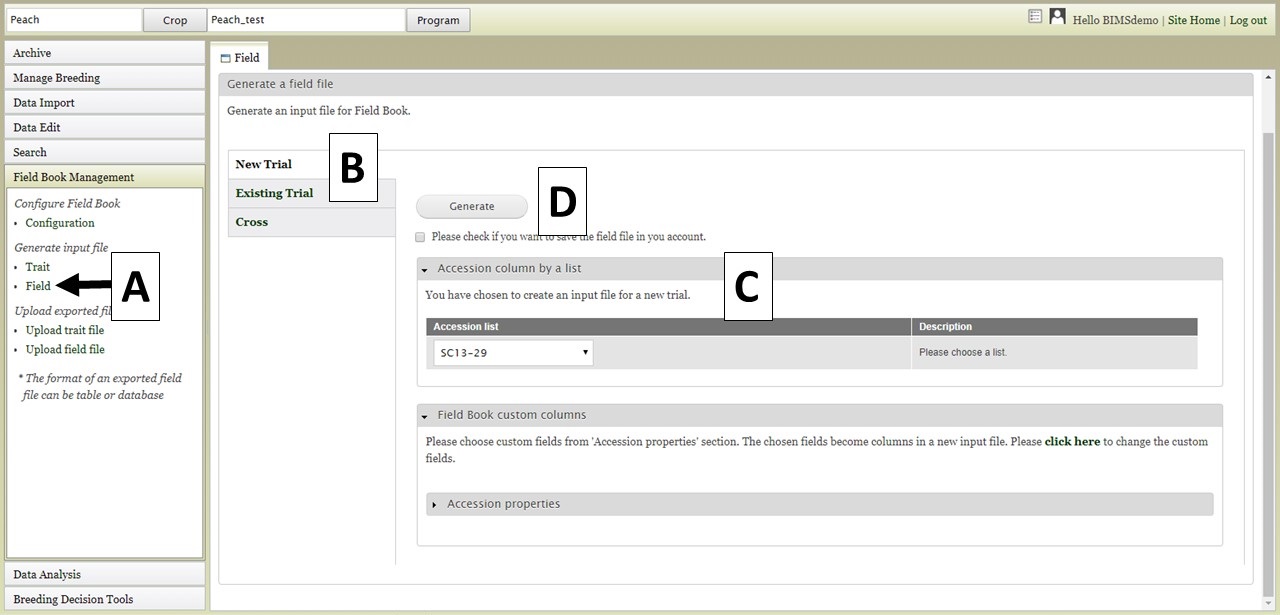
Figure 28. Generating a Field file for a New Trial.
Field files can also be generated from an Existing Trial. Files from Existing Trials (Fig. 29A) contain the accessions from the existing trial that is selected as well as the custom columns the user chooses. This functionality is to provide a way to sync data from multiple devices that have Field Book App to check which individual has been phenotyped already. Breeders can first upload the data from multiple devices, then re-generate an input file from the existing trial with a trait value.
Cross option (Fig. 30) allows you to generate input file for a new cross. When users upload a file (Fig. 30A) with an information on the cross and the planting (eg. cross name, primary order, and progeny in each primary order) and type in prefix for the unique id (Fig. 30B), then BIMS generates a Field Book input file with new progeny names and three required columns automatically filled in (Fig. 30C). In the uploaded file (Fig. 30A), the order of the columns is important, not the colum head.
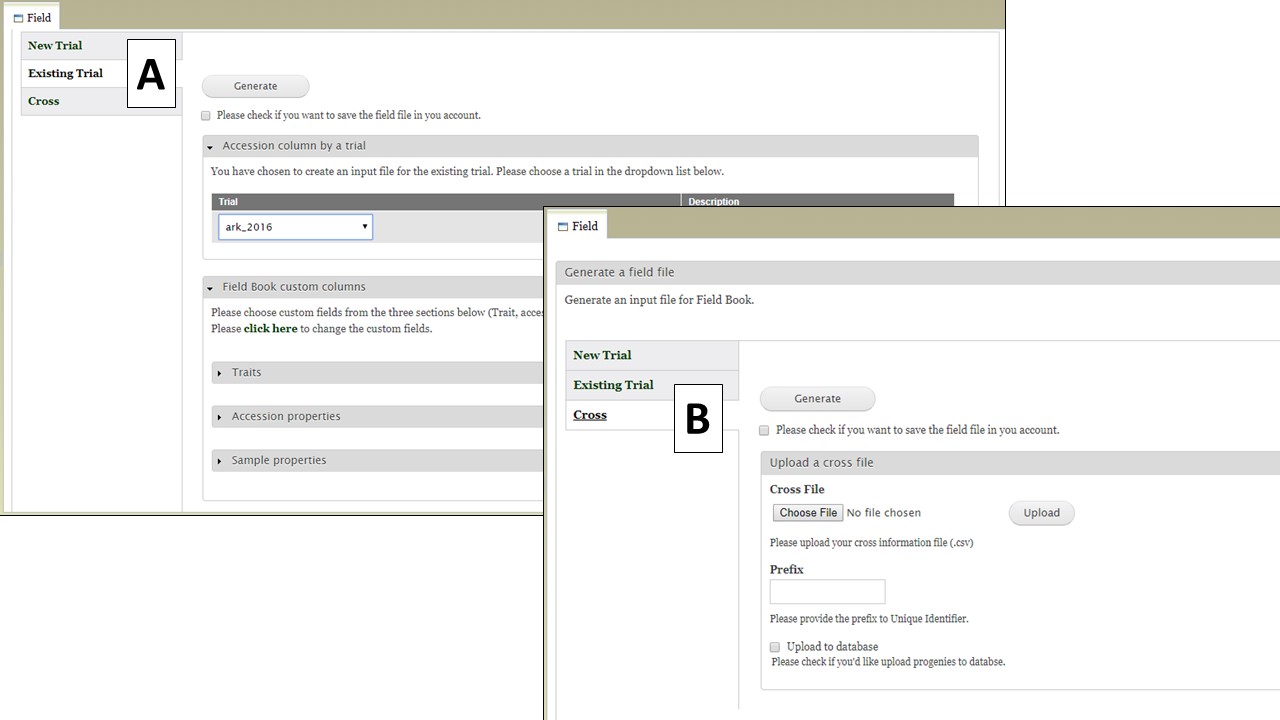
Figure 29. Generating a Field file from an Existing Trial or Cross.
.jpg)
Figure 30. Example input file and output file for Generating a Field file for a new Cross.
If you have already configured Field Book and would like to transfer the Trait information to BIMS, that can be done by importing the Trait files from Field Book. To import a Trait file, use the "Upload trait file" option (Fig. 31A). Select your file (Fig. 31B) and click "Upload." Once the file has uploaded, click "Submit" (Fig. 31C) to start the import job. The file then appears in the "Uploaded files" section (Fig. 31D).
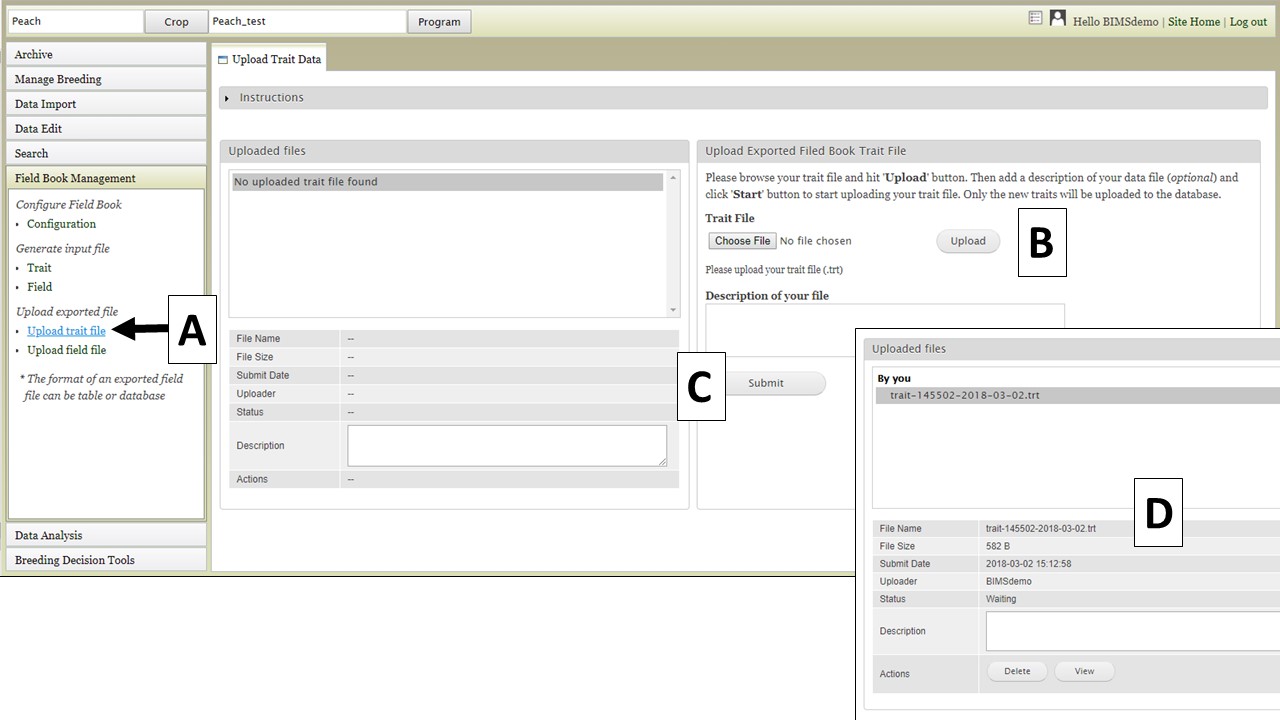
Figure 31. Importing Trait files from Field Book into BIMS.
Field files can be imported into BIMS from Field Book. However, you have to load phenotype_bims template first using Data Import section so that all the sample information (accession, unique_id, primary_order, secondary_order) are stored in BIMS. Once you have done that, you can load field file with phenotype data from Field Book app. Click on "Upload field file" (Fig. 32A) and then upload the field file and click "Inspect" (Fig. 31B). After BIMS checks to see if the required columns are present in the Field file, the "Upload an exported field file" section appears (Fig. 31C) and the location and trial can be selected. The file upload job is then initiated by clicking "Submit".
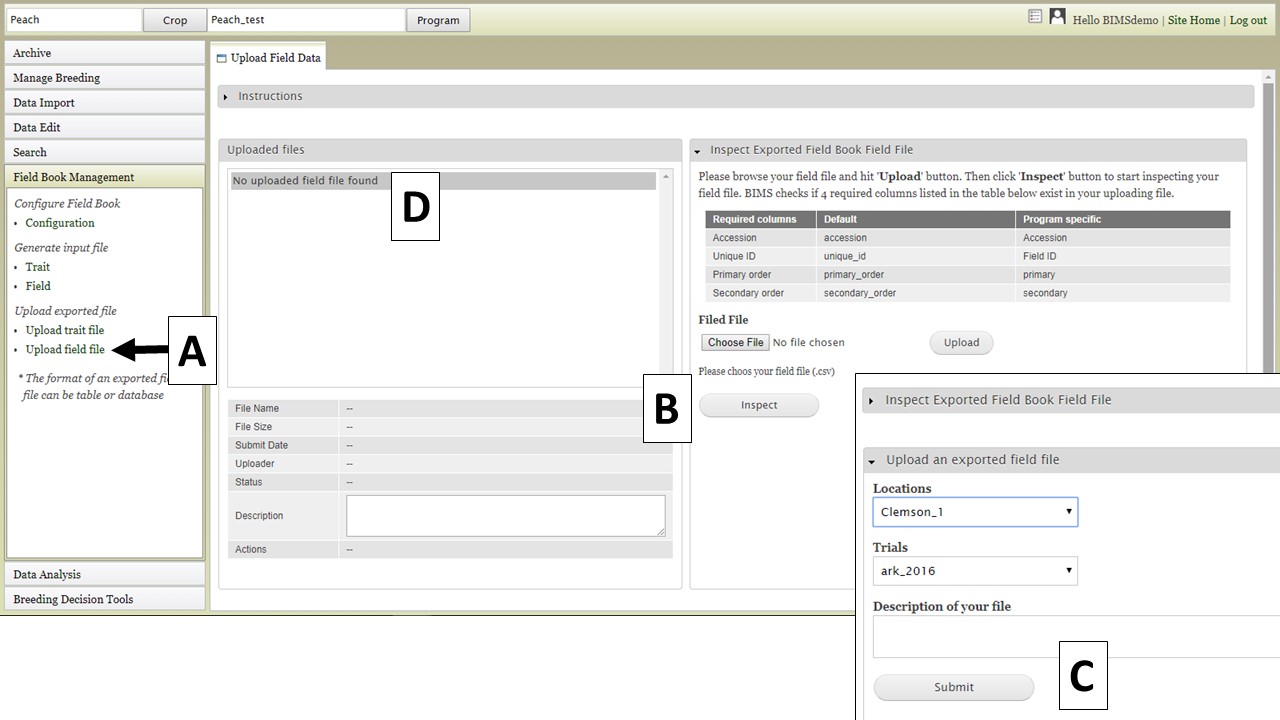
Figure 32. Importing Field files from Field Book into BIMS.
Importing Image Data
Importing Image Data sookImporting Image Data
BIMS can manage four different types of image data
- Sample: Images of a specific phenotypic sample (images that are associated with 'unique_id' or corresponding IDs in your program)
- Accession: Images of a specific accession
- Descripton: Images for a specific trait descriptor (images that describe the scale, color, phenotyping methods, etc)
- Marker: any images that are associated with specific molecular marker
Importing image data can be done in two steps in this order.
- Importing metadata
- Fill in the template (sample_image_bims, accession_image_bims, descriptor_image_bims, or marker_image_bims).
- Ensure that filename and timestamp are unique. You may add more information to each file name as desired to ensure uniqueness. E.g., 'Fruitphoto_Field20_2024_SC001.jpg' indicates the type of photo (fruit photo), field (Field20), year, and accession name.
- Save photofiles in a single directory in your computer to ensure each photo has a unique file name, and metadata in another directory. Ensure that the photofiles match the metadata.
- Load the template in Data Import-Excel Data Templates-Upload data
- Importing zipped image files
- Zip the image file that are listed in the template above and load it in Data Import-Photo files-Upload photo files
- Please make sure the correct photo type in the drop down
BIMS BrAPI
BIMS BrAPI ltaeinBIMS BrAPI
This section describes in detail how to communicate BIMS and Field Book though BrAPI specification.
Overviews
Overviews ltaeinOverviews
BIMS supports BrAPI specification for Field Book.
- Filed Book App version
BIMS supports Field Book v5.2.5.
- BrAPI version
BIMS currently supports BrAPI V1 only. It should support both V1 and V2 soon.
- Export traits
Traits in BIMS can be exported to Field Book. Field Book currently changes formats of some of the traits when imported through BrAPI as shown in the table below. These need to be changed to the correct format in Field Book.
| Format | BrAPI imported trait | BIMS Status |
|---|---|---|
| numeric | numeric | |
| categorical | categorical | |
| date | date | |
| percent | numeric | |
| boolean | text | |
| text | text | |
| photo | text | |
| audio | text | |
| counter | numeric | |
| disease rating | not supported | |
| multicat | categorical | |
| location | text | |
| zebra lable print | not supported | |
| GNSS (Global Navigation Satellite System) | not supported |
* The formats of some of BrAPI imported traits need to be changed to the right format before collectiong data.
- Export field
A trial in BIMS can be exported to Field Book as a field.
- Import observation data
The observation data collected in Field Book can be imported to BIMS
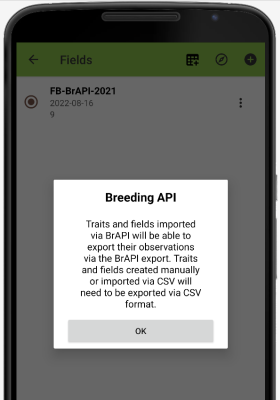
* All the observation data collected in Field Book MAY NOT BE exported. Only the traits and fields imported via BrAPI will be able to export their observations via the BrAPI export. Traits and fields created maually or imported via CSV will need to be exported via CSV format.
Field Book App
Field Book App ltaein
Fields
Fields ltaeinFields
Import Field
You can import a field to Field Book via local storage, clouds storage or BrAPI.
Import a field via BrAPI
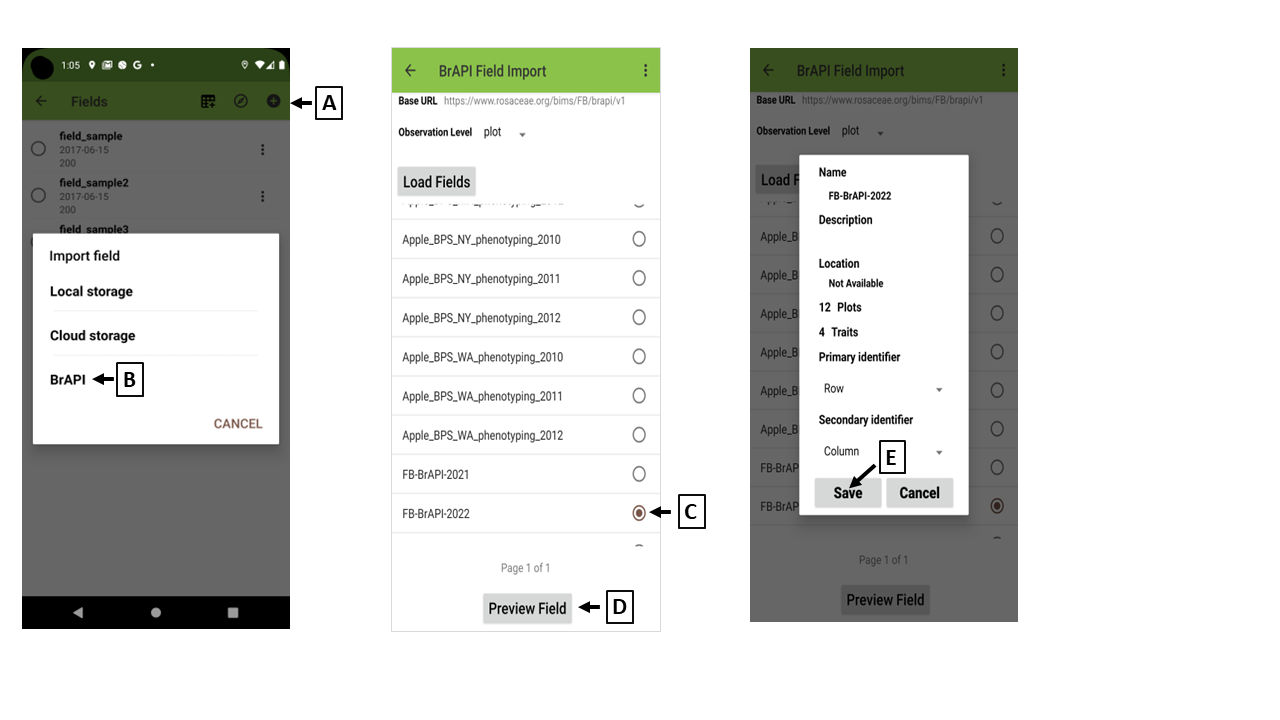
(A) Import fields
(B) Import a field via BrAPI
(C) Choose a trial from the list
(D) Preview the chosen trial
The trial "FB-BrAPI-2022" has 12 plots (samples) and 4 traits.
(E) Load the chosen trial
Loads the chosen trial "FB-BrAPI-2022" to Field Book
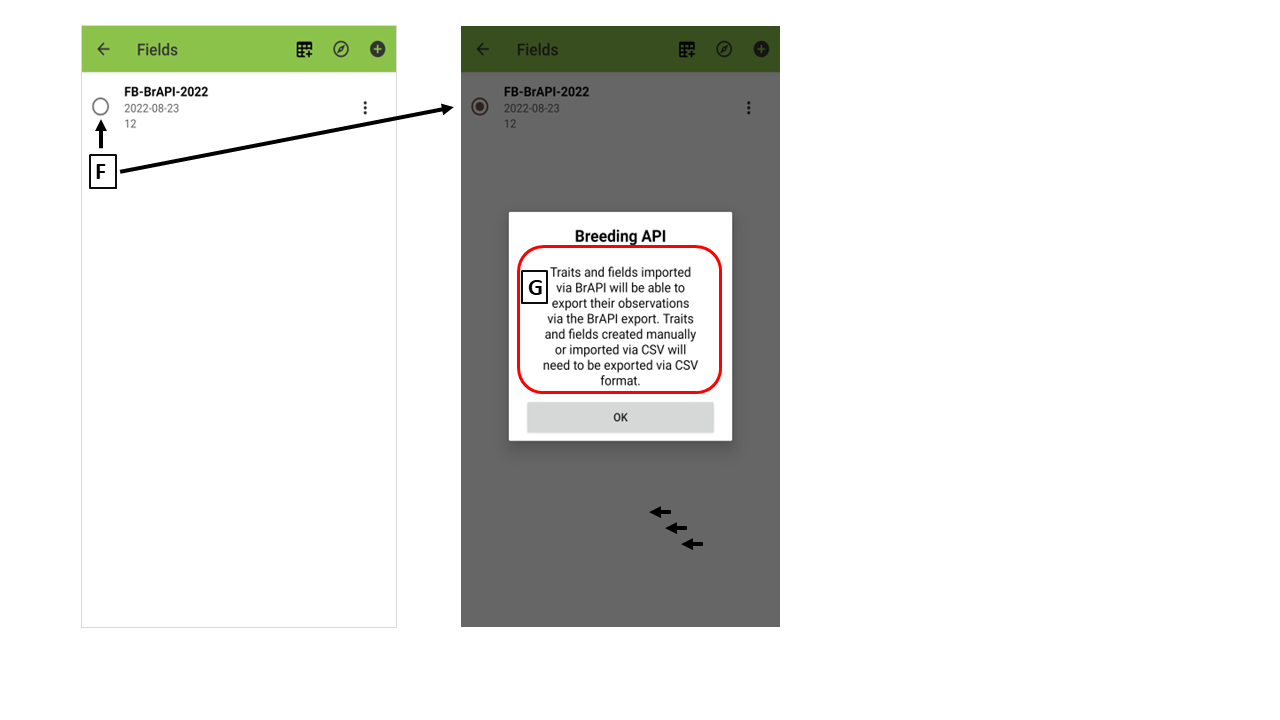
(F) Choose a field for data collection
(G) Reset the order of samples
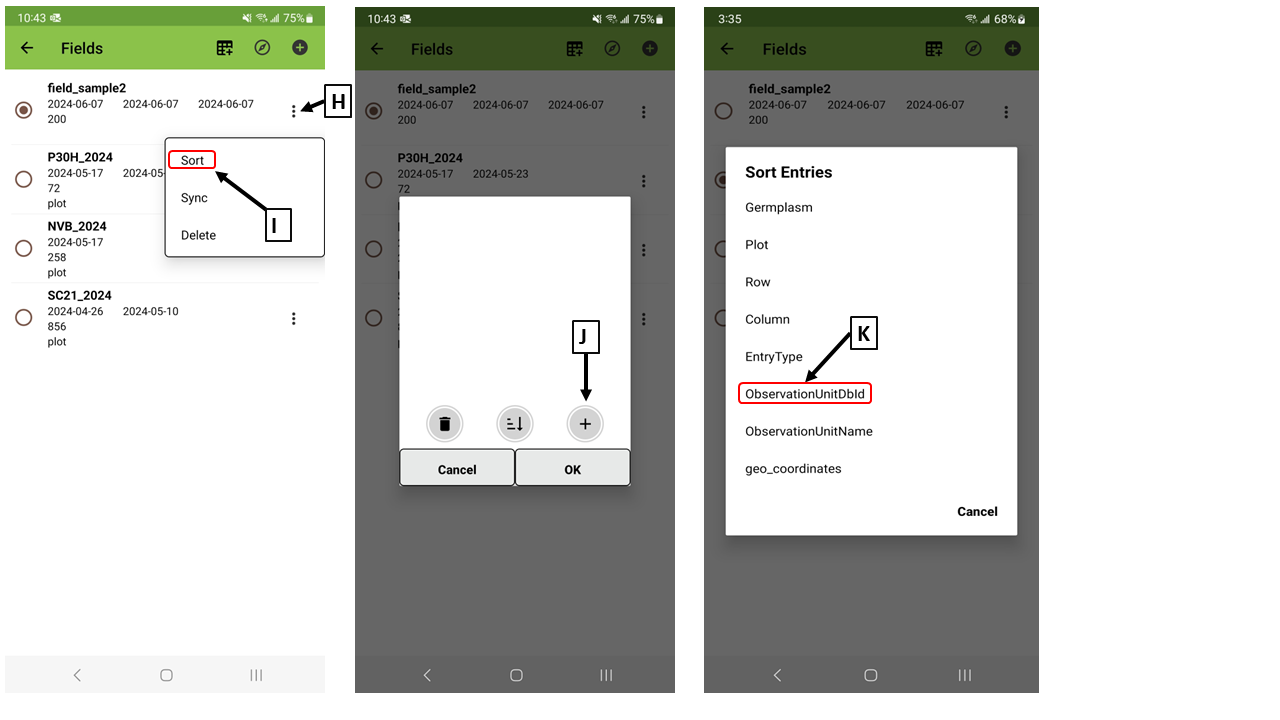
After the field data is imported to Field Book app via BrAPI, the order of samples in the field file can be changed. So please reset the order of samples using "ObservationUnitDbld".
(H) Warning message
Traits
Traits ltaeinTraits
Import Trait
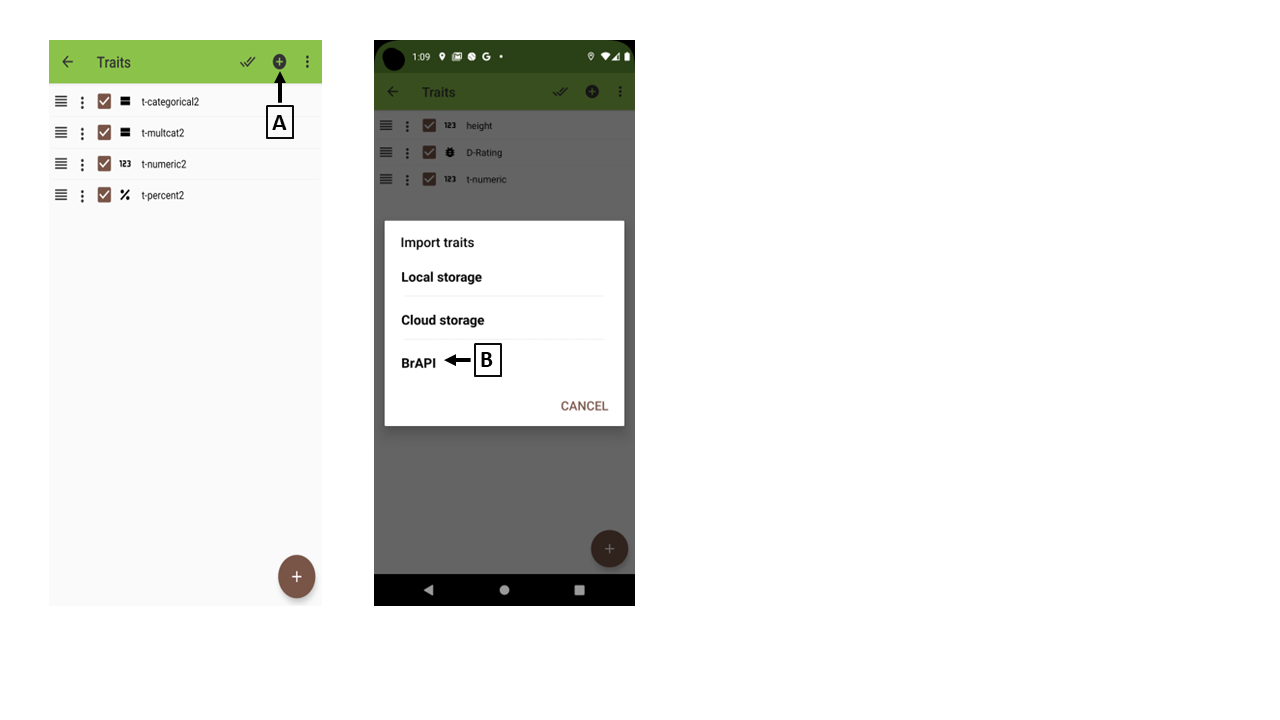
You can import traits to Filed Book via local storage, cloulds storage or BrAPI.
Import traits in BIMS
BIMS
The traits in BIMS can be imported via BrAPI to Field Book. However, Field Book currently allows a user to import one group of traits
and does have an option to select such a group. You need to choose a group in BIMS.
(I) Choose a group in BIMS
In BIMS, the traits are grouped by program. So you need to choose a program to decide which traits to be imported to Field Book.
"Field Book Export Trait" page in BIMS
<image>
(II) Choose the traits within the chosen group
Once a program is chosen, all the traits of the chosen program will be exported. If you don't want to export all traits of the chosen program, you can filter out some traits.
"Export Trait" page in BIMS
<image>
FIELD BOOK
(A) Import traits
(B) Import tratis via BrAPI
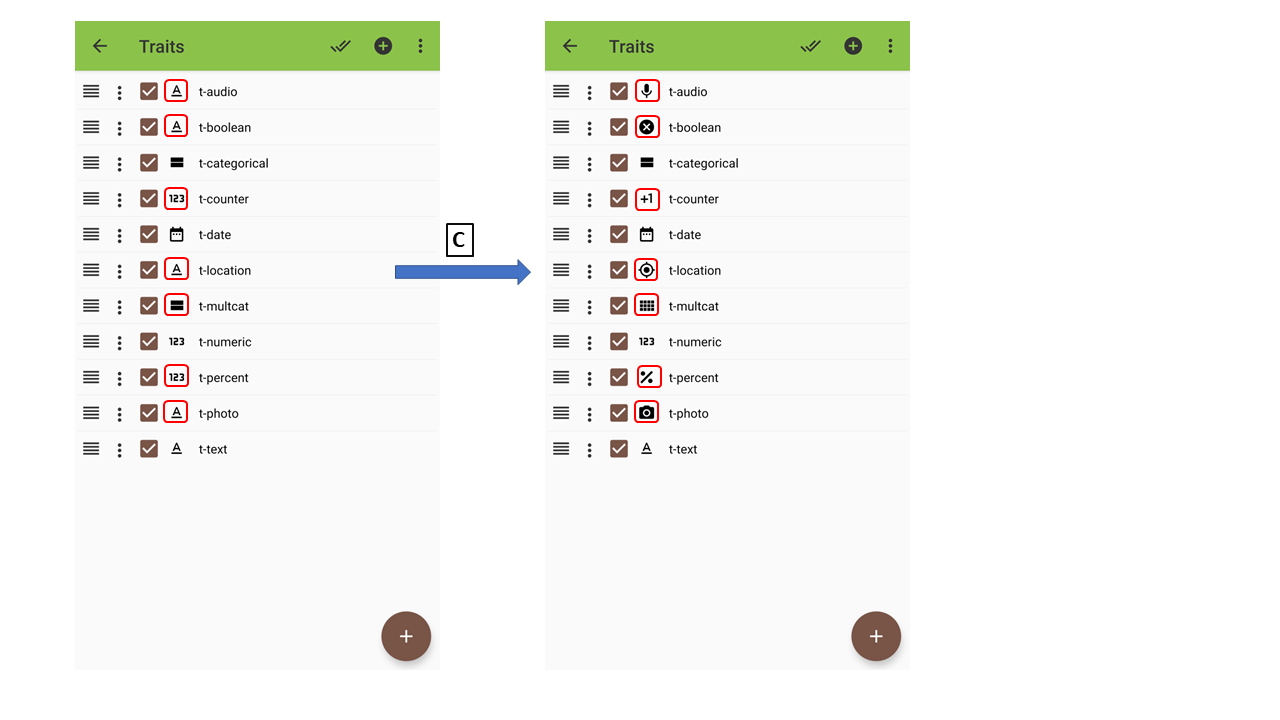
(C) Fix formats
The formats of some of the traits need to be fixed.
Collect
Collect ltaeinCollect
Collect data for chosen field and traits.
Export
Export ltaeinExport
Export data
The collected data can be exported to local storage, clouds storage or BrAPI.
Export data to BIMS via BrAPI
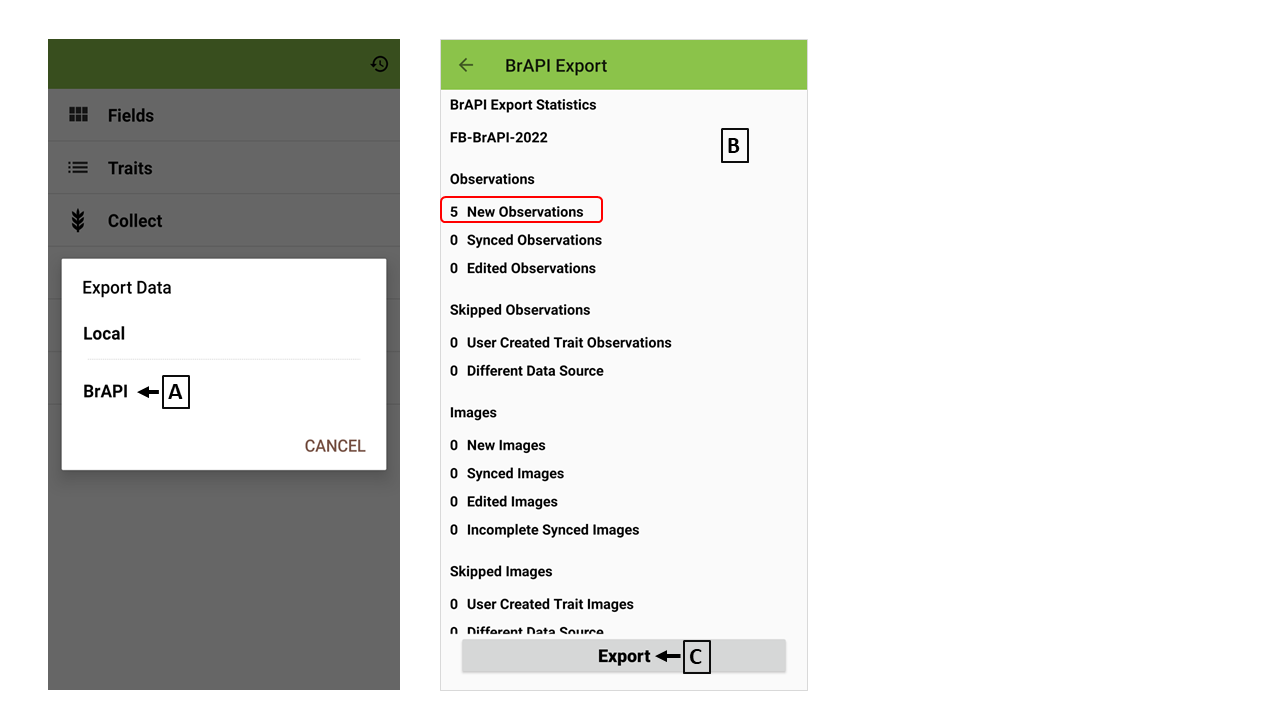
(A) Export data via BrAPI
(B) Summary for exporting data
(C) Export collected data
Only newly collected data will be exported
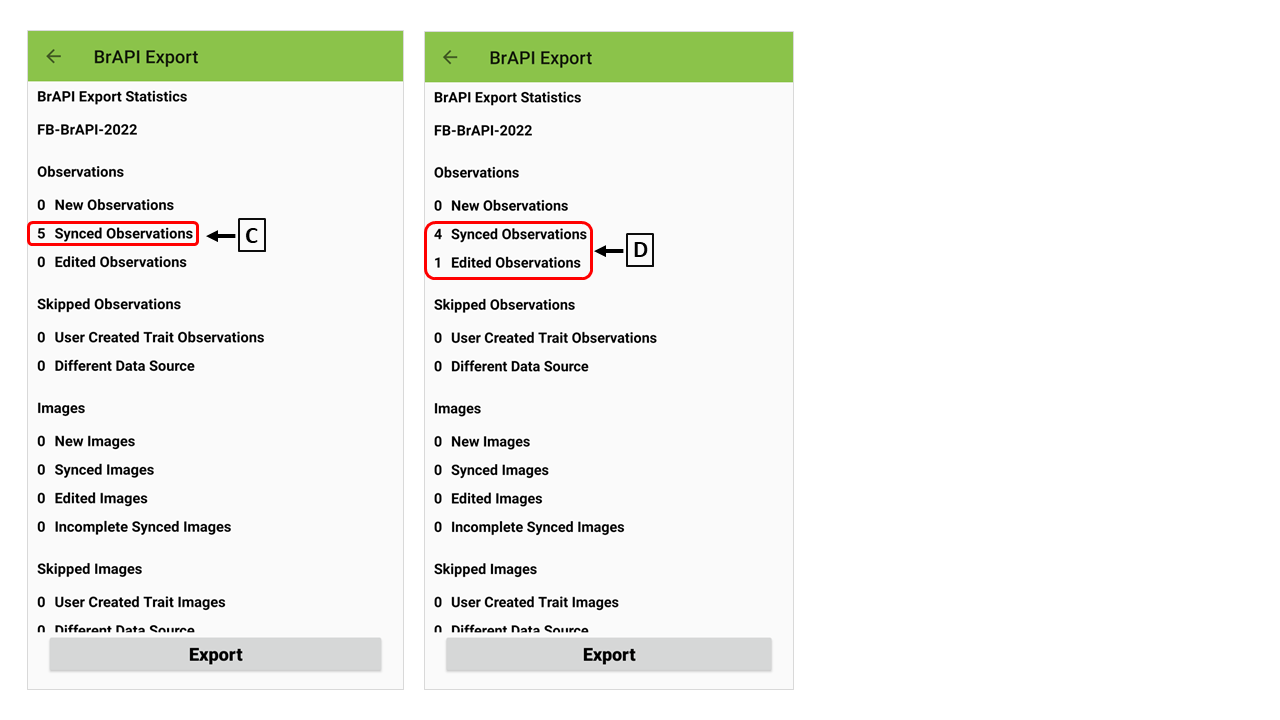
(D) Synced data
After the newly collected data are exported, the data are marked as "Synced". The synced data will not be exported agian.
(E) Edited data
Once the value of the exported data (synced data) is changed, it is marked as "Edited". The edited data will not be exported again.
Settings
Settings ltaeinField Book Settings
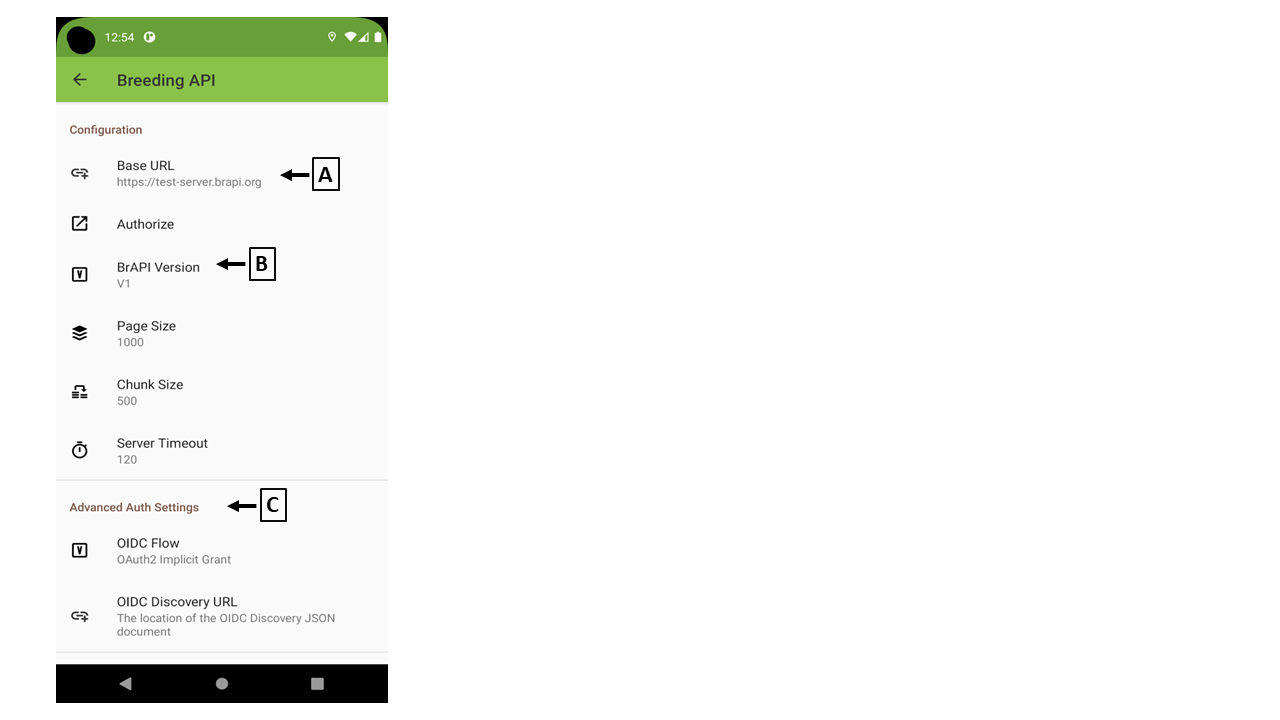
(A) Base URL
You need to set "Base URL" to communicate between Field Book and BIMS.
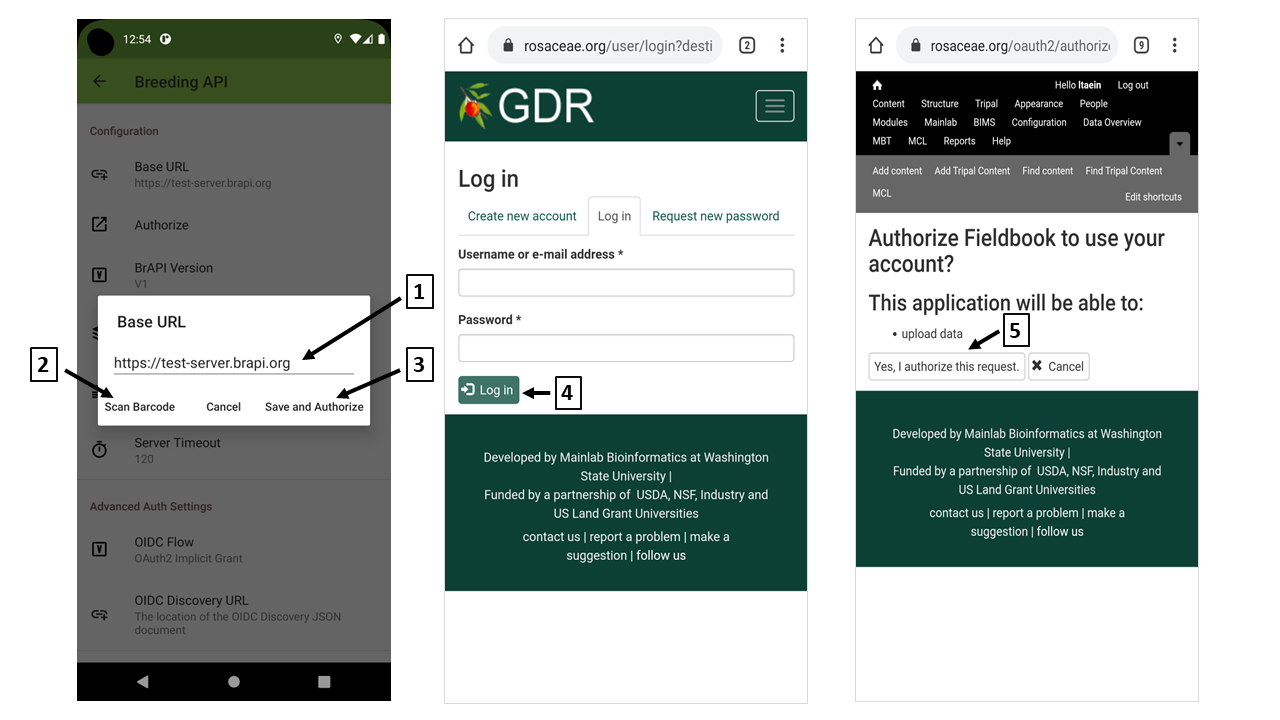
(1) Type "Base URL"
Type the base URL.
(2) Scan Barcode
You can find QR code and barcode of the base URL in BIMS. Please visit BIMS and find BrAPI instruction under "Field Book Management" section.
(3) Save and authorize
When the base URL is filled inand "Save and Authorize" is clicked, you will be redircted to the BIMS site page and asked to login the site.
(4) Login the site
Type your username and password and hit "Log in" button.
(5) Authorize
When you login successfully, you'll be asked your authrization to communicate with Field Book.
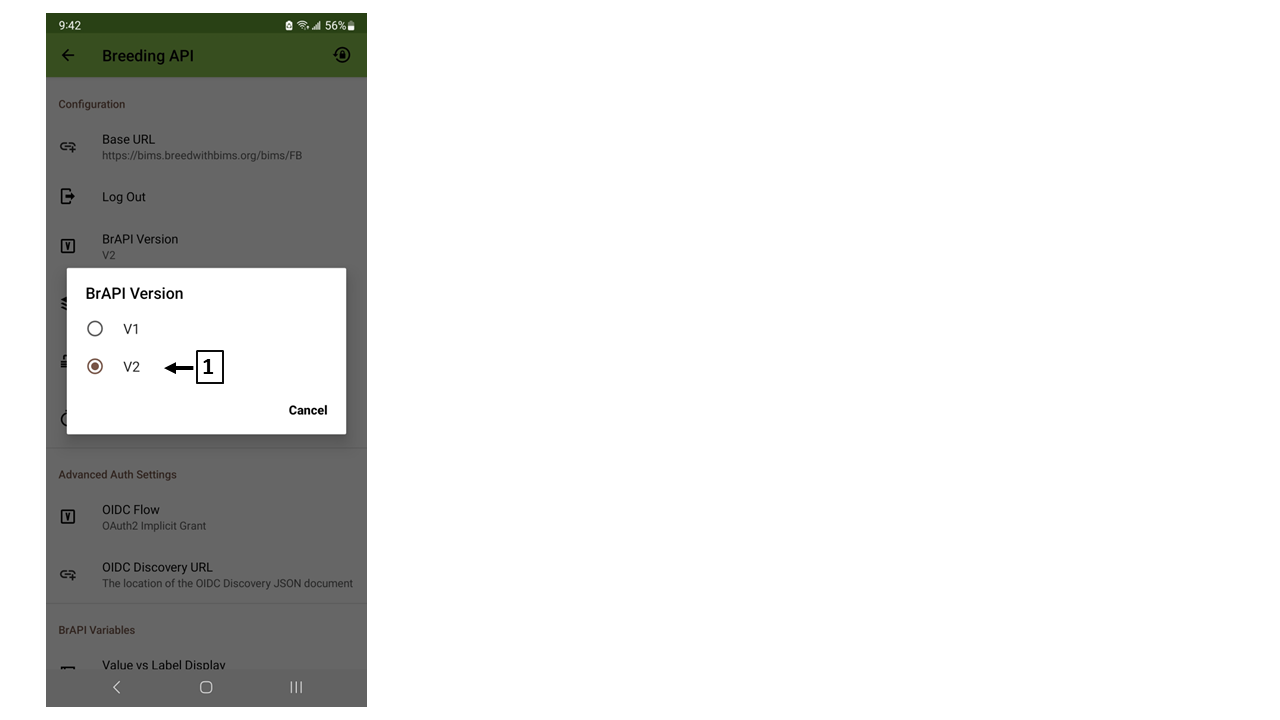
(B) BrAPI version
BIMS supports BrAPI V2. Please make sure "V2" is chosen.
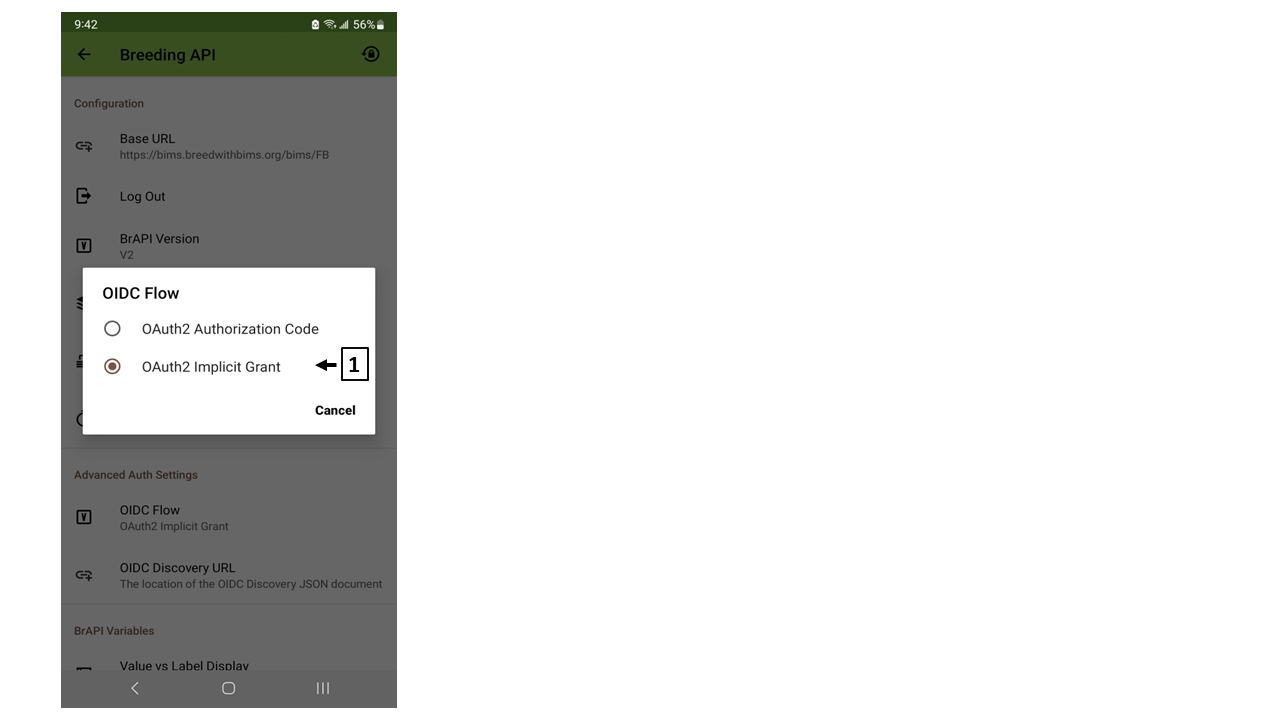
(C) OIDC Flow
BIMS supports "OAuth2 Implicit Grant". Please make sure "OAuth2 implicit Grant" is chosen.
(D) OIDC Discovery

(1) Type "OIDC Discovery URL"
<site_URL>/.well-known/openid-configuration
(e.g.)
https://bims.breedwithbims.org/.well-known/openid-configuration
(2) Scan Barcode / QR code
You can find QR code and barcode of the OIDC Discovery URL in BIMS. Please visit BIMS and find BrAPI instruction under "Field Book Management" section.
About
About ltaeinAbout
Field Book version
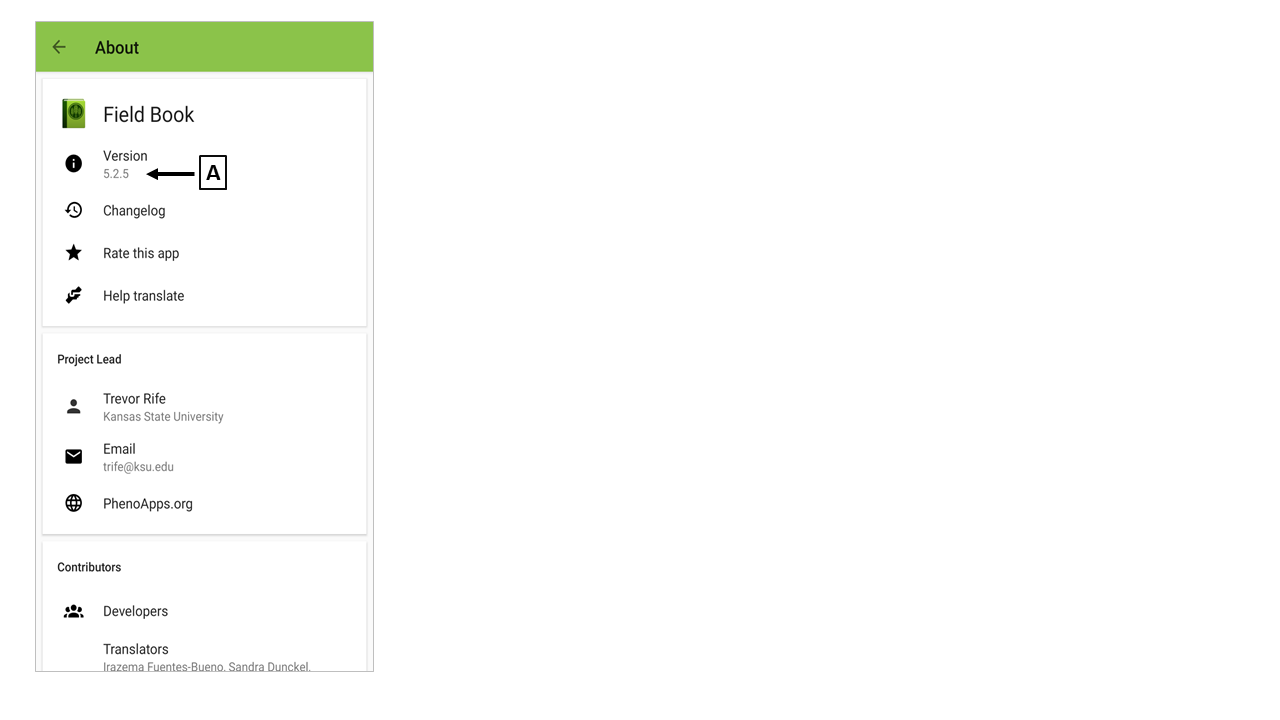
(A) Field Book version
Use Case
Use Case ltaeinUse Cases
Export a trial in BIMS
Export a trial in BIMS ltaeinExport a trial in BIMS
Export traits in BIMS
Export traits in BIMS ltaeinExport traits in BIMS
BIMS
1. Choose a program
Once a program is chosen, all the traits of the chosen program will be exported to Field Book.
<image>
2. Choose traits
If you don't want to export all the traits of the chosen program, you can filter out some of the traits in this page.
<image>
Field Book
3. Import Traits BrAPI
<image>
Import the collected data to BIMS
Import the collected data to BIMS ltaeinImport the collected data to BIMS
Archiving Data
Archiving Data sookArchiving Data
Creating an archive file of all the data in a breeding program is easily done using the "Archive" function in BIMS. Open the "Archive" section in the left-hand accordion menu, and then click "Manage Archive" (Fig. 32A). On the "Manage Archive" tab, there is an "Archive Data" button (Fig. 32B). When this button is clicked, an Excel file is generated that contains all the data in the current breeding program (Fig. 32C).
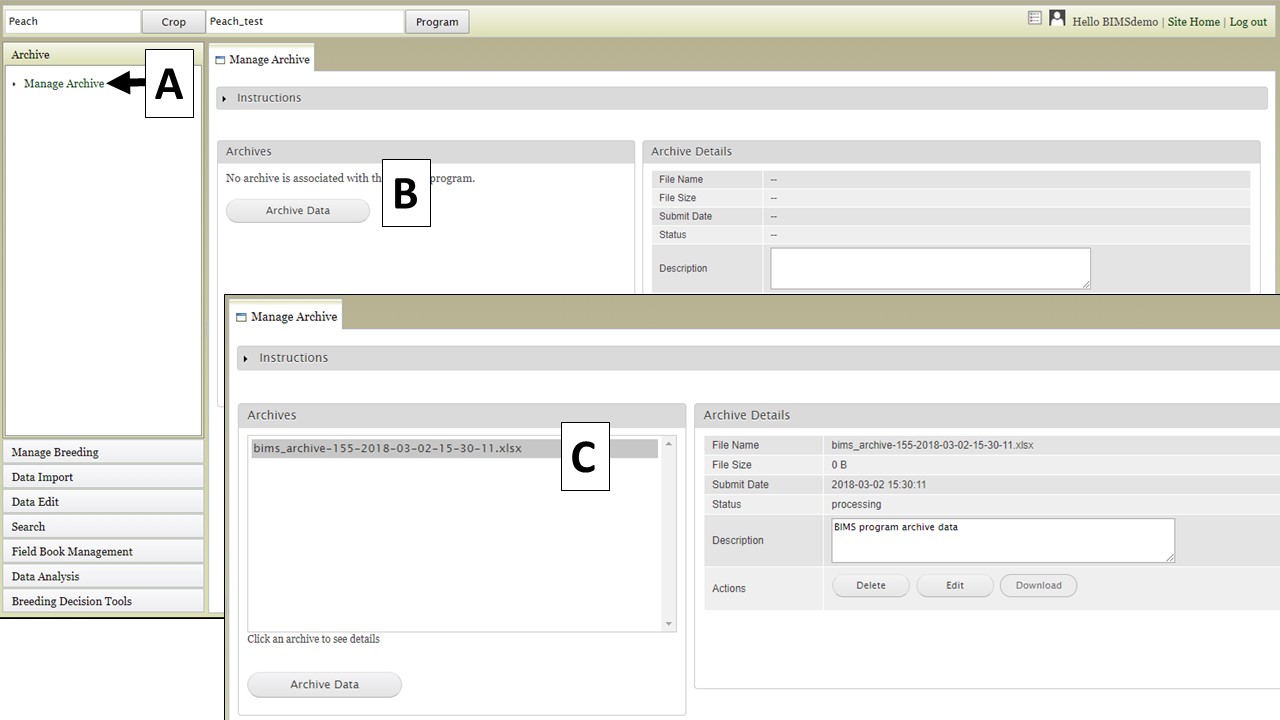
Figure 32. Generating an archive file.